> ## Documentation Index
> Fetch the complete documentation index at: https://docs.langdock.com/llms.txt
> Use this file to discover all available pages before exploring further.
# Core Concepts
> Understand the fundamental building blocks of workflows including nodes, triggers, connections, and execution.
## Introduction
Welcome to Workflows fundamentals. This guide covers everything you need to understand how workflows work - from individual nodes to execution patterns, versioning, and testing strategies.
**First time here?** This is your roadmap. Read through to understand the core
concepts, then check out the [Getting Started
guide](/en/using-langdock/workflows/getting-started) to build your first workflow.
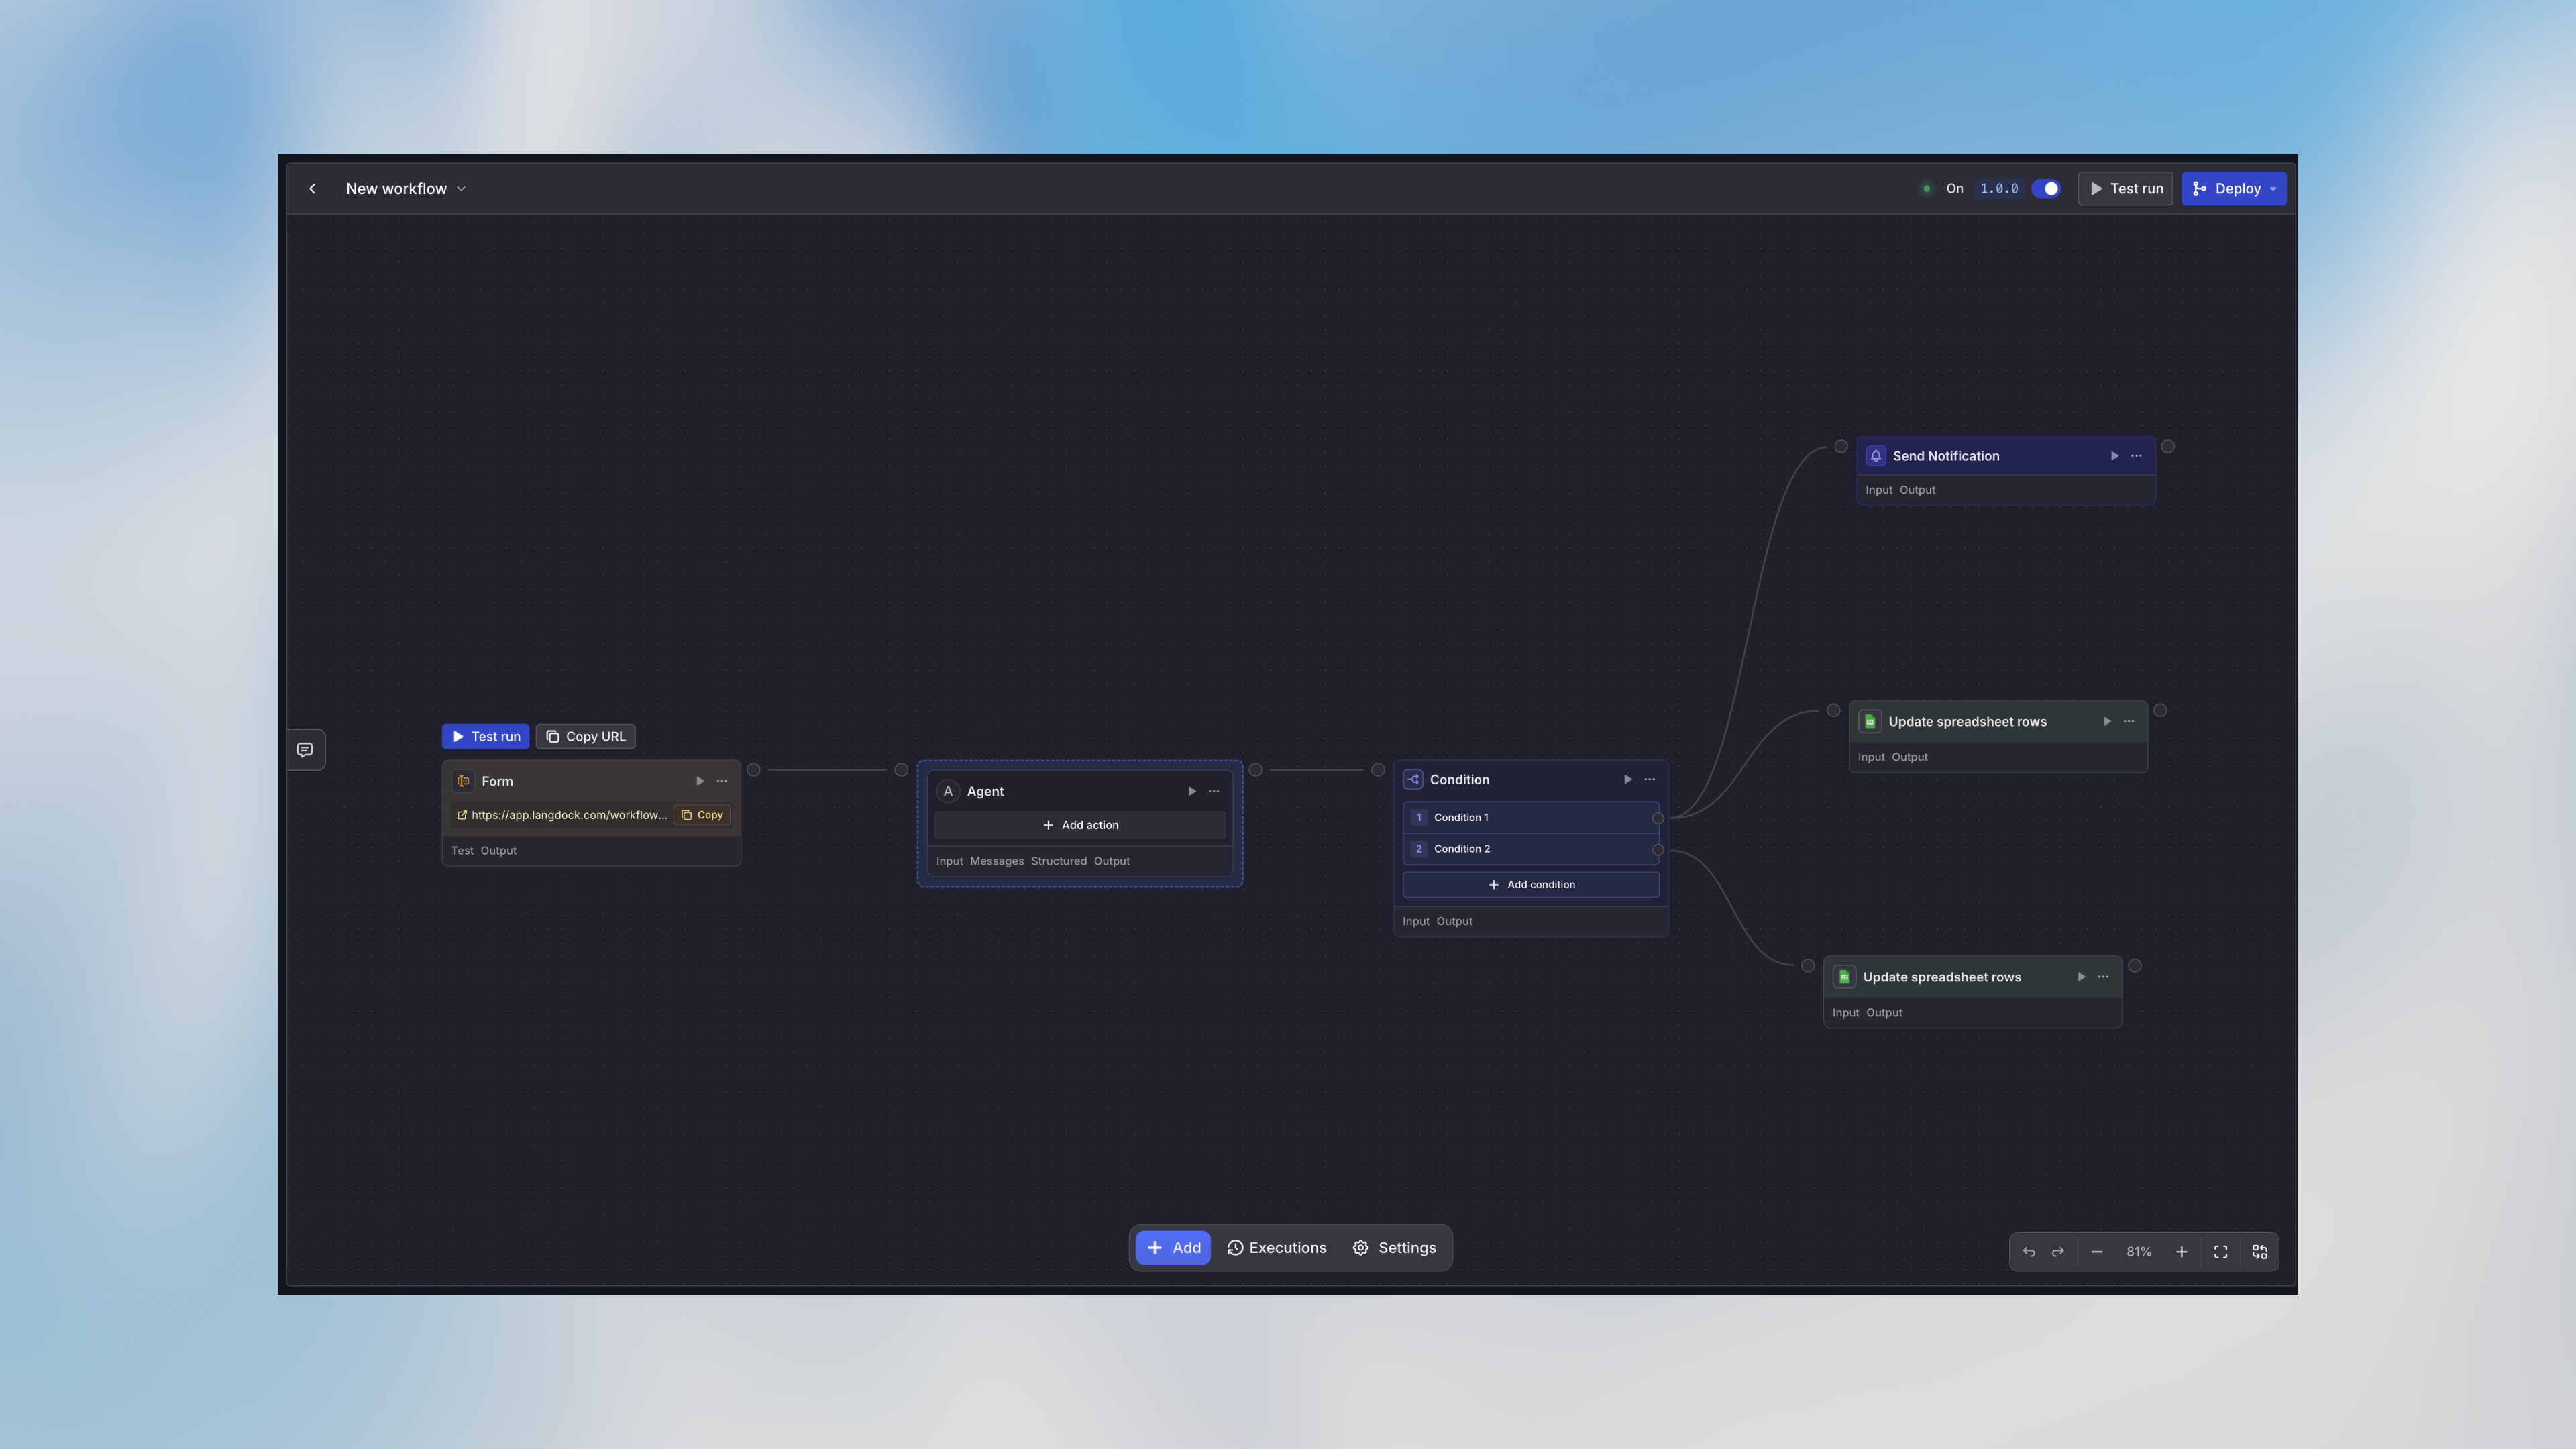
## What is a Node?
A **node** is the fundamental building block of a workflow. Think of it like a step in a recipe - each node does one thing, and you chain them together to create your complete automation.
Nodes can do all sorts of things:
* Execute AI agents to analyze or generate content
* Make HTTP requests to external APIs
* Transform data with custom code
* Route execution based on conditions
* Send notifications to team members
You connect nodes together to create a complete workflow that automates your process from start to finish.
**Visual Programming**: Workflows use a visual canvas where you drag, drop,
and connect nodes. No coding required (unless you want to use a Code node)!
 ## Understanding Node Structure
Every node has a few common elements that make them easy to work with:
### The Node Header
Shows you the node type and name. Click the play button here to test the node individually - super helpful for debugging!
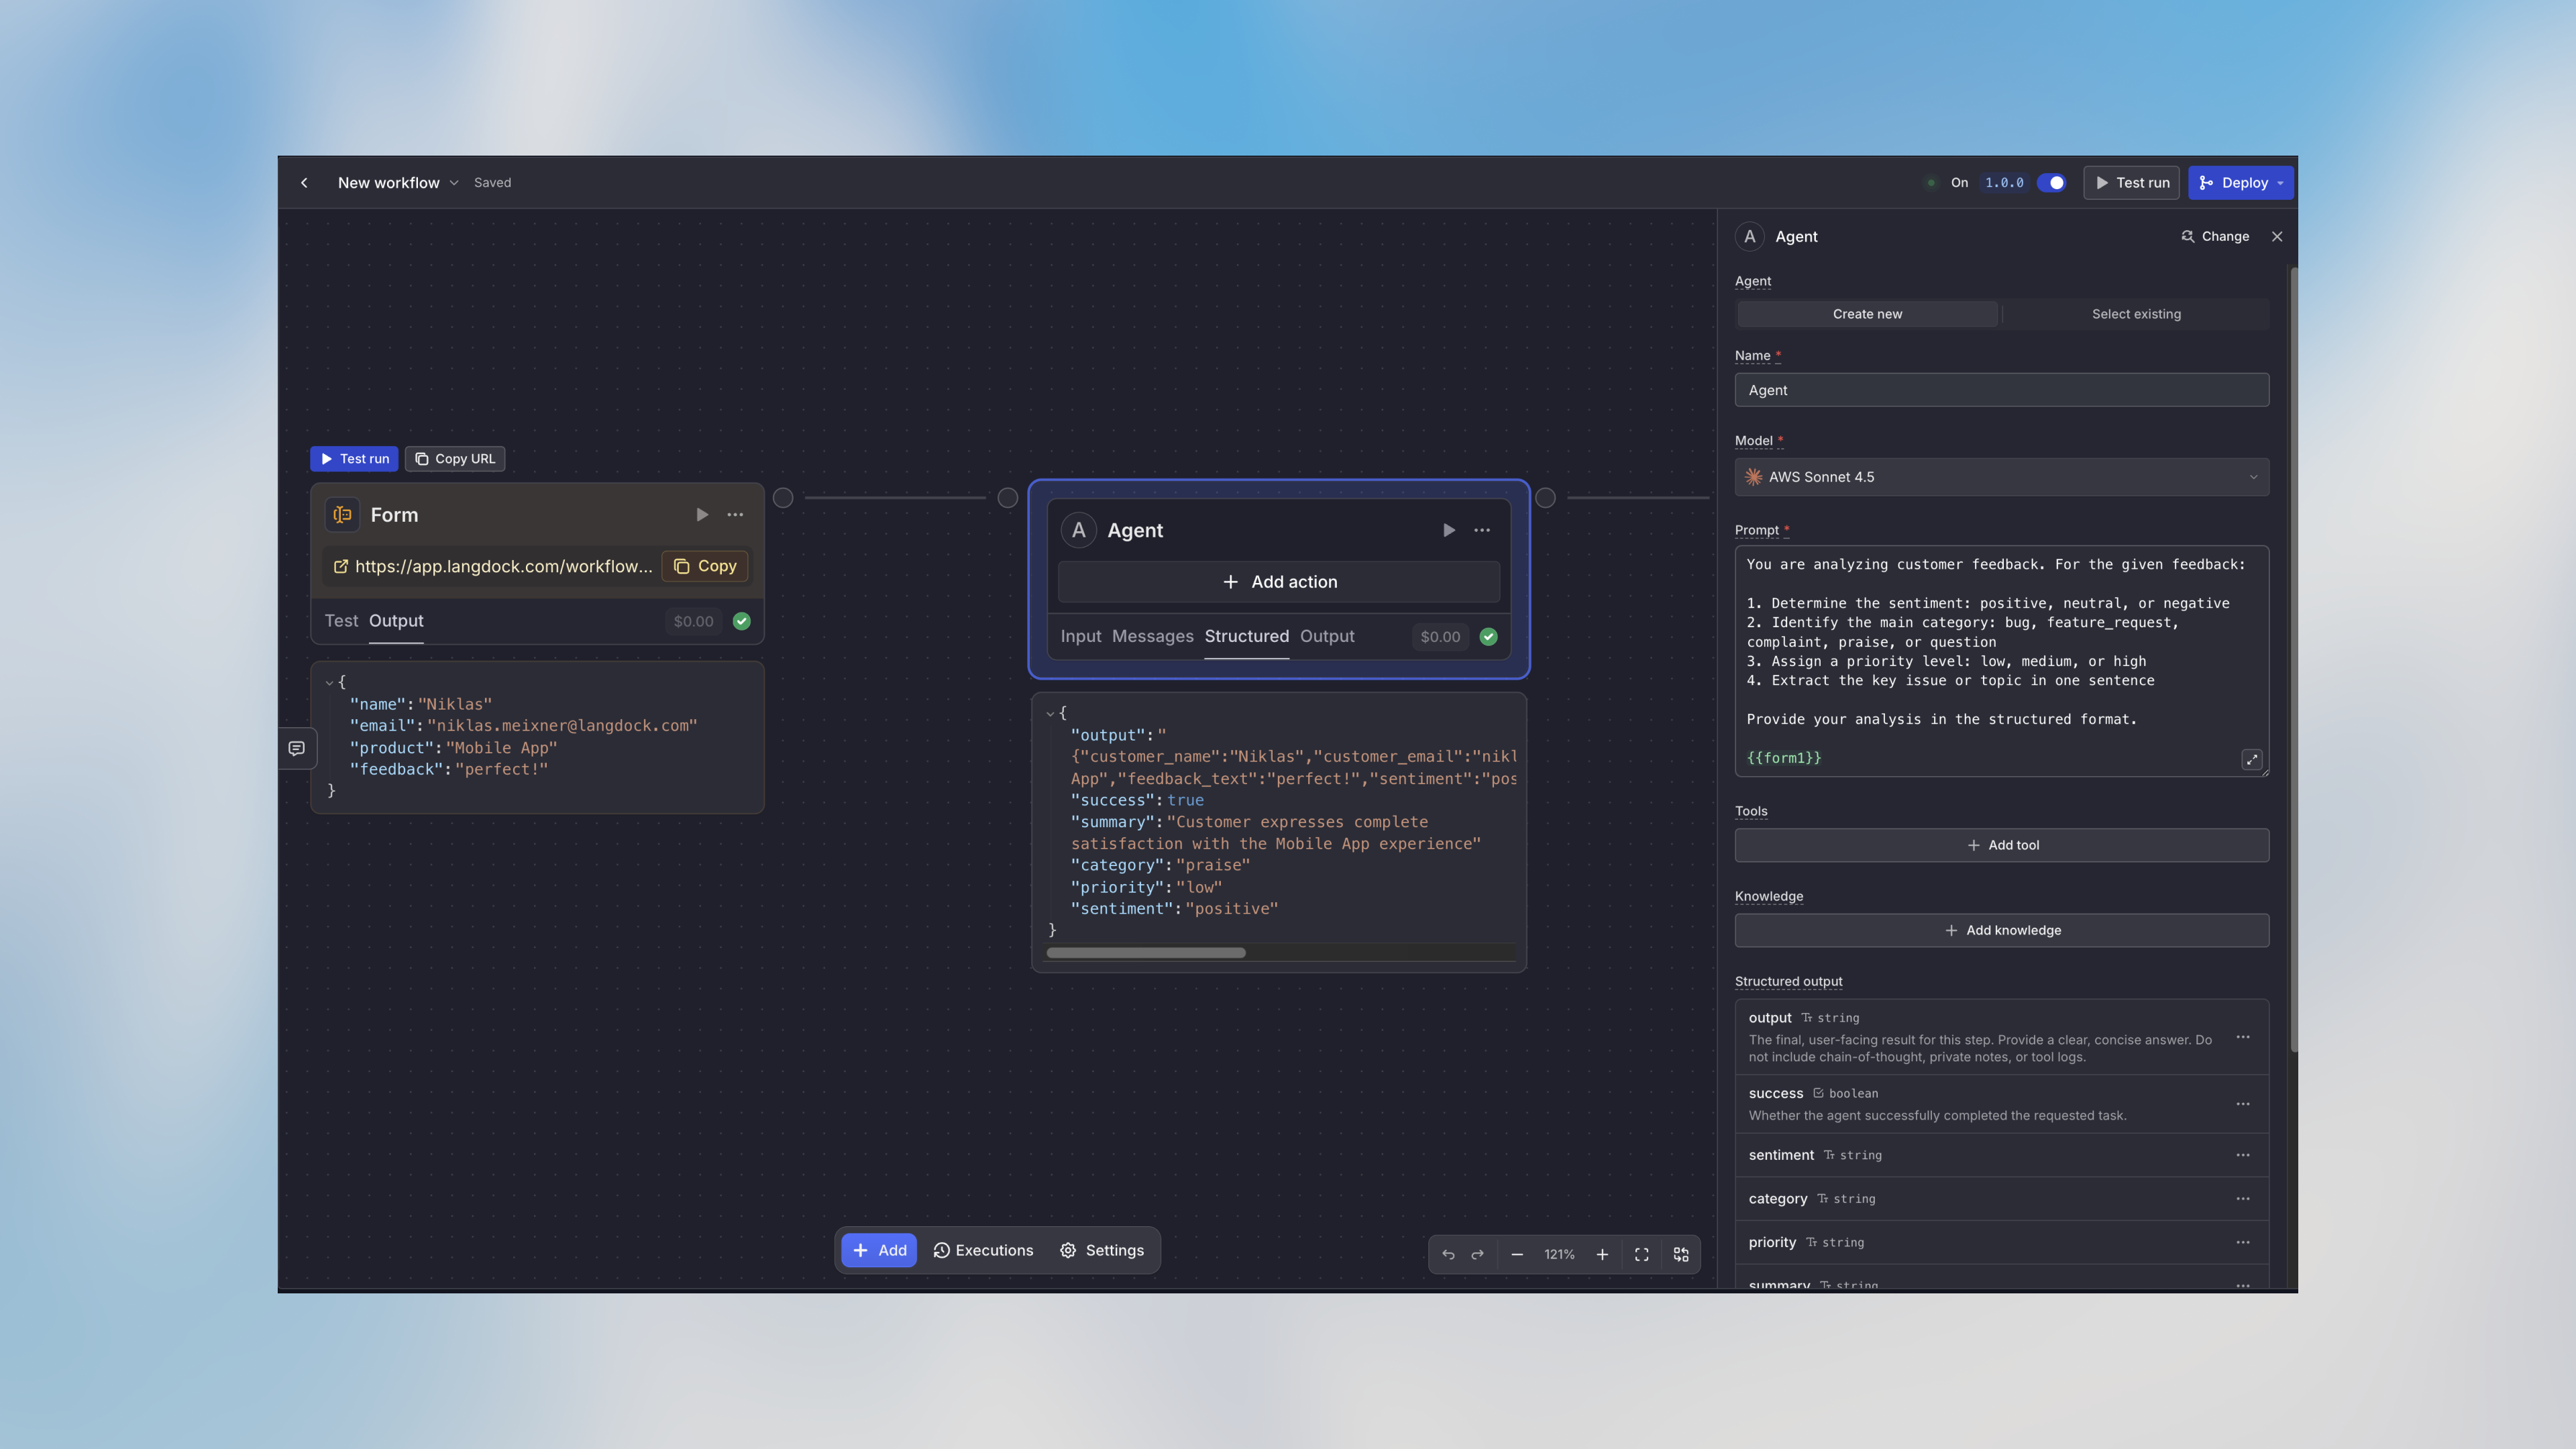
### Input and Output Tabs
After a node runs, you can click on it to see:
* **Input tab**: What data the node received
* **Output tab**: What data the node produced
This data flows to the next nodes in your workflow.
### Configuration Panel
Click any node to open its settings in the side panel. This is where you configure what the node does, select AI models, set up connections to external services, and more.
## Understanding Node Structure
Every node has a few common elements that make them easy to work with:
### The Node Header
Shows you the node type and name. Click the play button here to test the node individually - super helpful for debugging!
### Input and Output Tabs
After a node runs, you can click on it to see:
* **Input tab**: What data the node received
* **Output tab**: What data the node produced
This data flows to the next nodes in your workflow.
### Configuration Panel
Click any node to open its settings in the side panel. This is where you configure what the node does, select AI models, set up connections to external services, and more.
 ## Working with Variables
**Data flows through variables.** When a node finishes running, its output
becomes available as a variable that you can use in later nodes. This is how
information moves through your workflow.
### The Basics
Use double curly braces to reference variables:
```handlebars theme={null}
{{form1.output.email}}
{{analyze_data.output.structured.summary}}
{{api_response.data.items[0].title}}
```
### Configuring Fields with Variables
Every node has fields that need configuration. You can use variables in most text fields, or choose from three field modes:
* **Auto Mode**: Let the workflow automatically determine the best value
* **Manual Mode**: Enter exact values or use variables like `{{form1.output.email}}`
* **AI Prompt Mode**: Give instructions for AI to generate dynamic content
Understand Auto, Manual, and AI Prompt modes and when to use each one
**💡 Pro tip**: When you focus on any field, a data panel appears showing all connected upstream nodes. You'll see the node names immediately, but actual output data and structure only appear after you've run those nodes at least once.
**📁 Working with files**: In Agent node prompts, you'll also see a **Files** tab that lists files from previous nodes (like uploaded documents or generated images). Click a file to insert a reference - it appears as a colored pill in your prompt showing the file type and source node.
***
## How Workflows Execute
**Understanding execution is key.** Workflows can run nodes sequentially (one
after another) or in parallel (simultaneously). Knowing how execution works
helps you build faster, more efficient automations.
### Sequential Execution
By default, your workflow runs nodes one after another, following the connections you've drawn. Each node waits for the previous one to complete before starting. Simple and predictable!
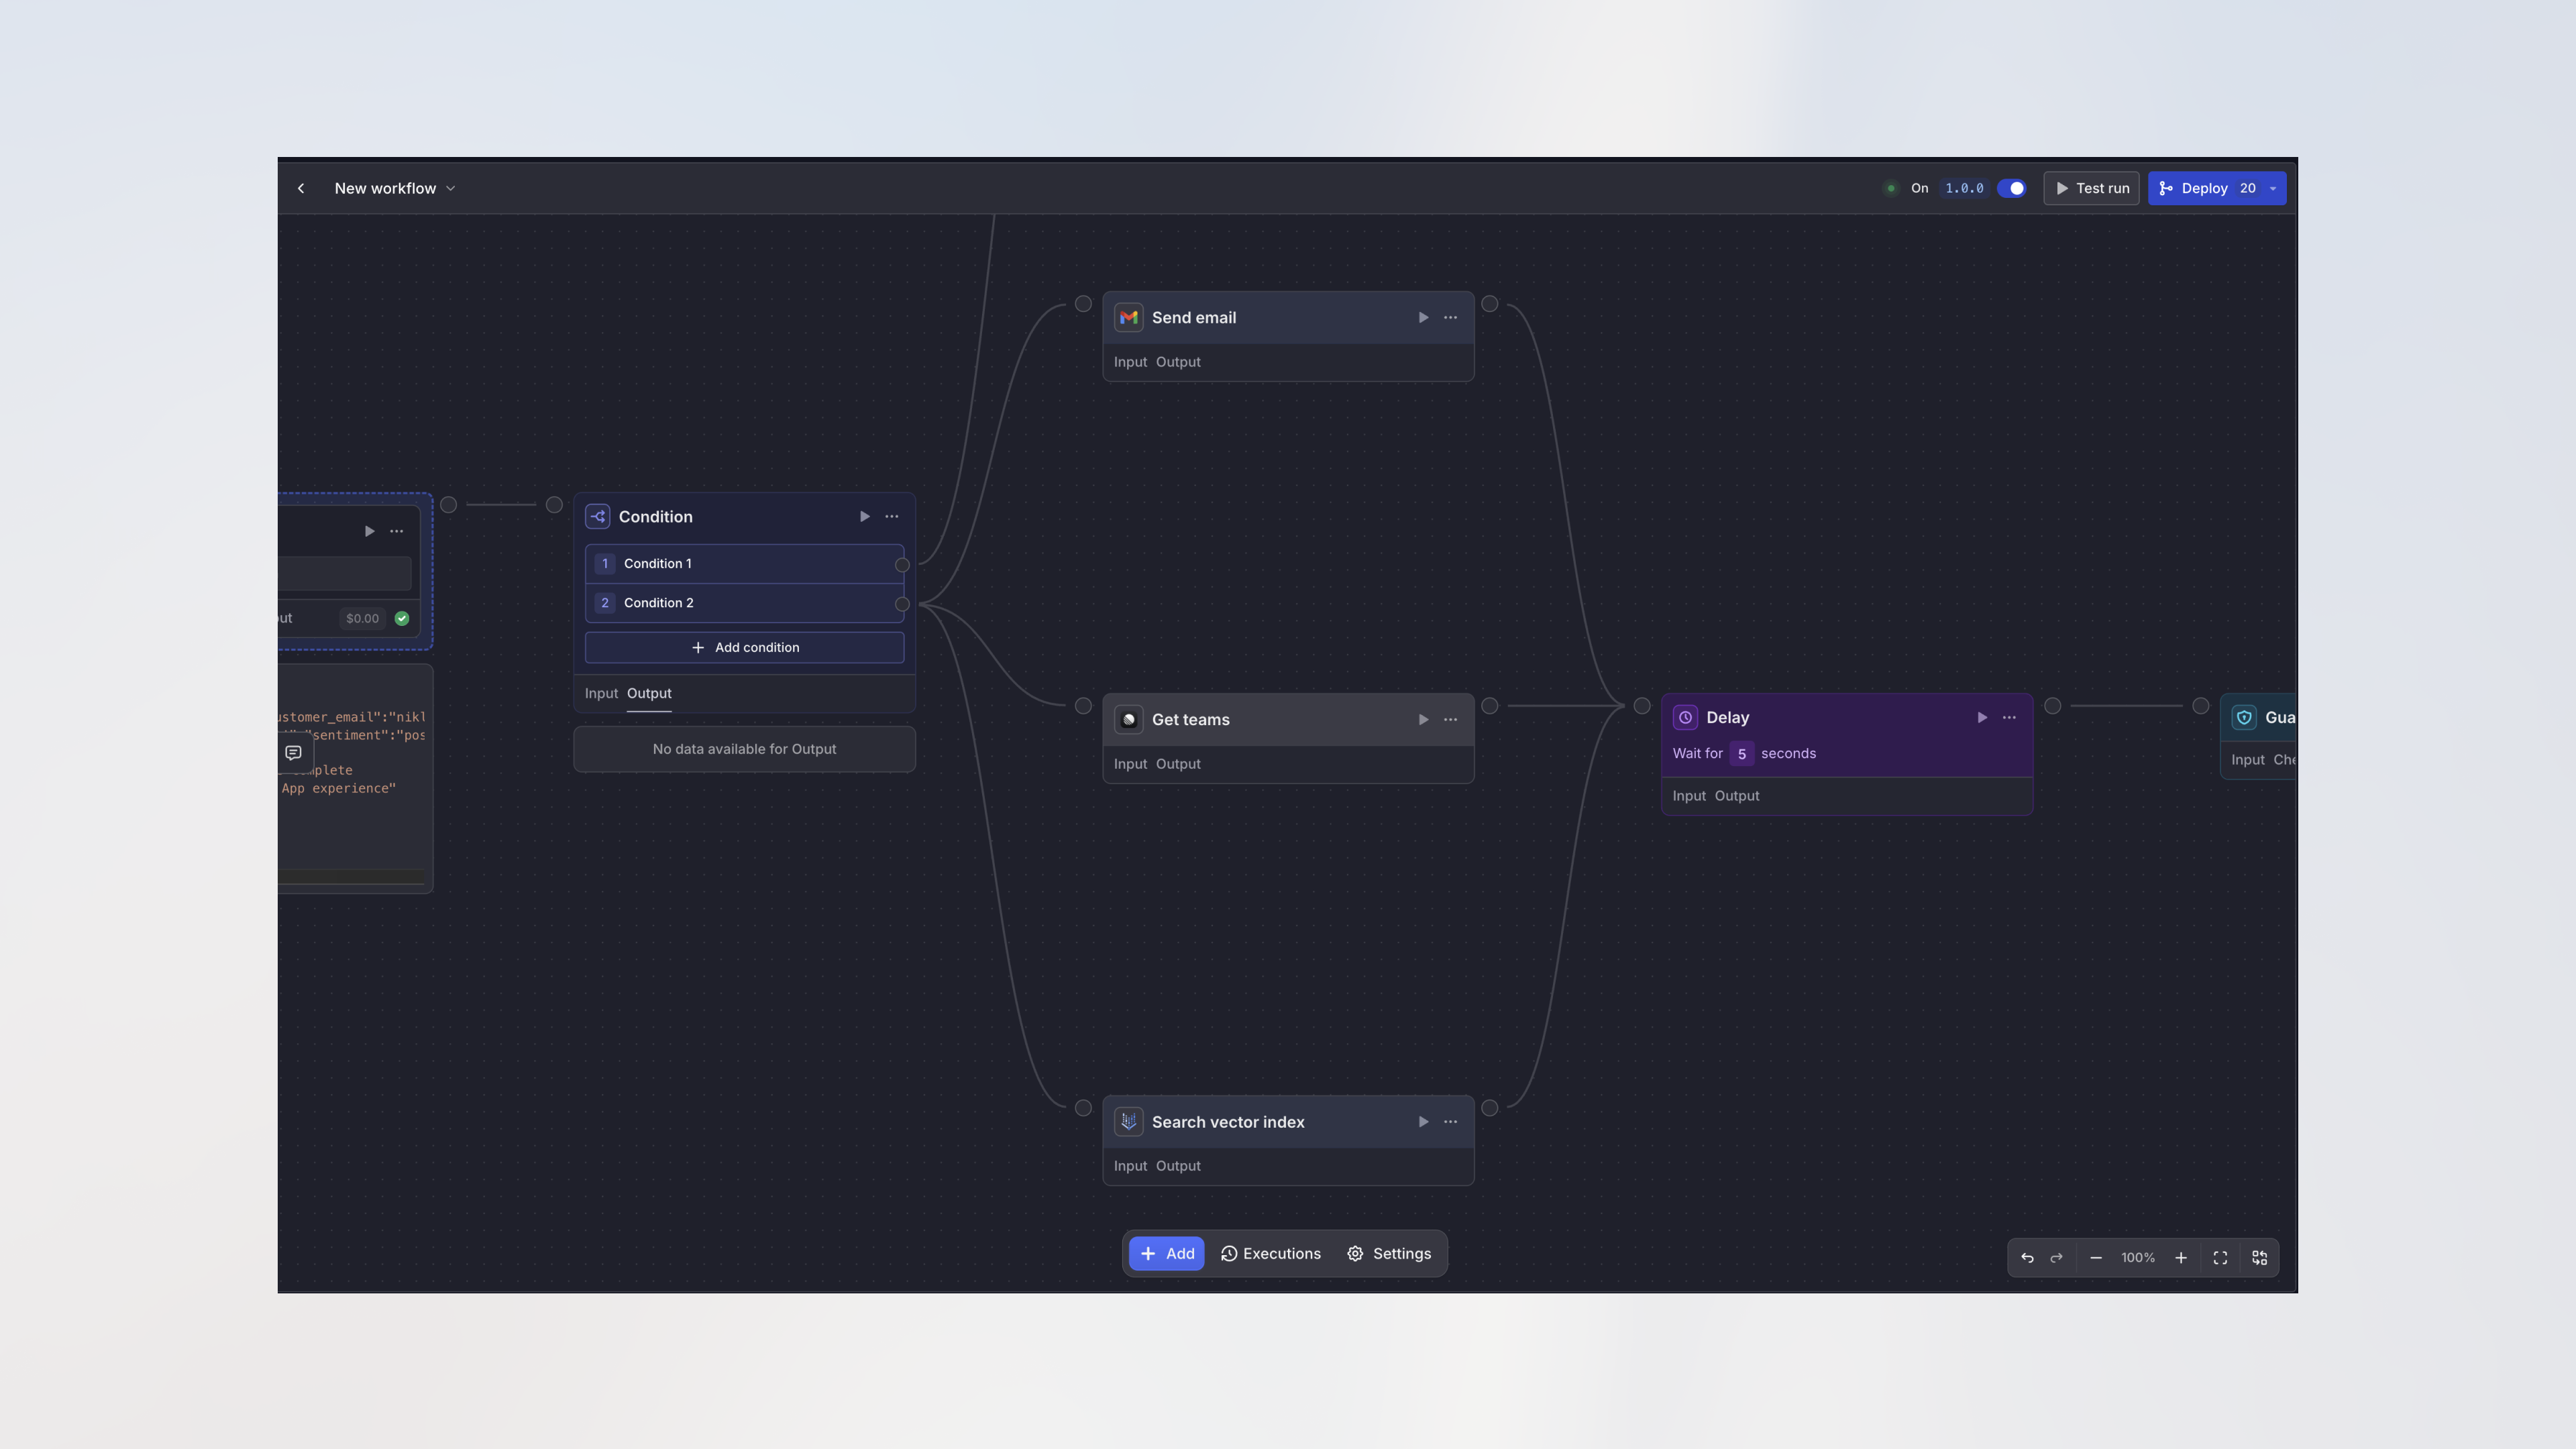
### Parallel Execution
When you connect multiple nodes to a single source node, they can run at the same time. This speeds up your workflow when nodes don't depend on each other.
For example:
```text theme={null}
→ Send Email →
Trigger → → Create Ticket → → Continue
→ Update Database →
```
All three nodes after the trigger can run in parallel since they're independent.
## Working with Variables
**Data flows through variables.** When a node finishes running, its output
becomes available as a variable that you can use in later nodes. This is how
information moves through your workflow.
### The Basics
Use double curly braces to reference variables:
```handlebars theme={null}
{{form1.output.email}}
{{analyze_data.output.structured.summary}}
{{api_response.data.items[0].title}}
```
### Configuring Fields with Variables
Every node has fields that need configuration. You can use variables in most text fields, or choose from three field modes:
* **Auto Mode**: Let the workflow automatically determine the best value
* **Manual Mode**: Enter exact values or use variables like `{{form1.output.email}}`
* **AI Prompt Mode**: Give instructions for AI to generate dynamic content
Understand Auto, Manual, and AI Prompt modes and when to use each one
**💡 Pro tip**: When you focus on any field, a data panel appears showing all connected upstream nodes. You'll see the node names immediately, but actual output data and structure only appear after you've run those nodes at least once.
**📁 Working with files**: In Agent node prompts, you'll also see a **Files** tab that lists files from previous nodes (like uploaded documents or generated images). Click a file to insert a reference - it appears as a colored pill in your prompt showing the file type and source node.
***
## How Workflows Execute
**Understanding execution is key.** Workflows can run nodes sequentially (one
after another) or in parallel (simultaneously). Knowing how execution works
helps you build faster, more efficient automations.
### Sequential Execution
By default, your workflow runs nodes one after another, following the connections you've drawn. Each node waits for the previous one to complete before starting. Simple and predictable!
### Parallel Execution
When you connect multiple nodes to a single source node, they can run at the same time. This speeds up your workflow when nodes don't depend on each other.
For example:
```text theme={null}
→ Send Email →
Trigger → → Create Ticket → → Continue
→ Update Database →
```
All three nodes after the trigger can run in parallel since they're independent.
 ### Error Handling
You control what happens when something goes wrong. For each node, you can choose:
* **Stop workflow**: Stop everything and mark the run as failed (good for critical steps)
* **Continue (using error output)**: Keep going and pass the error as the node's output (good for non-critical actions)
* **Add error callback**: Route to different nodes on error using the red error handle (good for fallback logic)
You can configure error handling for each node individually using the node settings.
### Error Handling
You control what happens when something goes wrong. For each node, you can choose:
* **Stop workflow**: Stop everything and mark the run as failed (good for critical steps)
* **Continue (using error output)**: Keep going and pass the error as the node's output (good for non-critical actions)
* **Add error callback**: Route to different nodes on error using the red error handle (good for fallback logic)
You can configure error handling for each node individually using the node settings.
 ***
## Workflow Versions
**Version control for workflows.** Every workflow has versions, similar to Git
for code. This keeps production stable while you make changes safely in draft
mode.
### Draft Version (v0)
This is your sandbox. Make changes, test things out, and experiment without affecting anything in production. The draft version is always labeled **v0**.
### Published Versions
When you're happy with your changes, publish them to create a new version (v1.0.0, v1.1.0, etc.). Published versions are:
* **Immutable**: They can't be changed, which keeps production stable
* **Activated for triggers**: Only active published versions respond to real triggers
* **Documented**: Each includes a description of what changed
* **Rollback-ready**: You can reactivate an older version if needed
When publishing, you choose the bump type:
* **Patch** (1.0.0 → 1.0.1): Bug fixes and small tweaks
* **Minor** (1.0.0 → 1.1.0): New features or nodes
* **Major** (1.0.0 → 2.0.0): Breaking changes
Workflow templates have no versions and are not published. Changes to a template are saved automatically and take effect immediately.
Test everything in the draft version before publishing. You can run full
workflow tests without affecting production triggers.
***
## Testing Your Workflow
**Test early, test often.** Don't wait until your workflow is complete to
start testing. Test each node as you build it to catch issues early.
### Testing Individual Nodes
Click the play button on any node to test just that piece. This is great for:
* Verifying an agent's output before building the rest of the workflow
* Checking if an API call returns the expected data
* Debugging issues in specific nodes
### Testing Complete Workflows
Use the "Test run" button on the trigger node to execute the entire workflow with sample data. This runs through all nodes but doesn't mark events as processed, so you can test safely.
### Replaying Previous Events
Replay events lets you test a workflow with data from an earlier form submission, webhook request, or integration event instead of entering sample data manually. Open the Test Run panel and choose **Replay events**.
### Viewing Results
After any test run, click on nodes to see:
* **Input**: What data the node received
* **Output**: What it produced
* **Messages**: For agent nodes, the full AI conversation
* **Logs**: For code nodes, any console output
* **Usage**: How many AI credits were consumed
***
## Connections Between Nodes
**Connections define flow.** The lines between nodes aren't just visual - they
determine the order of execution and how data flows through your workflow.
### Connection Handles
Nodes have connection points (handles) on their sides:
* **Left side (input)**: Where execution flows in
* **Right side (output)**: Where execution flows out
* **Multiple outputs**: Condition nodes have one output per condition
* **Red handle**: Special error output (appears when error handling is enabled)
### Drawing Connections
Click and drag from an output handle to an input handle. The line shows the execution flow. Workflows execute in the order defined by these connections.
***
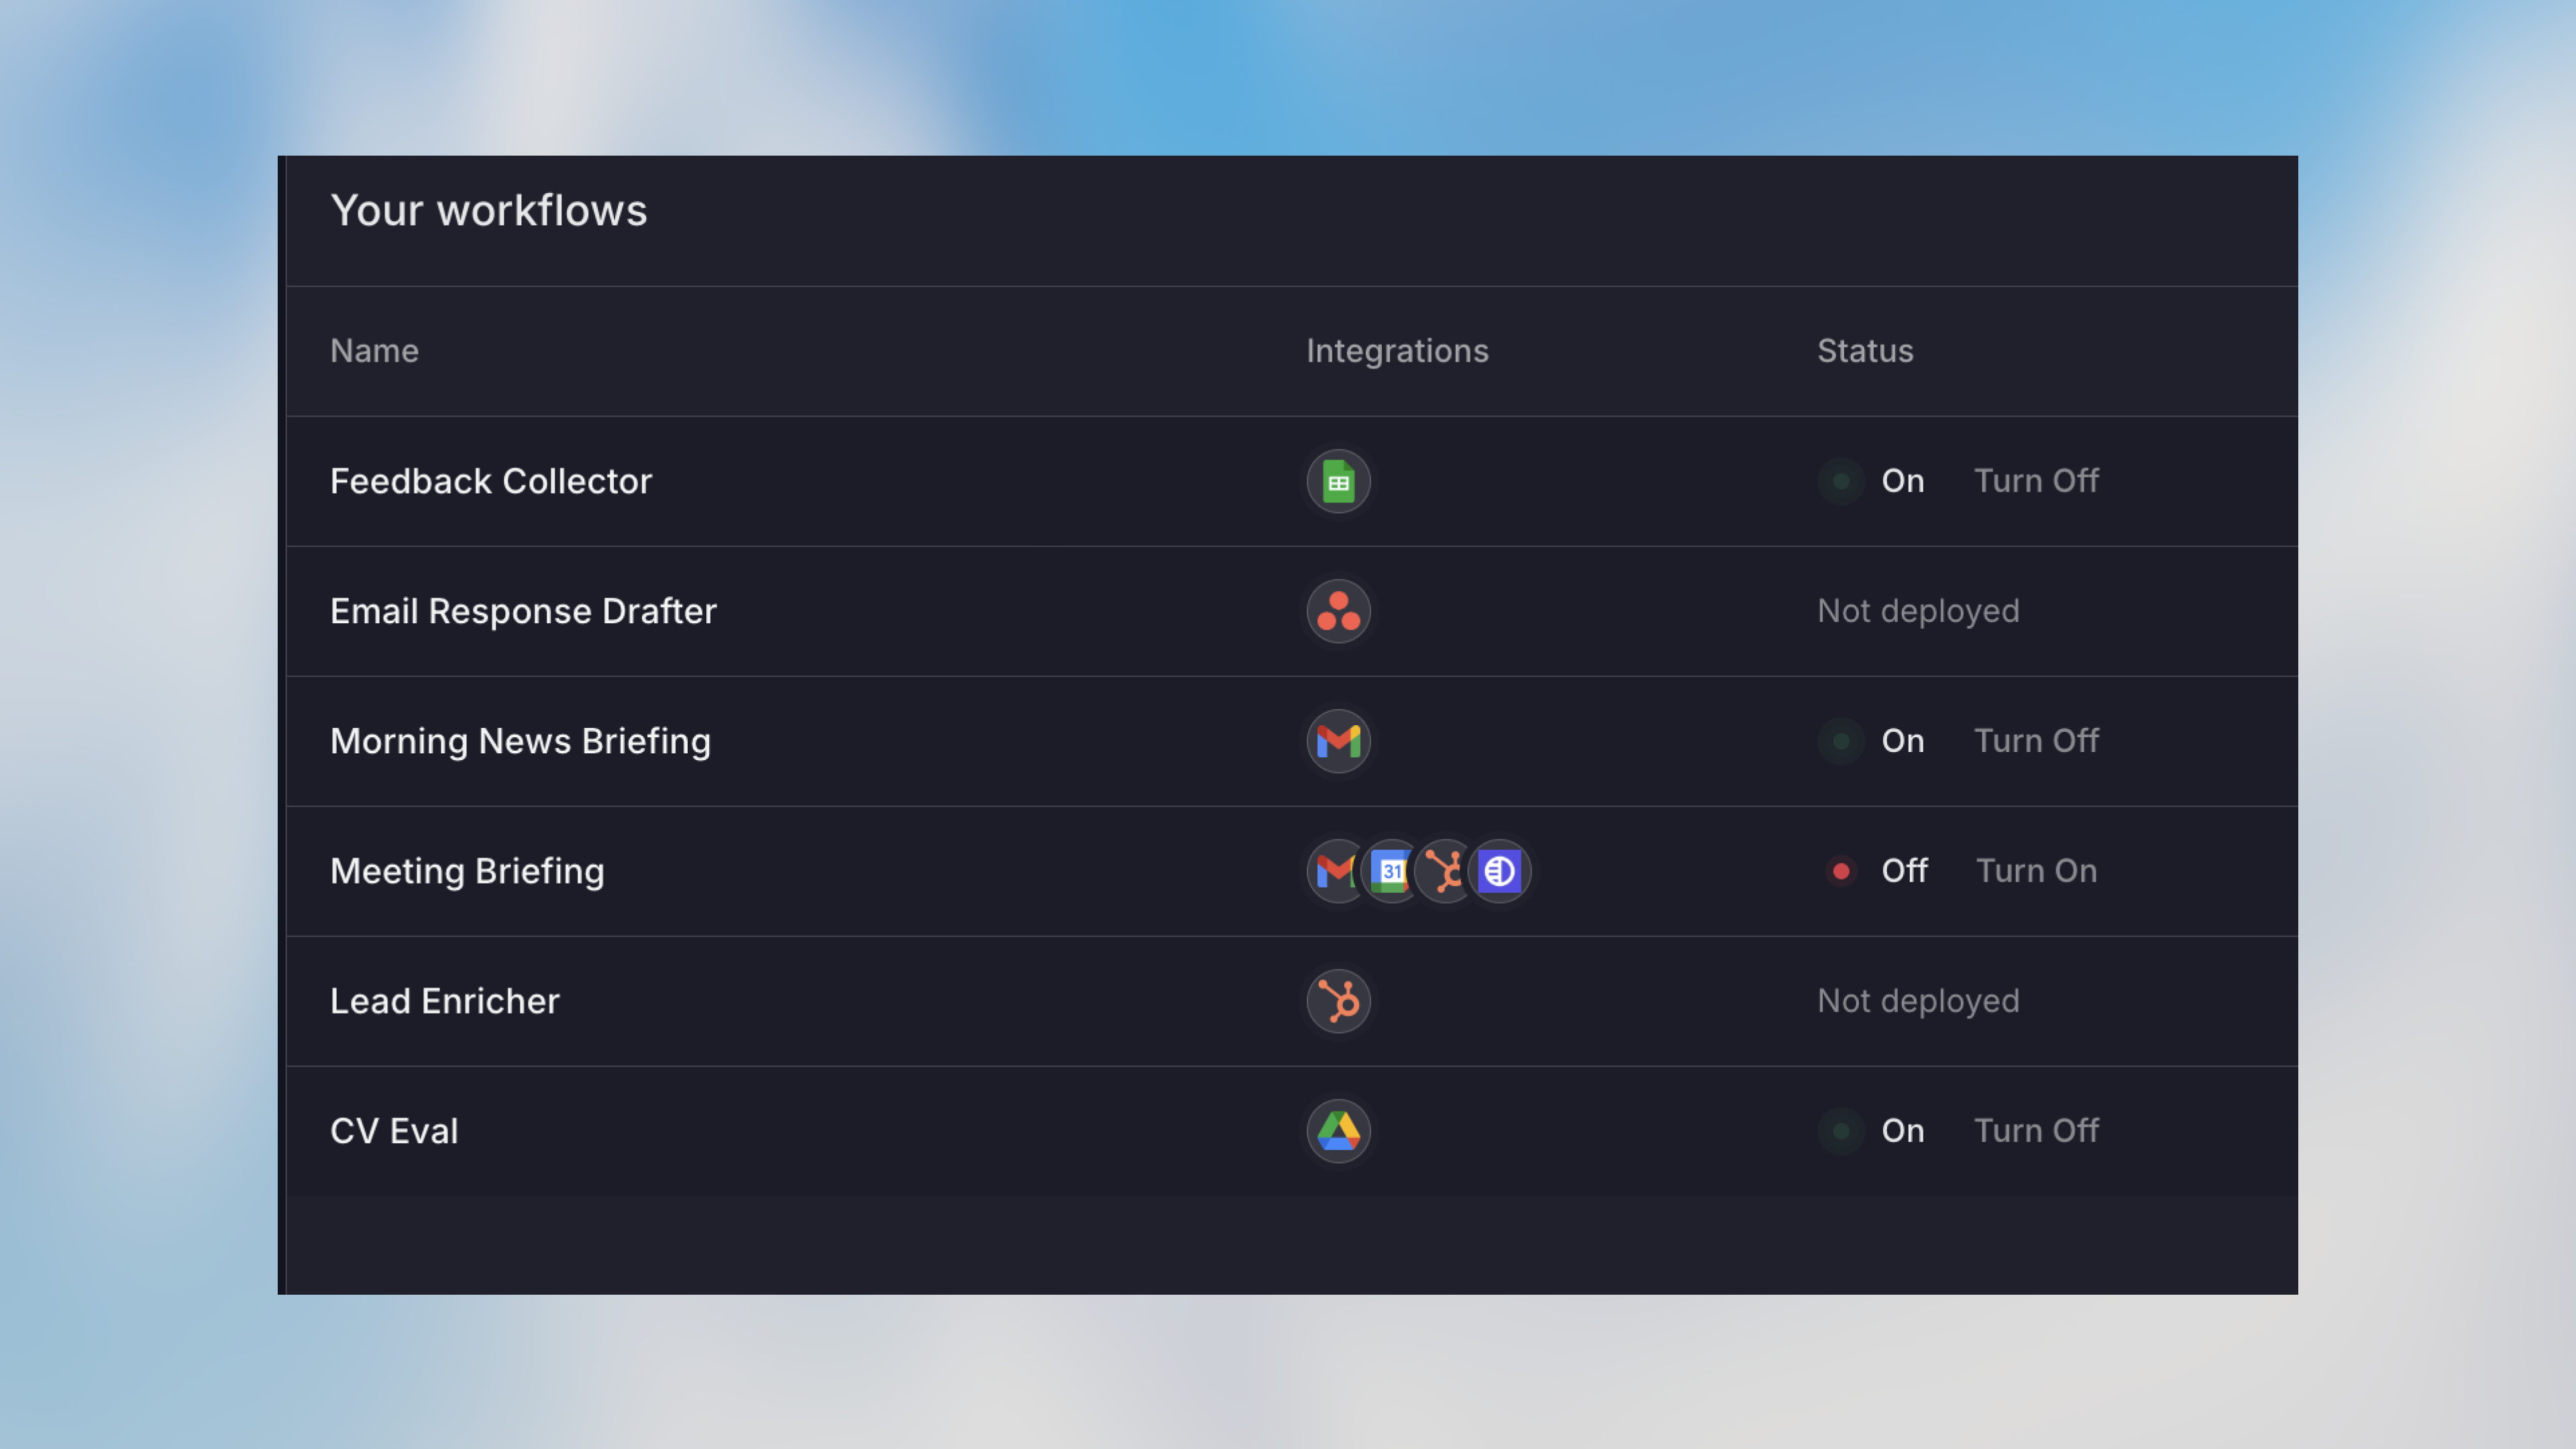
## Workflow Status
Your workflow can be in one of three states:
Still being built - no automatic triggers fire. Safe for making changes and
testing.
Published and responding to triggers automatically. This is production mode.
Exists but temporarily disabled. Good for maintenance or debugging without
deleting the workflow.
***
## Workflow Versions
**Version control for workflows.** Every workflow has versions, similar to Git
for code. This keeps production stable while you make changes safely in draft
mode.
### Draft Version (v0)
This is your sandbox. Make changes, test things out, and experiment without affecting anything in production. The draft version is always labeled **v0**.
### Published Versions
When you're happy with your changes, publish them to create a new version (v1.0.0, v1.1.0, etc.). Published versions are:
* **Immutable**: They can't be changed, which keeps production stable
* **Activated for triggers**: Only active published versions respond to real triggers
* **Documented**: Each includes a description of what changed
* **Rollback-ready**: You can reactivate an older version if needed
When publishing, you choose the bump type:
* **Patch** (1.0.0 → 1.0.1): Bug fixes and small tweaks
* **Minor** (1.0.0 → 1.1.0): New features or nodes
* **Major** (1.0.0 → 2.0.0): Breaking changes
Workflow templates have no versions and are not published. Changes to a template are saved automatically and take effect immediately.
Test everything in the draft version before publishing. You can run full
workflow tests without affecting production triggers.
***
## Testing Your Workflow
**Test early, test often.** Don't wait until your workflow is complete to
start testing. Test each node as you build it to catch issues early.
### Testing Individual Nodes
Click the play button on any node to test just that piece. This is great for:
* Verifying an agent's output before building the rest of the workflow
* Checking if an API call returns the expected data
* Debugging issues in specific nodes
### Testing Complete Workflows
Use the "Test run" button on the trigger node to execute the entire workflow with sample data. This runs through all nodes but doesn't mark events as processed, so you can test safely.
### Replaying Previous Events
Replay events lets you test a workflow with data from an earlier form submission, webhook request, or integration event instead of entering sample data manually. Open the Test Run panel and choose **Replay events**.
### Viewing Results
After any test run, click on nodes to see:
* **Input**: What data the node received
* **Output**: What it produced
* **Messages**: For agent nodes, the full AI conversation
* **Logs**: For code nodes, any console output
* **Usage**: How many AI credits were consumed
***
## Connections Between Nodes
**Connections define flow.** The lines between nodes aren't just visual - they
determine the order of execution and how data flows through your workflow.
### Connection Handles
Nodes have connection points (handles) on their sides:
* **Left side (input)**: Where execution flows in
* **Right side (output)**: Where execution flows out
* **Multiple outputs**: Condition nodes have one output per condition
* **Red handle**: Special error output (appears when error handling is enabled)
### Drawing Connections
Click and drag from an output handle to an input handle. The line shows the execution flow. Workflows execute in the order defined by these connections.
***
## Workflow Status
Your workflow can be in one of three states:
Still being built - no automatic triggers fire. Safe for making changes and
testing.
Published and responding to triggers automatically. This is production mode.
Exists but temporarily disabled. Good for maintenance or debugging without
deleting the workflow.
 ***
## Human Oversight
For sensitive actions like financial transactions or data deletions, you can require manual approval before proceeding:
Add manual approval steps for important actions requiring human oversight
## Best Practices
* **Give nodes clear names**: "Analyze feedback" not "Agent 1"
* **Keep workflows focused**: One workflow, one purpose
* **Test early and often**: Test each node as you build
* **Add comments**: Click the three dots menu on any node and select "Add Comment" to document complex logic
## Next Steps
Now that you understand the fundamentals, dive deeper into specific topics:
Configure node fields with Auto, Manual, and AI Prompt modes
Add manual approval for sensitive actions
Build your first workflow step-by-step
Explore all available triggers and nodes
***
## Human Oversight
For sensitive actions like financial transactions or data deletions, you can require manual approval before proceeding:
Add manual approval steps for important actions requiring human oversight
## Best Practices
* **Give nodes clear names**: "Analyze feedback" not "Agent 1"
* **Keep workflows focused**: One workflow, one purpose
* **Test early and often**: Test each node as you build
* **Add comments**: Click the three dots menu on any node and select "Add Comment" to document complex logic
## Next Steps
Now that you understand the fundamentals, dive deeper into specific topics:
Configure node fields with Auto, Manual, and AI Prompt modes
Add manual approval for sensitive actions
Build your first workflow step-by-step
Explore all available triggers and nodes