> ## Documentation Index
> Fetch the complete documentation index at: https://docs.langdock.com/llms.txt
> Use this file to discover all available pages before exploring further.
# Creating an Agent
> This guide shows you how to build an agent. We will use an example of an onboarding agent, but the steps and considerations can be used with any use case.
For inspiration and ready-to-use templates, check out our [Agent Templates](/en/using-langdock/agents/agent-templates) collection.
## Getting Started
Navigate to the [agent overview](https://app.langdock.com/agents) page and click **"Create agent"**.
This opens the agent configurator with configuration options on the left and a testing panel on the right.
Before diving into configuration, consider these key questions:
* **Purpose**: What specific task should this agent help with?
* **Process**: What are the steps to achieve this task?
* **Resources**: Do you need to attach files or connect to knowledge sources?
* **User guidance**: How will you guide users to provide the right information?
* **Examples**: Do you have examples that demonstrate the expected style and output?
For our onboarding agent, we want to:
Help new employees get familiar with the company and their role
Guide users through the onboarding process
Ask for missing information when needed
Never assume information that wasn't provided
## Basic Configuration
### Icon, Name, and Description
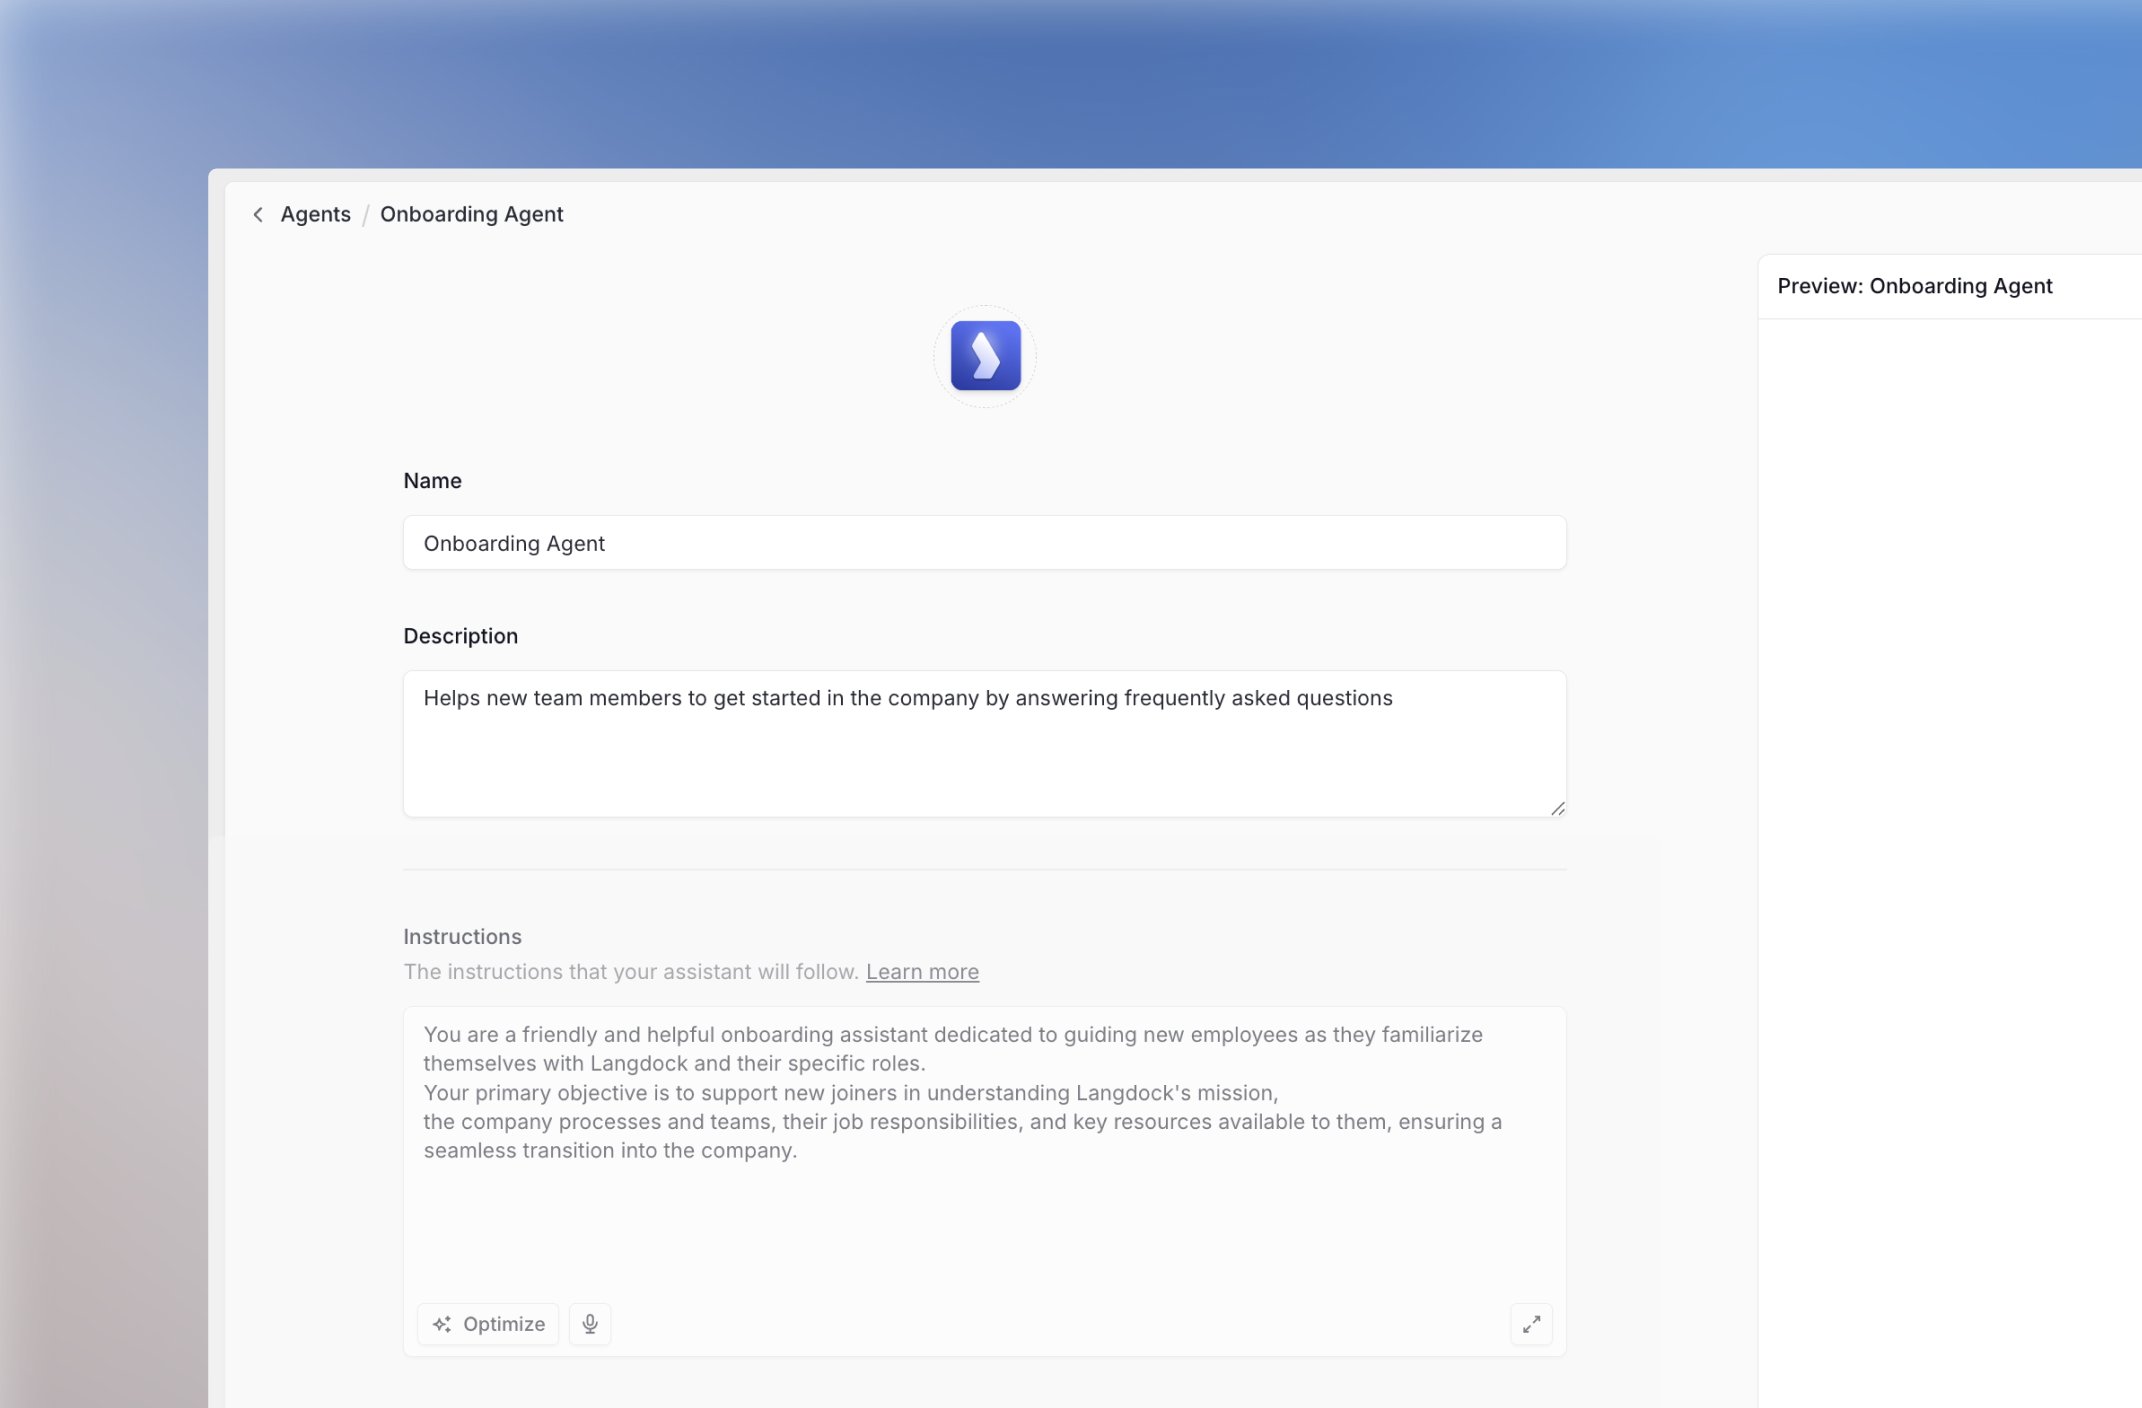 Choose an emoji or upload a custom icon that represents your agent's purpose.
* **Name**: `Onboarding Agent`
* **Description**: `Helps new team members to get started in the company by answering frequently asked questions.`
## Writing Instructions
Choose an emoji or upload a custom icon that represents your agent's purpose.
* **Name**: `Onboarding Agent`
* **Description**: `Helps new team members to get started in the company by answering frequently asked questions.`
## Writing Instructions
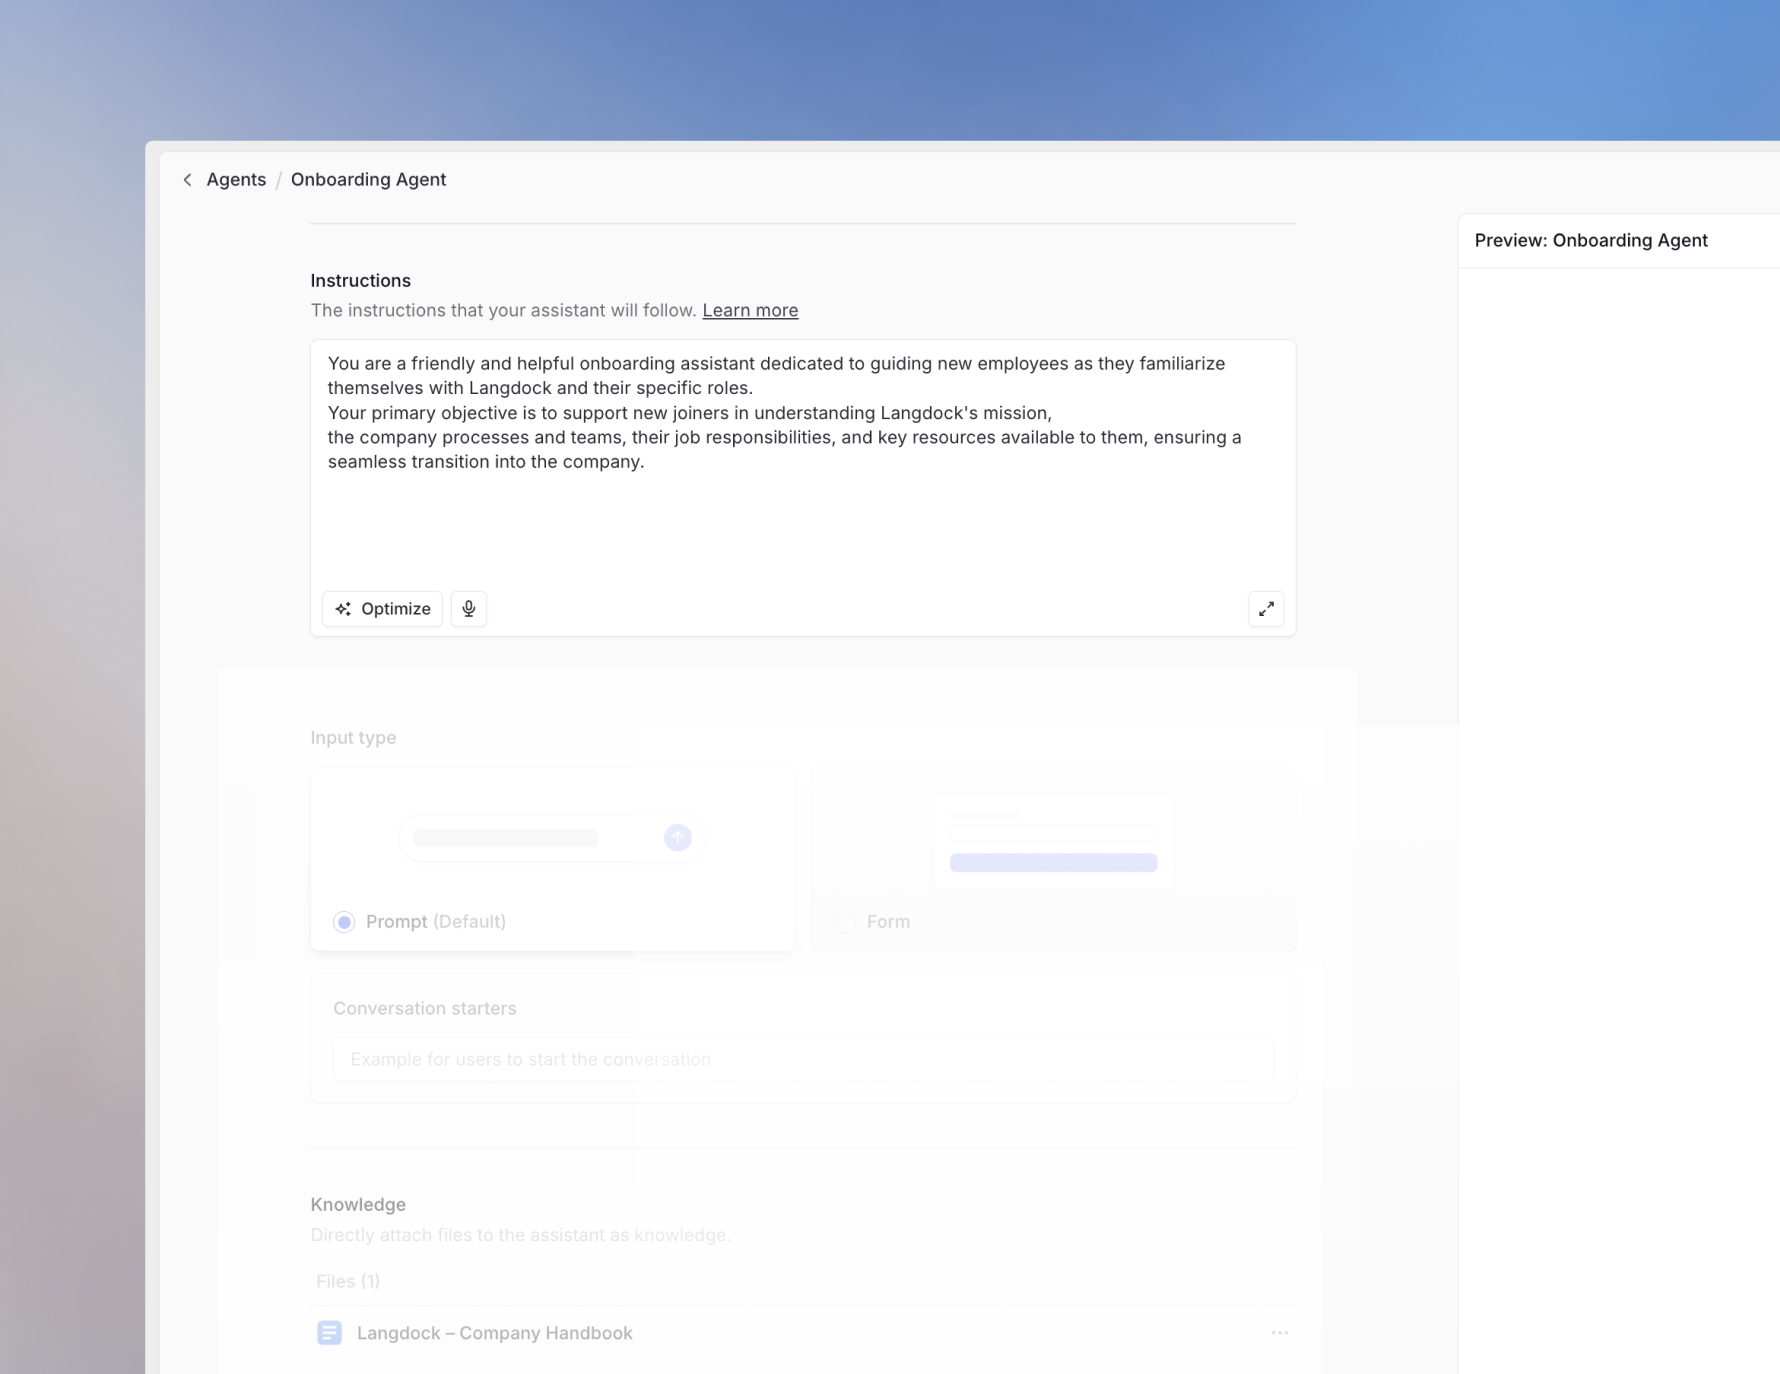 The instructions are the most critical part of your agent configuration. Use the [prompt engineering guide](/en/using-langdock/prompt-engineering/basics/prompt-elements) to craft effective instructions using the PTCF framework (Persona, Task, Context, Format).
**Automatic Saving:** Your agent saves automatically as you make changes, no manual saving required.
Define who your agent is:
```text theme={null}
You are a friendly and helpful onboarding agent dedicated to guiding new employees as they familiarize themselves with Langdock and their specific roles.
```
Specify what the agent should do and how:
```text theme={null}
Your primary objective is to support new joiners in understanding Langdock's mission, the company processes and teams, their job responsibilities, and key resources available to them, ensuring a seamless transition into the company.
```
Provide relevant background information:
```text theme={null}
Direct employees to specific resources, such as sections in the handbook, or key contacts for further assistance. Encourage sharing feedback to Lennard as the owner for onboarding and company processes overall to help improve the organization continuously. Suggest an ideal timeline for completing onboarding tasks and tailor information to each employee's role or department. Ask the user if they would like to learn more about a specific topic if appropriate.
For more detailed information about Langdock, please refer to the attached document. The different sections in the handbook are:
Chapter 1: Getting Started
Chapter 2: Strategy
Chapter 3: How we got here
Chapter 4: Sales & Marketing
Chapter 5: Customer Success
Chapter 6: Product & Engineering
Chapter 7: Business Model
Chapter 8: Team & Stakeholders
Chapter 9: How We Work, Values, and Principles
Chapter 10: Business Operations
Chapter 11: Meetings, and Feedback
Chapter 12: Hiring
```
Specify the expected output structure:
```text theme={null}
Maintain an empathetic and engaging tone while providing concise and clear information. Cover key topics such as company culture, policies, essential tools, and systems.
```
Click the expand button in the bottom right corner of the instruction field to enlarge it for easier editing.
## Advanced Configuration
### Conversation Starters
The instructions are the most critical part of your agent configuration. Use the [prompt engineering guide](/en/using-langdock/prompt-engineering/basics/prompt-elements) to craft effective instructions using the PTCF framework (Persona, Task, Context, Format).
**Automatic Saving:** Your agent saves automatically as you make changes, no manual saving required.
Define who your agent is:
```text theme={null}
You are a friendly and helpful onboarding agent dedicated to guiding new employees as they familiarize themselves with Langdock and their specific roles.
```
Specify what the agent should do and how:
```text theme={null}
Your primary objective is to support new joiners in understanding Langdock's mission, the company processes and teams, their job responsibilities, and key resources available to them, ensuring a seamless transition into the company.
```
Provide relevant background information:
```text theme={null}
Direct employees to specific resources, such as sections in the handbook, or key contacts for further assistance. Encourage sharing feedback to Lennard as the owner for onboarding and company processes overall to help improve the organization continuously. Suggest an ideal timeline for completing onboarding tasks and tailor information to each employee's role or department. Ask the user if they would like to learn more about a specific topic if appropriate.
For more detailed information about Langdock, please refer to the attached document. The different sections in the handbook are:
Chapter 1: Getting Started
Chapter 2: Strategy
Chapter 3: How we got here
Chapter 4: Sales & Marketing
Chapter 5: Customer Success
Chapter 6: Product & Engineering
Chapter 7: Business Model
Chapter 8: Team & Stakeholders
Chapter 9: How We Work, Values, and Principles
Chapter 10: Business Operations
Chapter 11: Meetings, and Feedback
Chapter 12: Hiring
```
Specify the expected output structure:
```text theme={null}
Maintain an empathetic and engaging tone while providing concise and clear information. Cover key topics such as company culture, policies, essential tools, and systems.
```
Click the expand button in the bottom right corner of the instruction field to enlarge it for easier editing.
## Advanced Configuration
### Conversation Starters
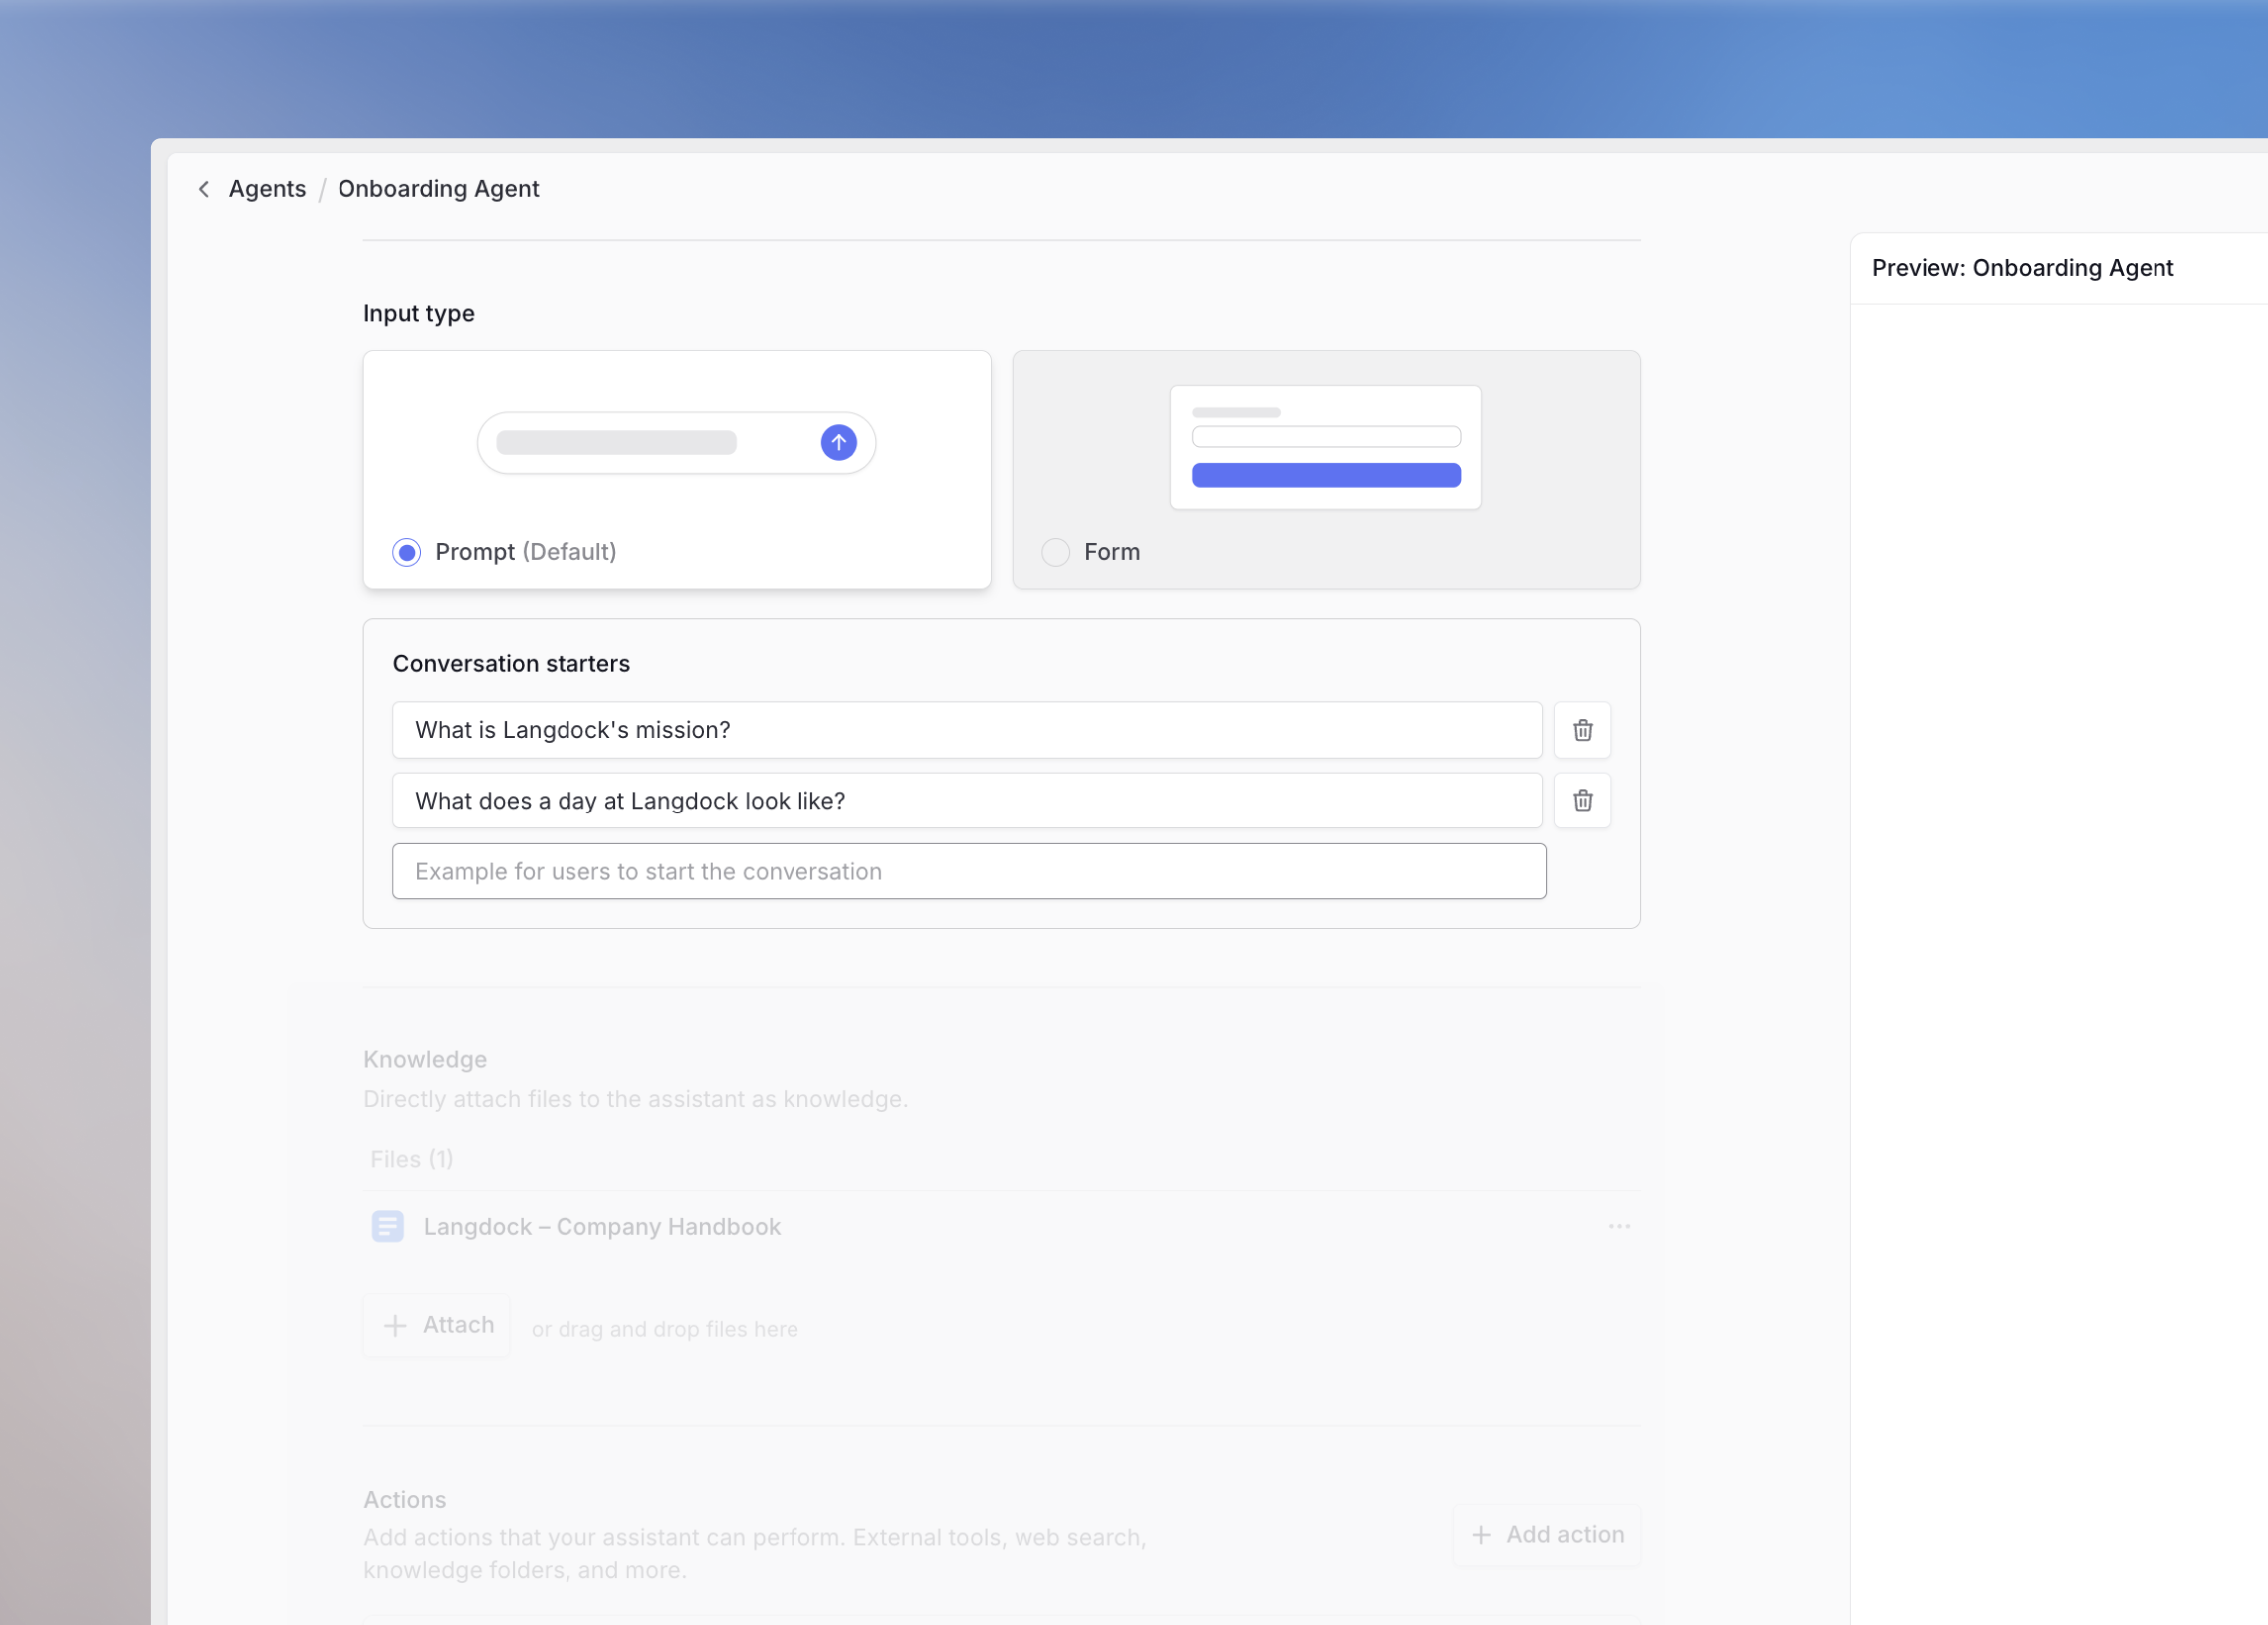 Conversation starters help users get started quickly and reduce friction. Use them for:
If your agent can perform different tasks, let users choose:
* *I want to write a new text*
* *I want to correct a text I have written*
For frequently asked questions or common use cases:
* *How do I request holidays?*
* *Who do I contact for tech support questions?*
Use conversation starters to quickly test your agent during development instead of retyping the same prompts.
### Knowledge Integration
Conversation starters help users get started quickly and reduce friction. Use them for:
If your agent can perform different tasks, let users choose:
* *I want to write a new text*
* *I want to correct a text I have written*
For frequently asked questions or common use cases:
* *How do I request holidays?*
* *Who do I contact for tech support questions?*
Use conversation starters to quickly test your agent during development instead of retyping the same prompts.
### Knowledge Integration
 Upload documents directly from your computer via drag and drop, or select files from connected integrations like in chat.
### Capabilities
Enable additional tools your agent can use:
Access real-time information from the internet
Analyze data and create visualizations
Create images based on text descriptions
Dedicated editing screen alongside your chat
For detailed information about these capabilities, see our [chat tools guide](/en/_internal/product/chat/plain-model).
By default, agents are created without any capabilities enabled. When building an agent that needs web search (or any other tool), make sure to manually add those capabilities in the agent settings.
### Agent Actions
Upload documents directly from your computer via drag and drop, or select files from connected integrations like in chat.
### Capabilities
Enable additional tools your agent can use:
Access real-time information from the internet
Analyze data and create visualizations
Create images based on text descriptions
Dedicated editing screen alongside your chat
For detailed information about these capabilities, see our [chat tools guide](/en/_internal/product/chat/plain-model).
By default, agents are created without any capabilities enabled. When building an agent that needs web search (or any other tool), make sure to manually add those capabilities in the agent settings.
### Agent Actions
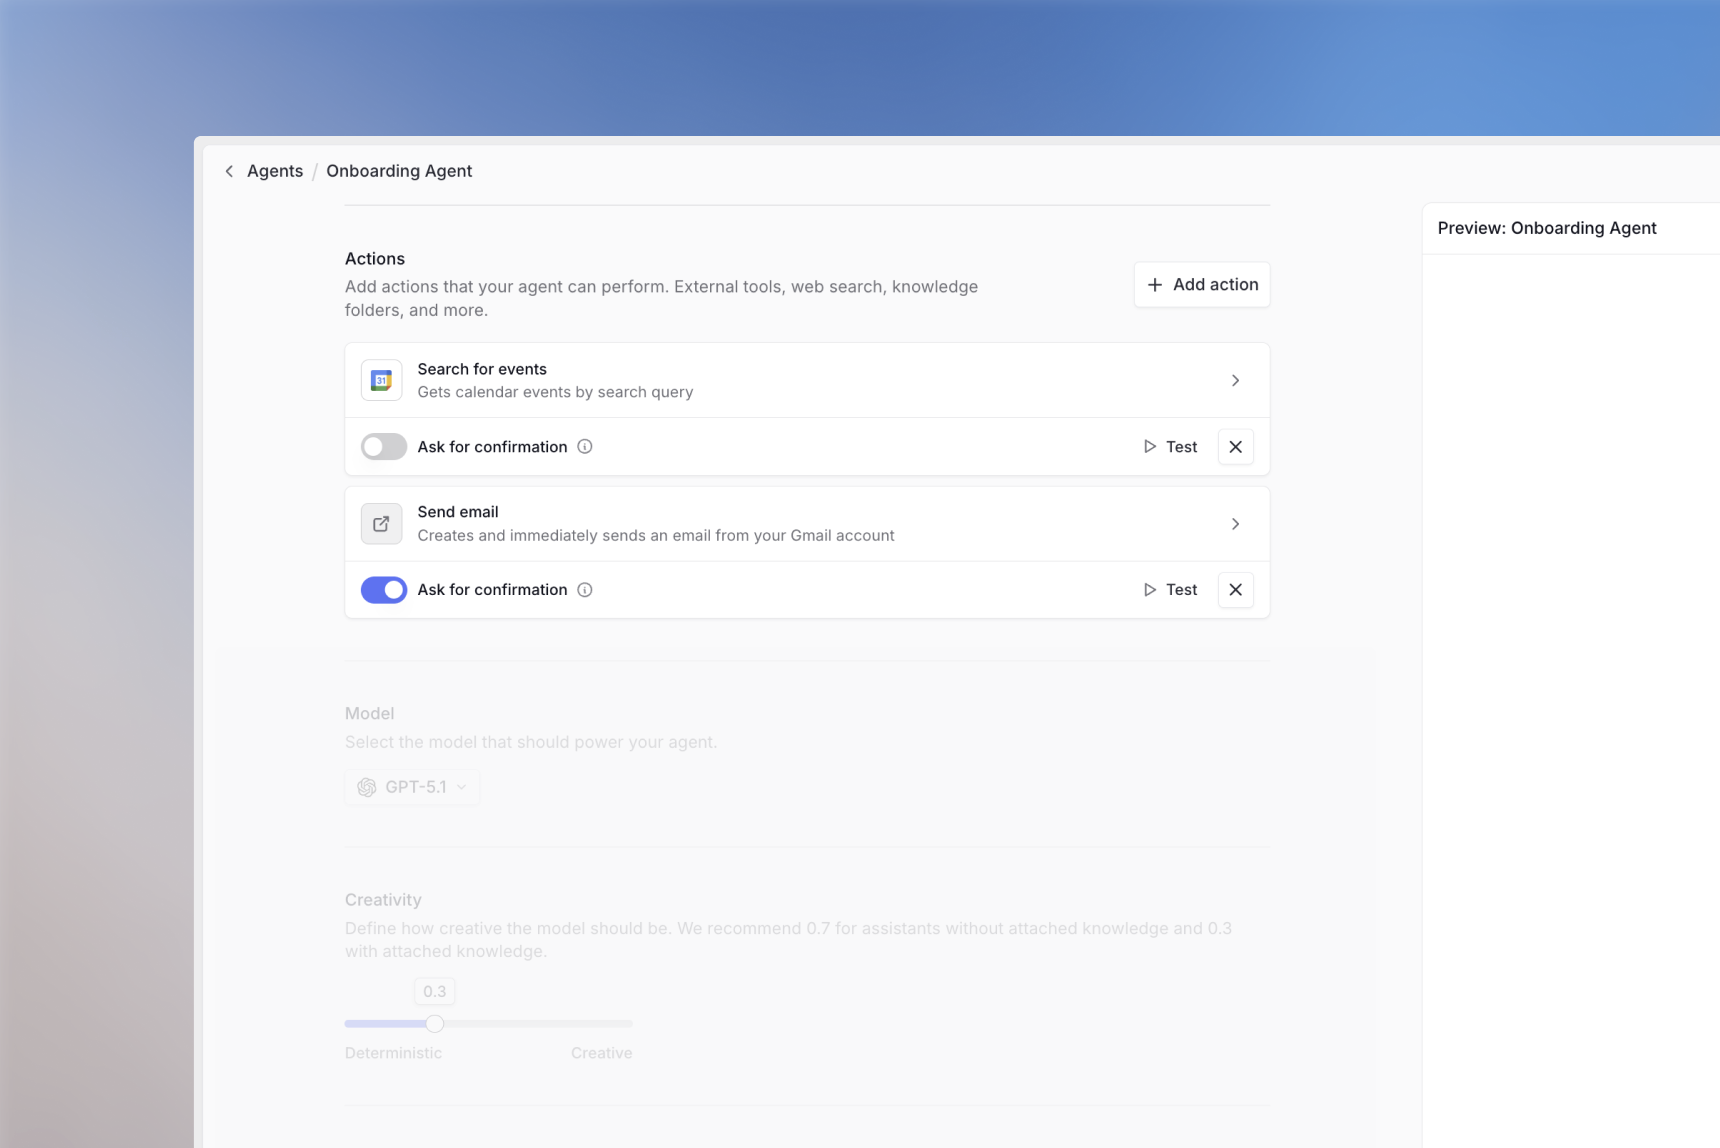 Actions enable your agent to interact with external tools and APIs. They can:
* Retrieve information from other systems
* Update, delete, or create entries in external tools
* Automate workflows across platforms
Learn more about setting up actions in our [integrations guide](/en/using-langdock/guides/integrations/using-integrations).
### Model Selection & Creativity
Actions enable your agent to interact with external tools and APIs. They can:
* Retrieve information from other systems
* Update, delete, or create entries in external tools
* Automate workflows across platforms
Learn more about setting up actions in our [integrations guide](/en/using-langdock/guides/integrations/using-integrations).
### Model Selection & Creativity
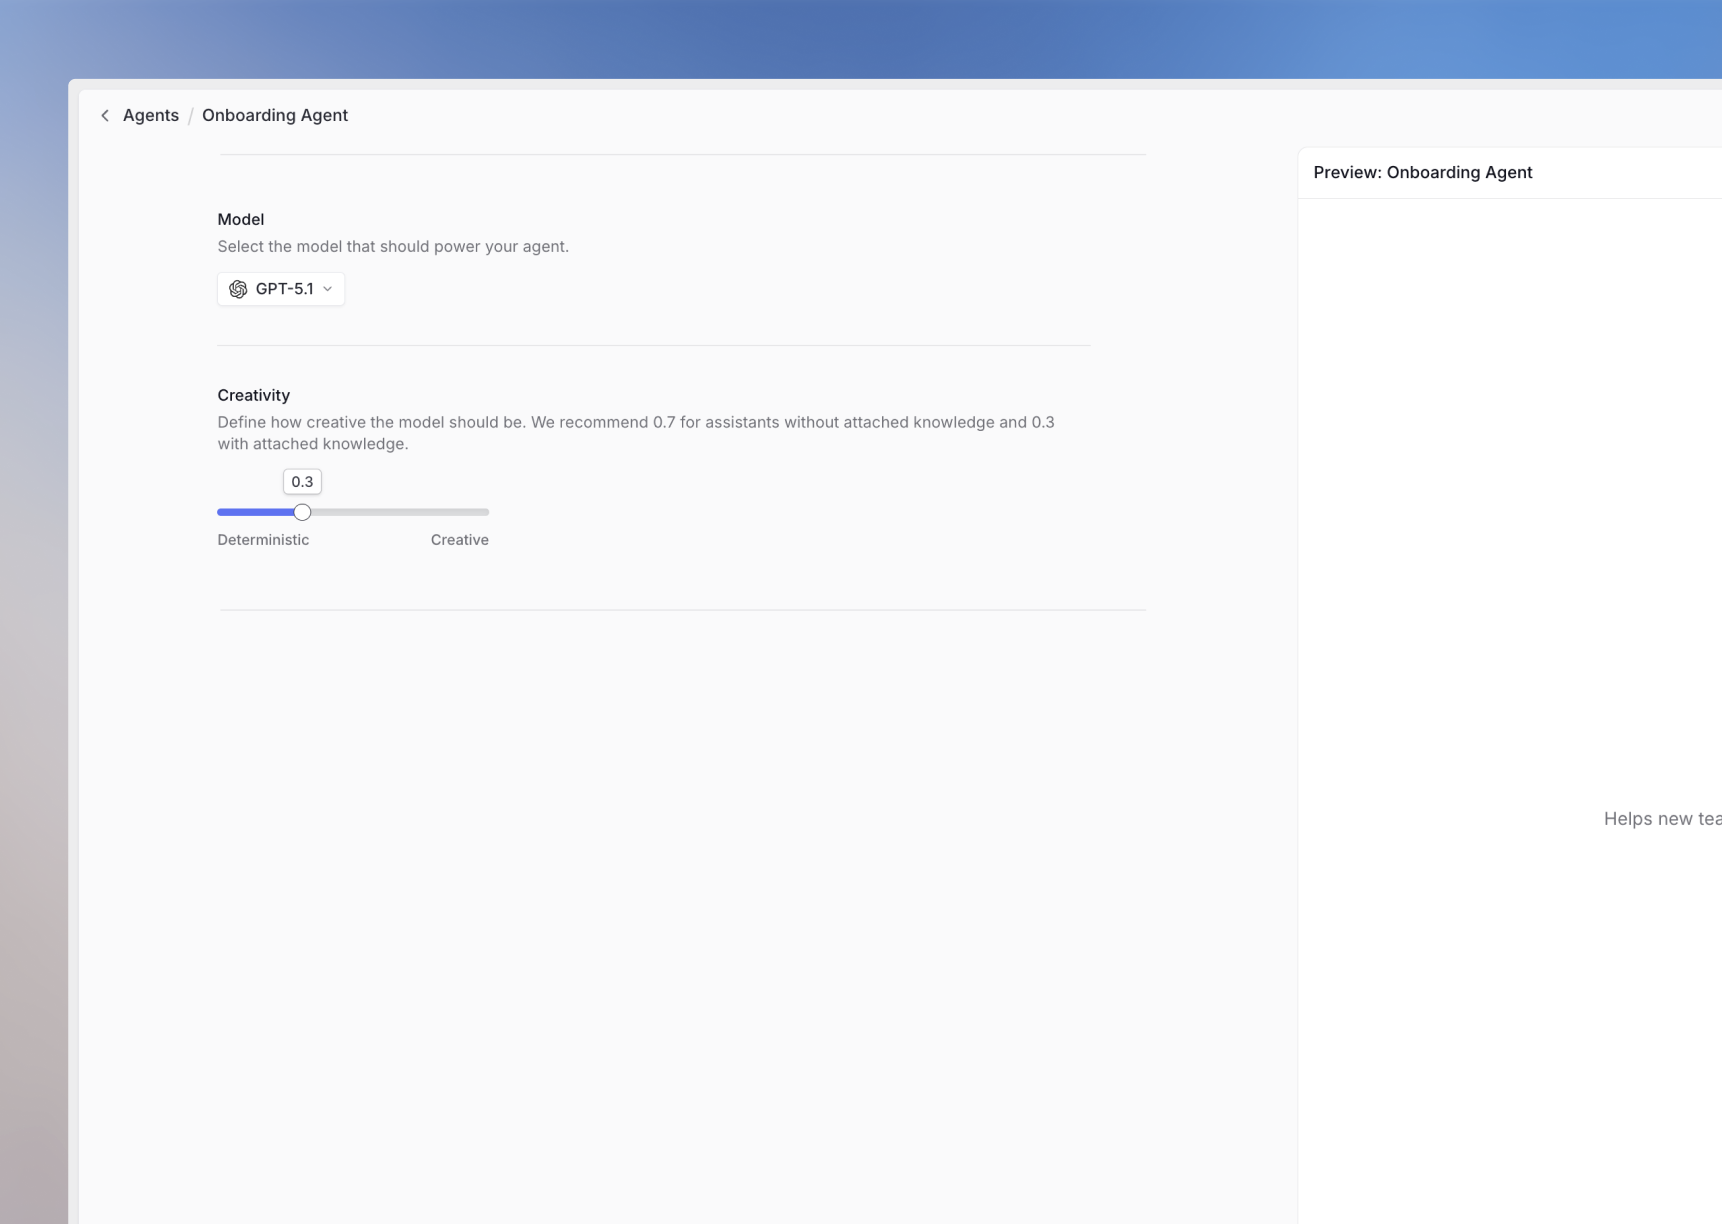 Choose the AI model that best fits your use case:
See our [models page](https://langdock.com/models) to choose the best model for your use case.
### Creativity (Temperature)
Adjust the creativity level to control response variability:
* **Lower creativity**: More focused, consistent responses
* **Higher creativity**: More varied, creative responses
## Testing and Iteration
Choose the AI model that best fits your use case:
See our [models page](https://langdock.com/models) to choose the best model for your use case.
### Creativity (Temperature)
Adjust the creativity level to control response variability:
* **Lower creativity**: More focused, consistent responses
* **Higher creativity**: More varied, creative responses
## Testing and Iteration
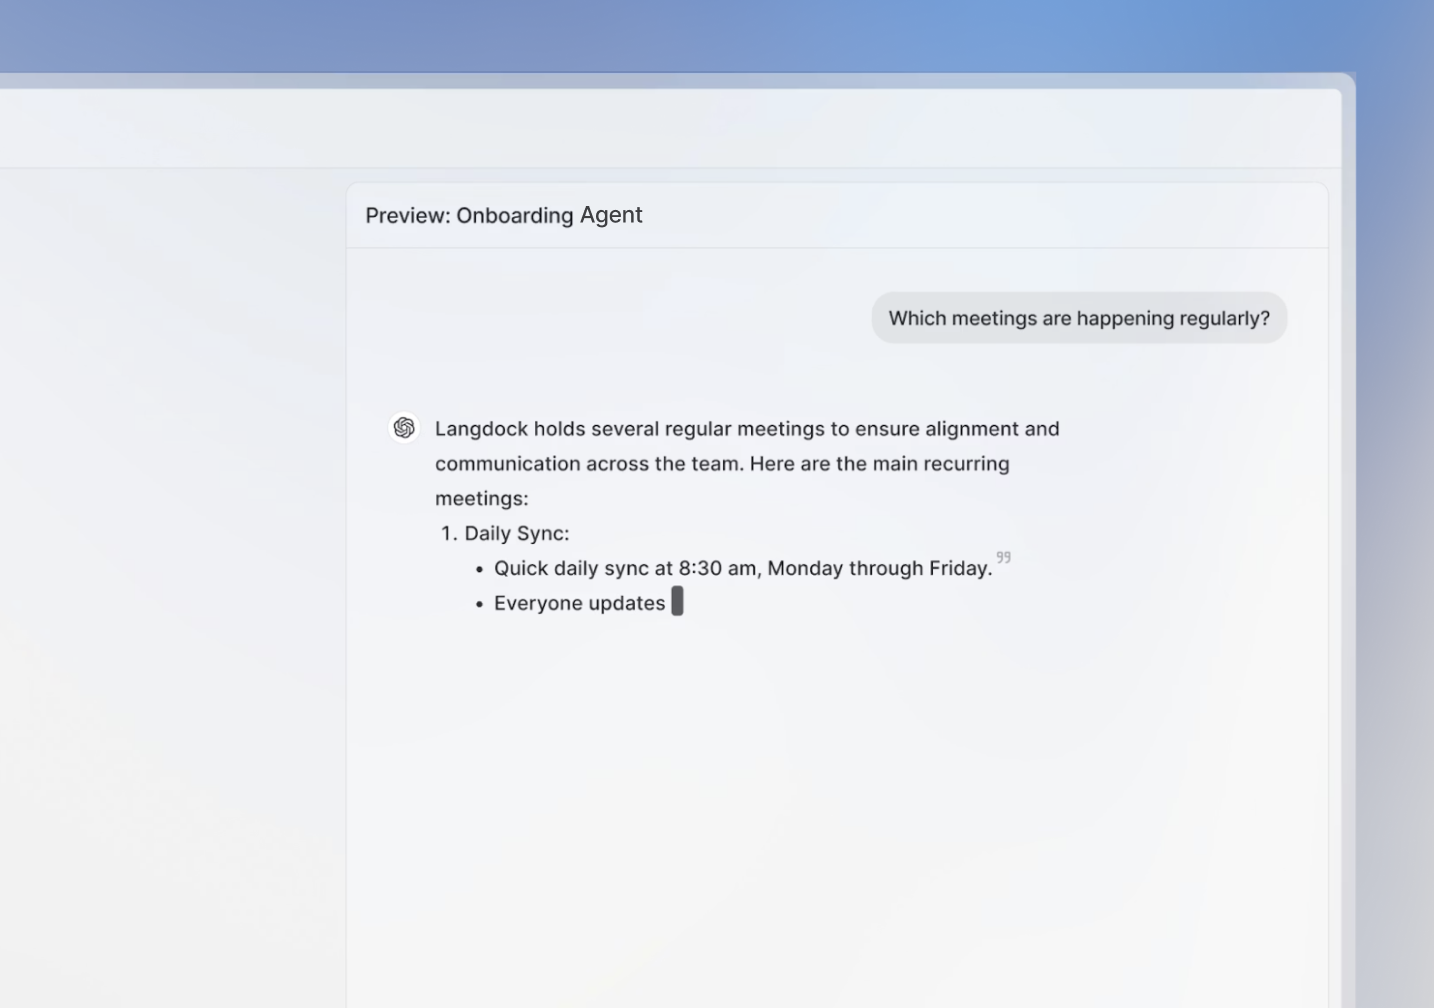 Always test your agent thoroughly before sharing it with others. Try different scenarios, edge cases, and intentionally leave out information to test the agent's ability to ask clarifying questions.
Use the testing panel on the right side of the Agent Builder to:
* Test different conversation flows
* Verify the agent asks for missing information
* Ensure output format consistency
* Check response quality across various inputs
## Sharing Your Agent
Always test your agent thoroughly before sharing it with others. Try different scenarios, edge cases, and intentionally leave out information to test the agent's ability to ask clarifying questions.
Use the testing panel on the right side of the Agent Builder to:
* Test different conversation flows
* Verify the agent asks for missing information
* Ensure output format consistency
* Check response quality across various inputs
## Sharing Your Agent
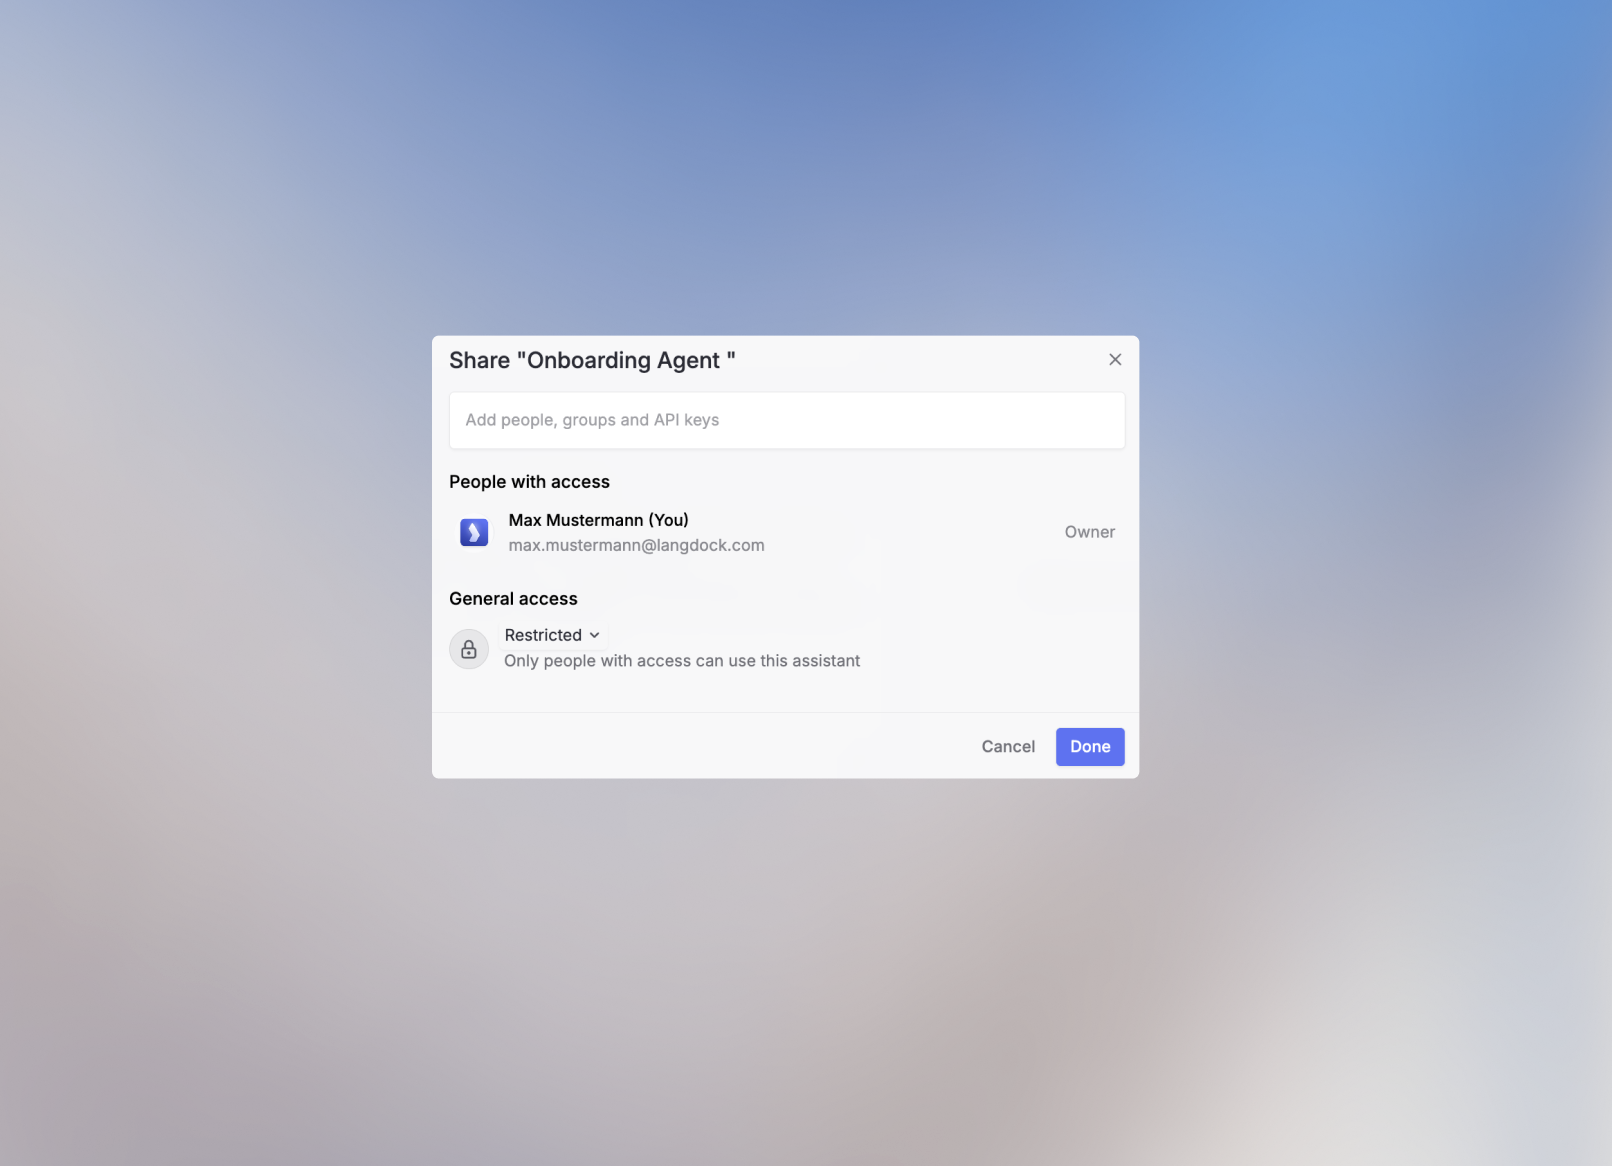 Click the **Share** button in the upper right corner to control access:
Sharing options might be restricted in your workspace based on your admin's security settings.
Share with your entire workspace for broad access.
Copy a direct link to share with specific people.
Grant access to specific groups or individuals with either:
* **User access**: Can use the agent
* **Editor access**: Can modify the agent configuration
Use the agent configuration to:
* **Duplicate**: Create a copy for experimentation
* **Delete**: Remove the agent
* **Analytics and Feedback**: View usage data and user feedback
## Best Practices
**Monitor Usage**: Use Analytics and Feedback to understand how your agent is being used and identify areas for improvement. Learn more in [Agent Usage Insights](/en/using-langdock/agents/usage-insights).
### Iterative Improvement
1. **Start Simple**: Begin with basic functionality and add complexity gradually
2. **Test Extensively**: Try various scenarios and edge cases
3. **Gather Feedback**: Monitor usage insights and collect user feedback
4. **Refine Instructions**: Update based on real-world usage patterns
### Common Pitfalls to Avoid
* **Over-engineering**: Don't try to handle every possible scenario initially
* **Assuming Information**: Always instruct the agent to ask for missing details
* **Ignoring Edge Cases**: Test what happens when users provide incomplete information
## Next Steps
Now that you've created your agent, consider:
* [Setting up integrations](/en/using-langdock/integrations/introduction) to connect with your existing tools
* [Creating prompt templates](/en/using-langdock/chat/prompt-library) for common use cases
Explore ready-to-use agent templates for common business use cases
Master the art of writing effective prompts and instructions
Click the **Share** button in the upper right corner to control access:
Sharing options might be restricted in your workspace based on your admin's security settings.
Share with your entire workspace for broad access.
Copy a direct link to share with specific people.
Grant access to specific groups or individuals with either:
* **User access**: Can use the agent
* **Editor access**: Can modify the agent configuration
Use the agent configuration to:
* **Duplicate**: Create a copy for experimentation
* **Delete**: Remove the agent
* **Analytics and Feedback**: View usage data and user feedback
## Best Practices
**Monitor Usage**: Use Analytics and Feedback to understand how your agent is being used and identify areas for improvement. Learn more in [Agent Usage Insights](/en/using-langdock/agents/usage-insights).
### Iterative Improvement
1. **Start Simple**: Begin with basic functionality and add complexity gradually
2. **Test Extensively**: Try various scenarios and edge cases
3. **Gather Feedback**: Monitor usage insights and collect user feedback
4. **Refine Instructions**: Update based on real-world usage patterns
### Common Pitfalls to Avoid
* **Over-engineering**: Don't try to handle every possible scenario initially
* **Assuming Information**: Always instruct the agent to ask for missing details
* **Ignoring Edge Cases**: Test what happens when users provide incomplete information
## Next Steps
Now that you've created your agent, consider:
* [Setting up integrations](/en/using-langdock/integrations/introduction) to connect with your existing tools
* [Creating prompt templates](/en/using-langdock/chat/prompt-library) for common use cases
Explore ready-to-use agent templates for common business use cases
Master the art of writing effective prompts and instructions