> ## Documentation Index
> Fetch the complete documentation index at: https://docs.langdock.com/llms.txt
> Use this file to discover all available pages before exploring further.
# Shared Teams Channel
> Set up a shared Microsoft Teams channel with Langdock for direct communication, fast support, and product updates.
Shared Teams channels give your team direct access to Langdock for questions, feedback, and use case discussions. We also use these channels to share product updates and announcements.
Shared channels are available for enterprise customers. Contact your Langdock account manager to get started.
We use **B2B direct connect** as it's the most user-friendly and secure method, utilizing Microsoft Entra and exchanging tenant IDs.
## Step 1: Enable Required Permissions in Teams
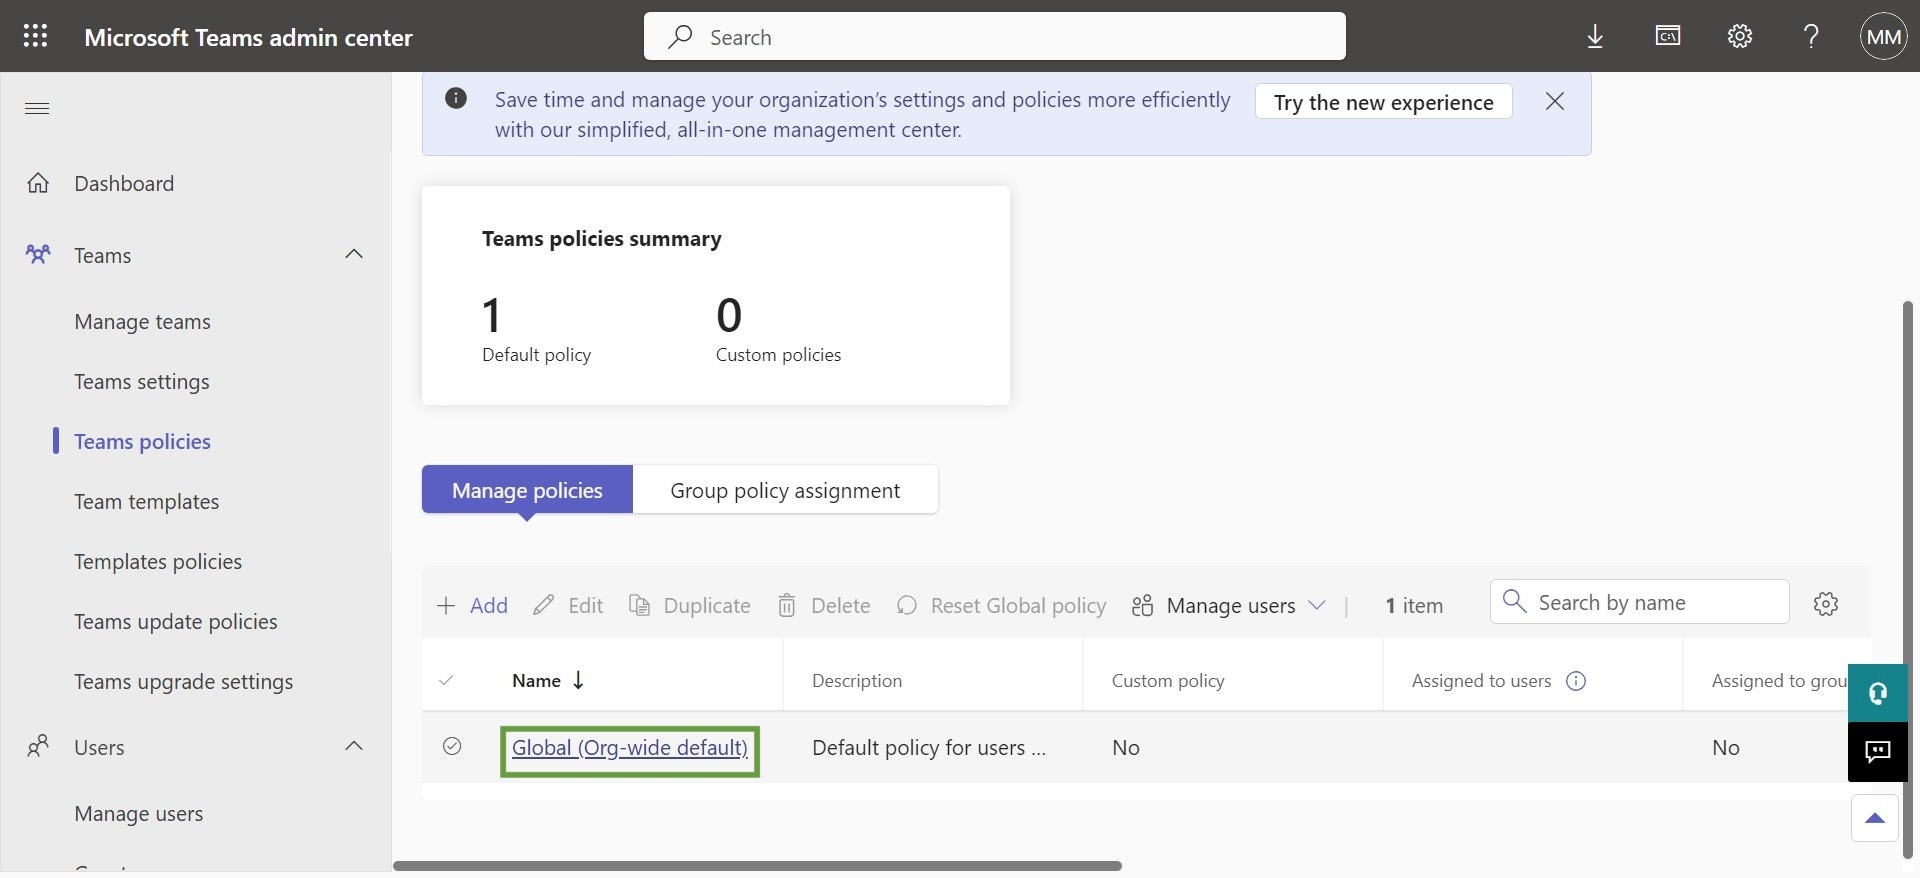
1. Navigate to the [Microsoft Teams Admin Center](https://admin.teams.microsoft.com/policies/channels).
2. Click **Global (Org-wide default)**
 3. Ensure that **Join external shared channels** is activated. If you changed your settings, click **Apply**
 Please verify that the langdock.com organization is not blocked. If you use a whitelist, [langdock.com](https://www.langdock.com) should be on the whitelist. If you use a blacklist, it should not be on the blacklist.
## Step 2: Configure B2B Direct Connect in Microsoft Entra
You need admin permissions in Microsoft Entra (formerly Azure AD) to complete this setup.
We follow the [Microsoft B2B direct connect guide](https://learn.microsoft.com/en-us/microsoft-365/solutions/collaborate-teams-direct-connect?view=o365-worldwide#configure-cross-tenant-access-settings-in-microsoft-entra-external-id). You only need to add the Langdock organization and configure outbound settings—inbound settings are not needed since we'll invite you to the channel.
### Add Langdock as an organization
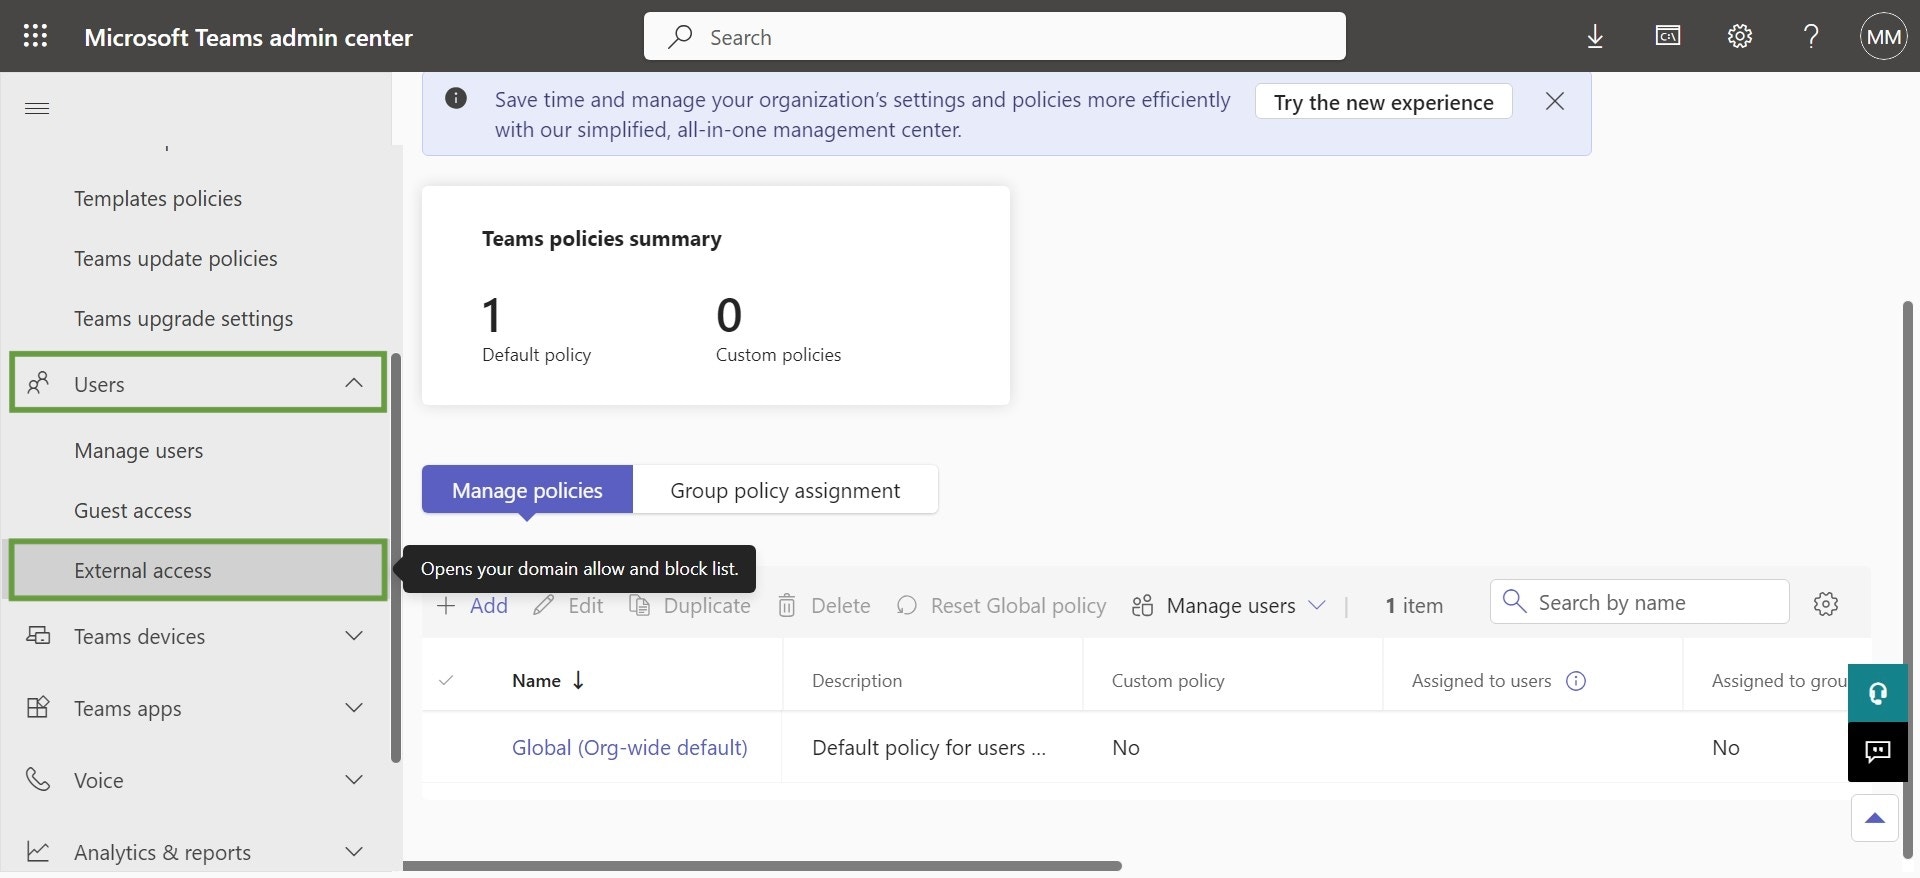
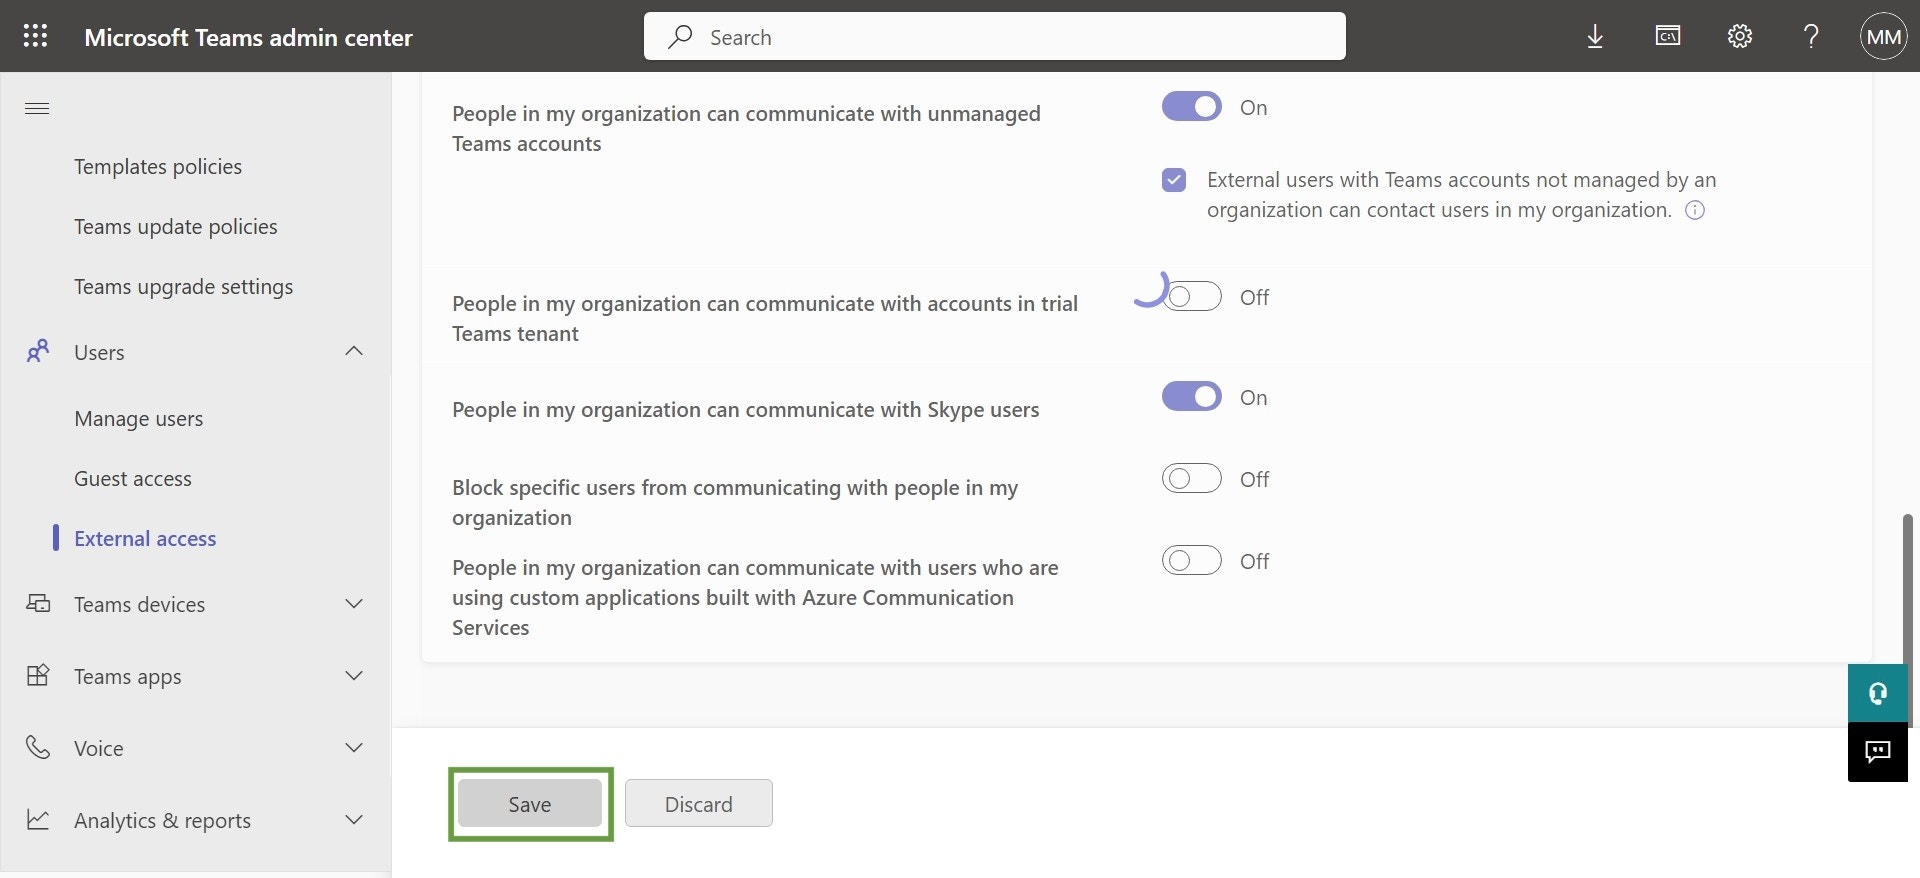
1. Go to **Users** and then to **External access**
Please verify that the langdock.com organization is not blocked. If you use a whitelist, [langdock.com](https://www.langdock.com) should be on the whitelist. If you use a blacklist, it should not be on the blacklist.
## Step 2: Configure B2B Direct Connect in Microsoft Entra
You need admin permissions in Microsoft Entra (formerly Azure AD) to complete this setup.
We follow the [Microsoft B2B direct connect guide](https://learn.microsoft.com/en-us/microsoft-365/solutions/collaborate-teams-direct-connect?view=o365-worldwide#configure-cross-tenant-access-settings-in-microsoft-entra-external-id). You only need to add the Langdock organization and configure outbound settings—inbound settings are not needed since we'll invite you to the channel.
### Add Langdock as an organization
1. Go to **Users** and then to **External access**
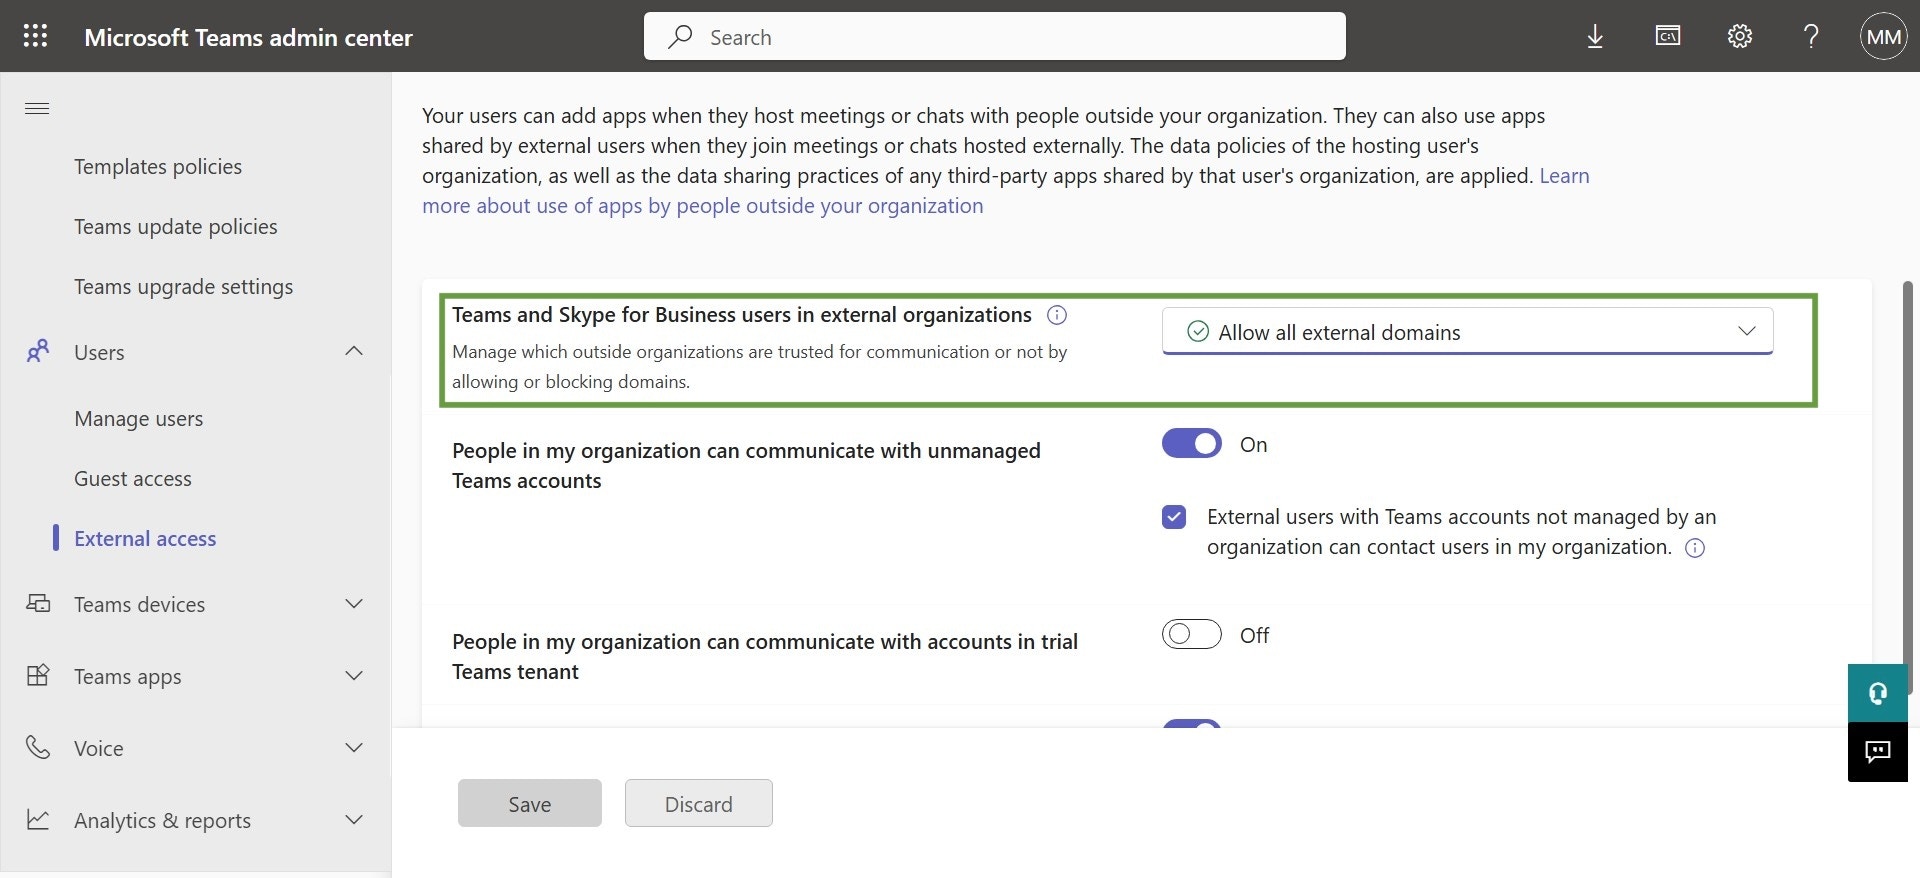
 2. Ensure that **Teams and Skype for Business users in external organizations** is either set to **Allow all external domains** or **Allow only specific external domains**
 3. If you only want to allow specific domains, click **Create a list of external domains that are allowed**. Only the specified external organizations are trusted. All other domains will be blocked.
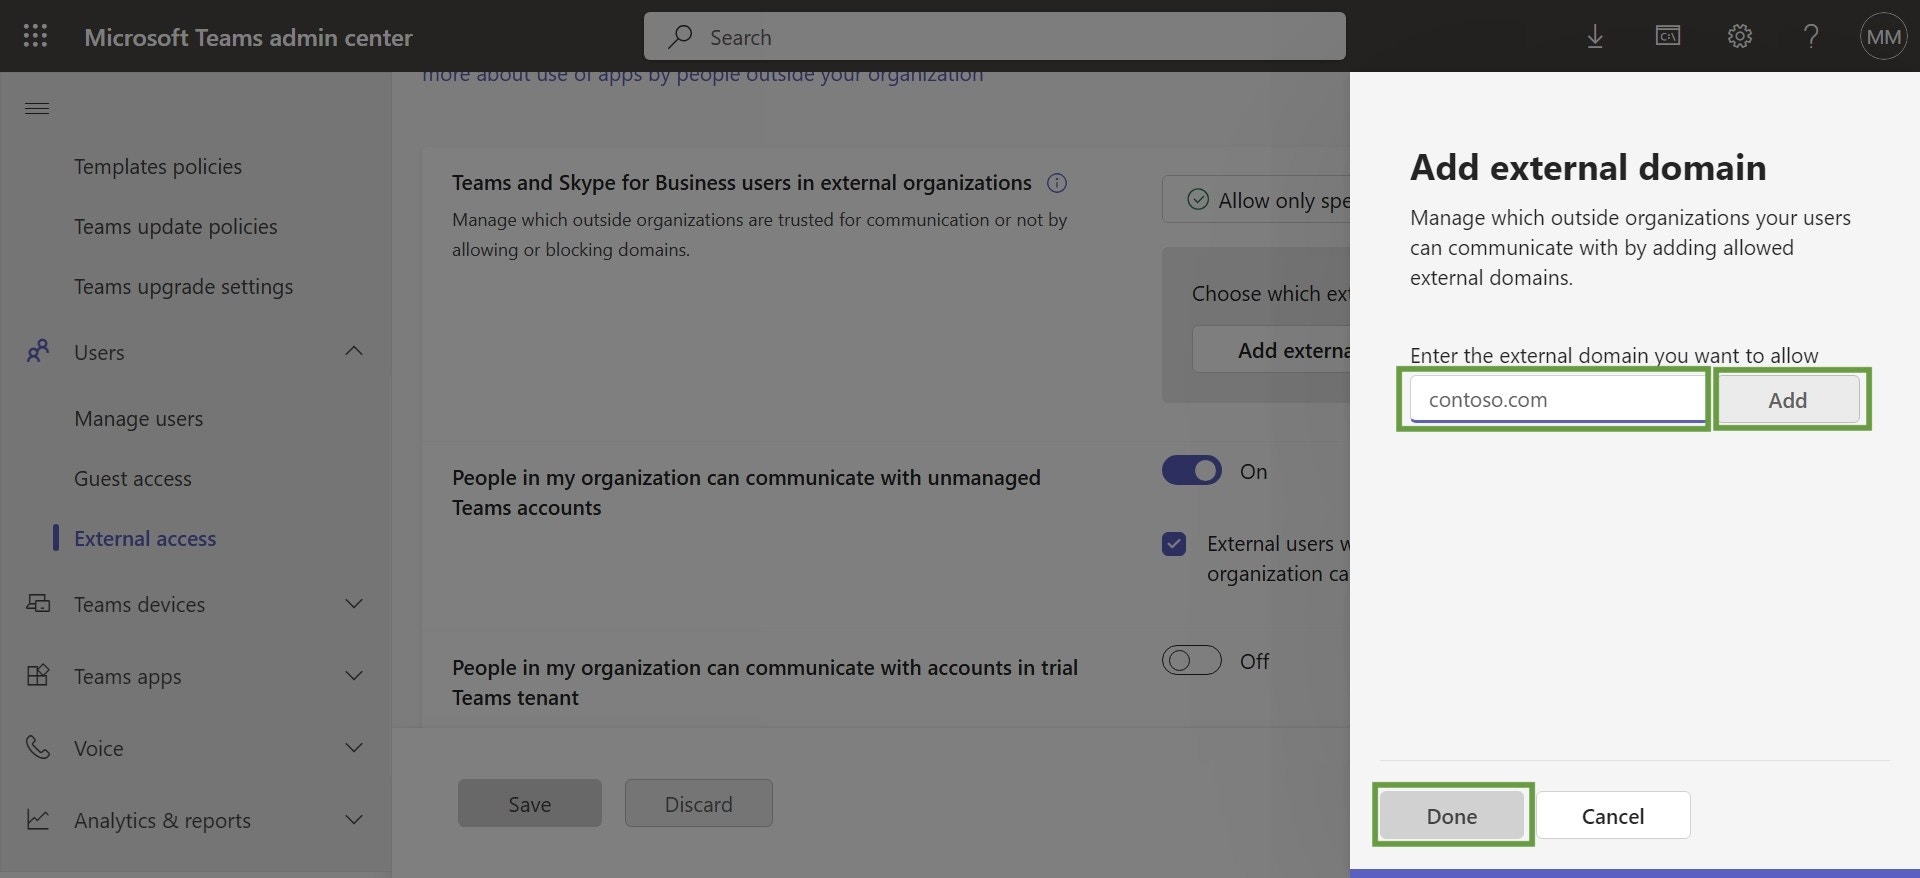
4. Click **Add external domains**
5. Enter [**langdock.com**](https://www.langdock.com) and click **Add**. Then click **Done** to close the sidebar.
3. If you only want to allow specific domains, click **Create a list of external domains that are allowed**. Only the specified external organizations are trusted. All other domains will be blocked.
4. Click **Add external domains**
5. Enter [**langdock.com**](https://www.langdock.com) and click **Add**. Then click **Done** to close the sidebar.
 6. Click **Save**
 ### Configure outbound settings
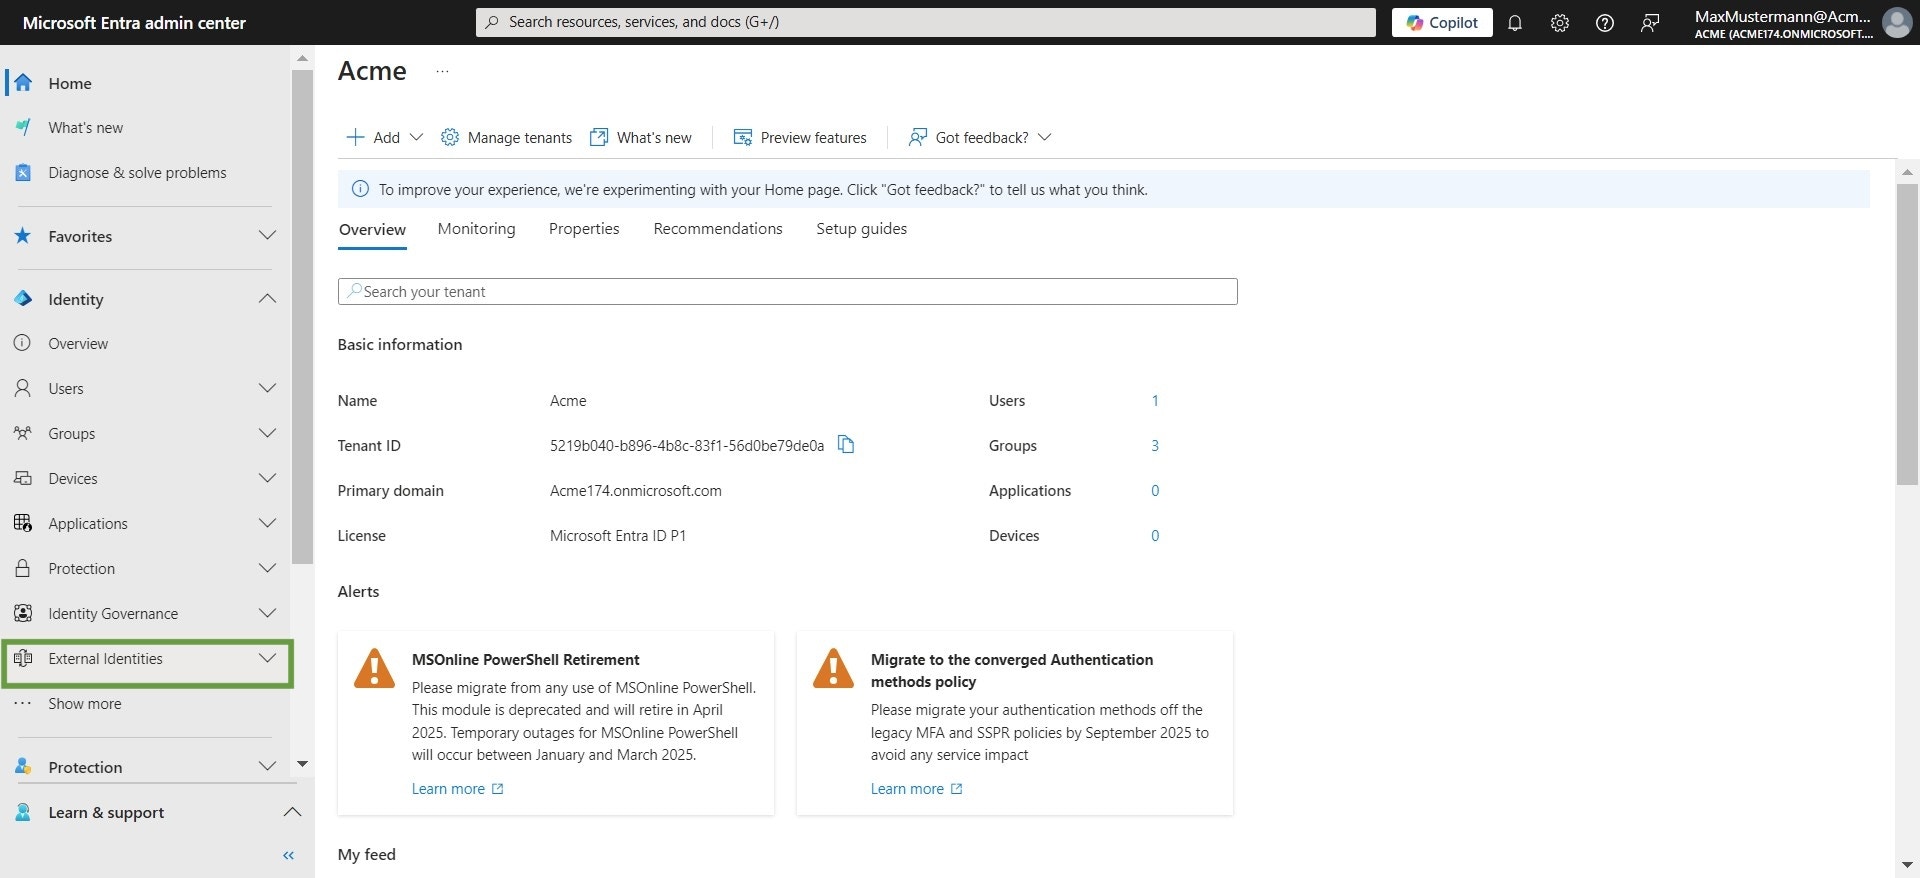
7. In a new tab, navigate to the [Microsoft Entra Admin Center](https://entra.microsoft.com/#home)
8. In the sidebar on the left, click **External Identities**
### Configure outbound settings
7. In a new tab, navigate to the [Microsoft Entra Admin Center](https://entra.microsoft.com/#home)
8. In the sidebar on the left, click **External Identities**
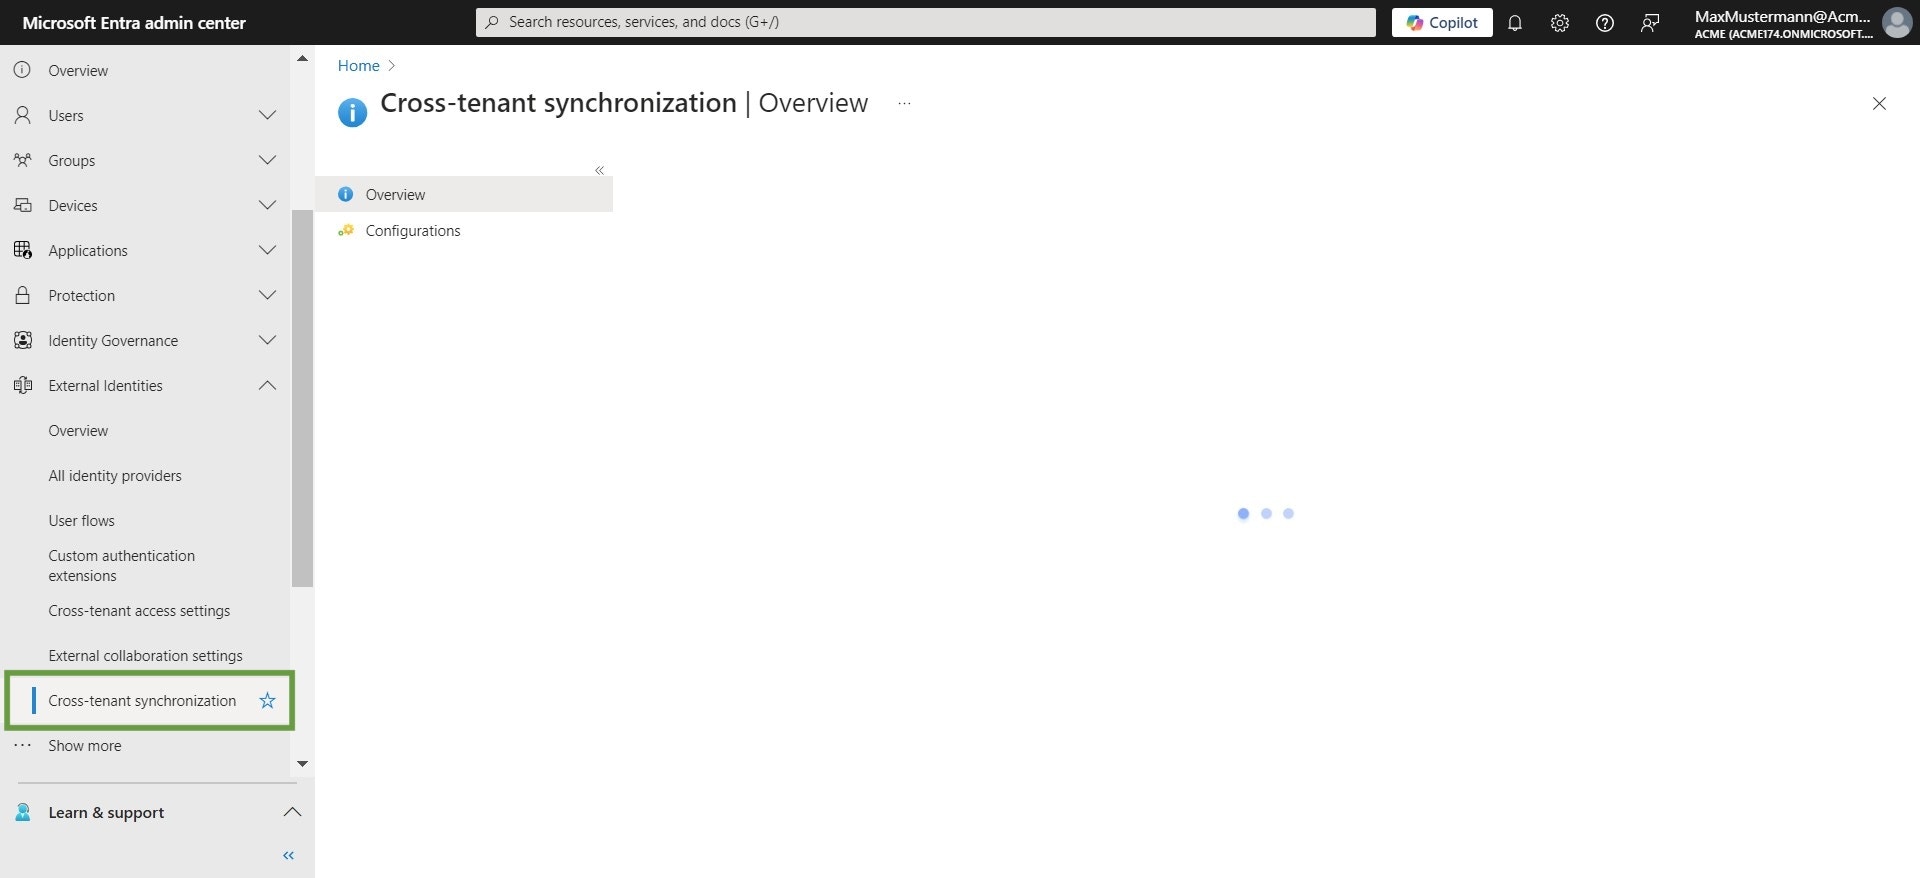
 9. Select **Cross-tenant synchronization**
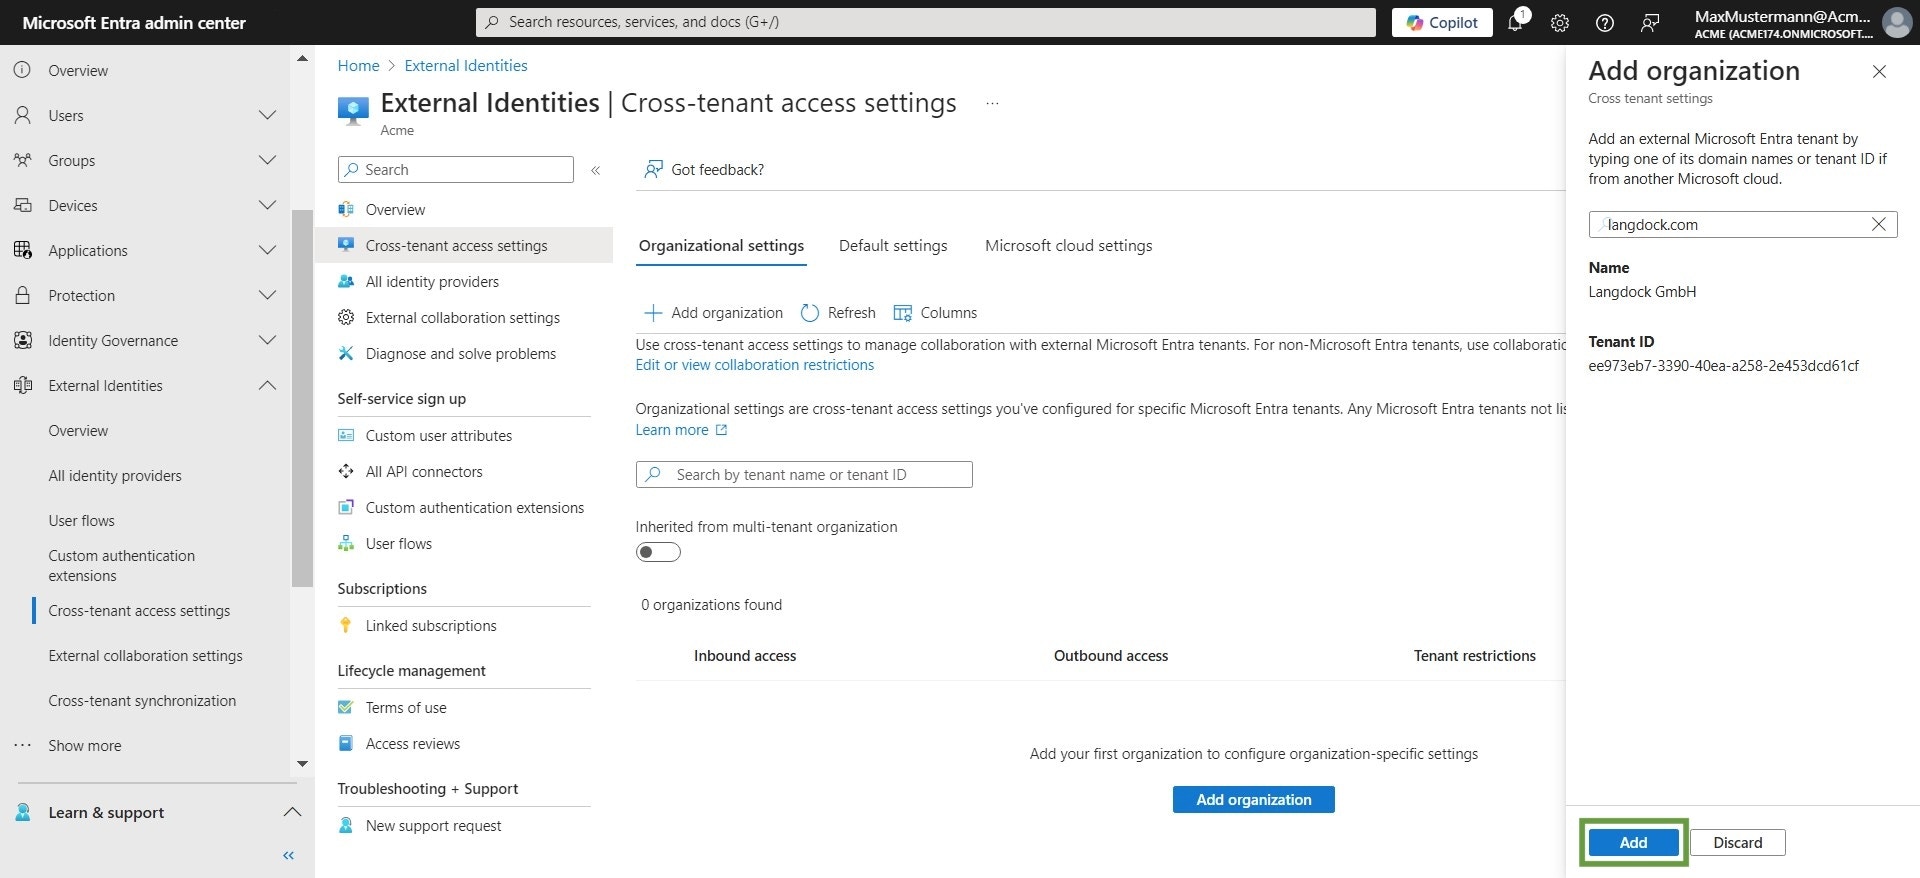
 10. Switch to the **Organizational settings** tab. Then, click **Add organization**
 11. Click the **Tenant ID or domain name** field and enter **langdock.com**
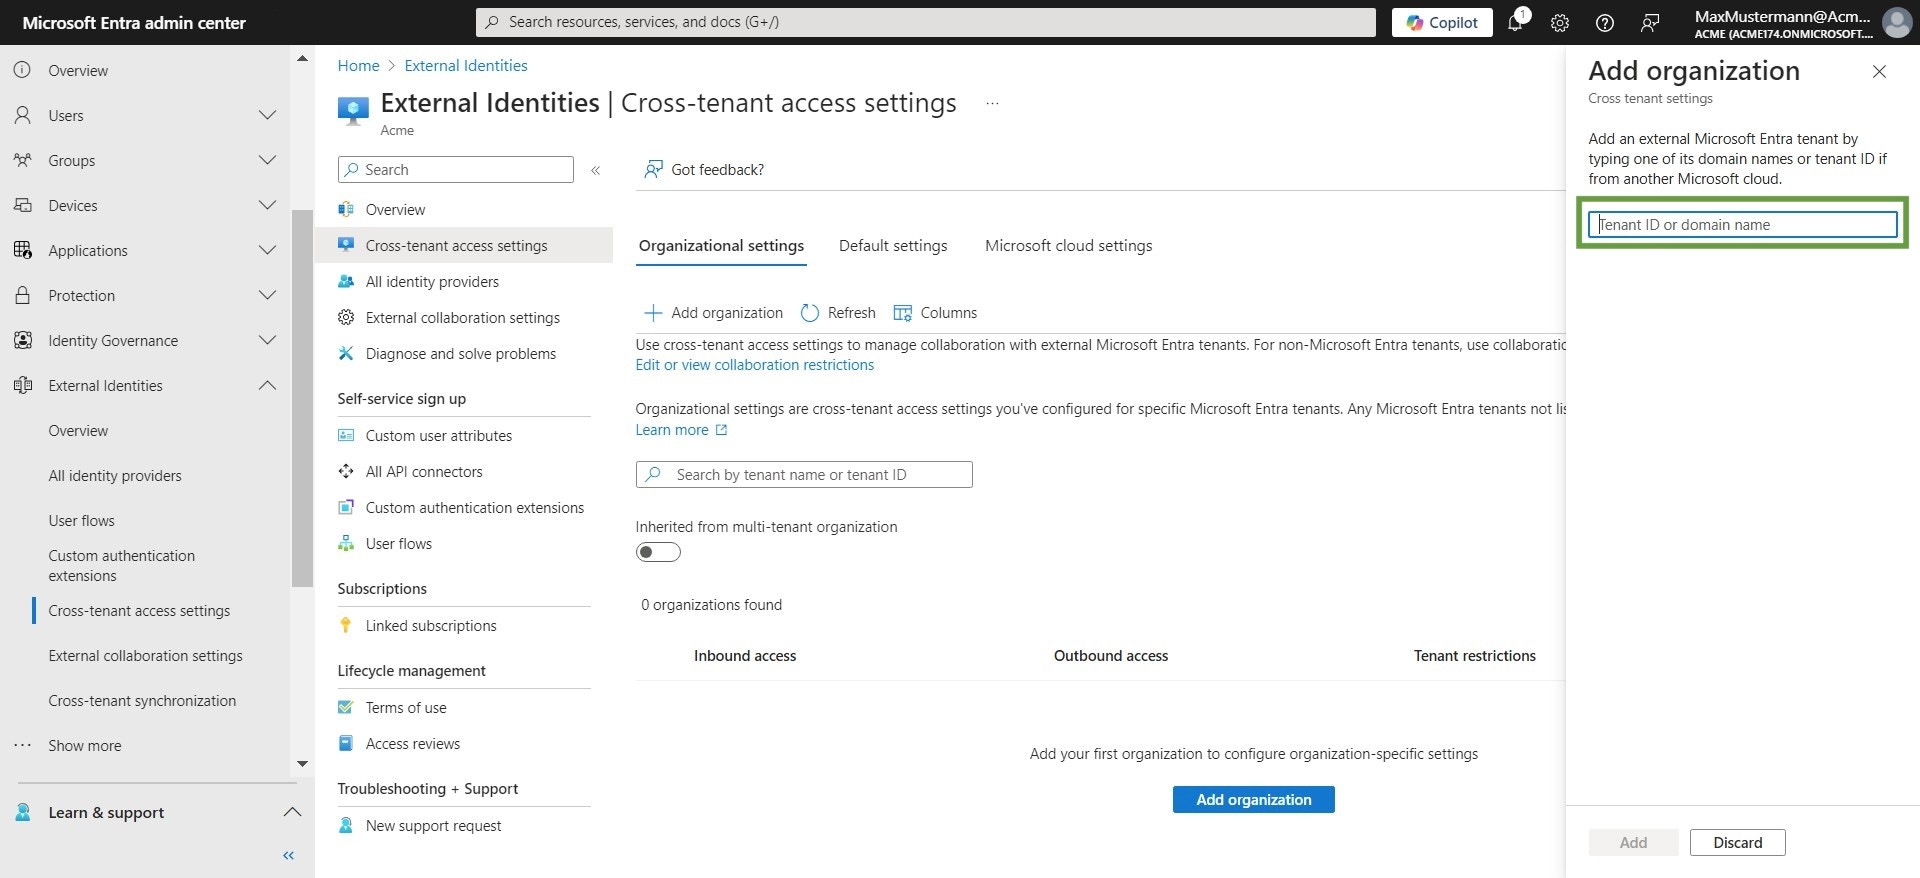 > **Note:** If your setup requires an `onmicrosoft.com` address (e.g. for a Teams Allow-List or IAM process), use `langdock365.onmicrosoft.com` instead.
12. Select **Langdock GmbH** and click **Add**
> **Note:** If your setup requires an `onmicrosoft.com` address (e.g. for a Teams Allow-List or IAM process), use `langdock365.onmicrosoft.com` instead.
12. Select **Langdock GmbH** and click **Add**
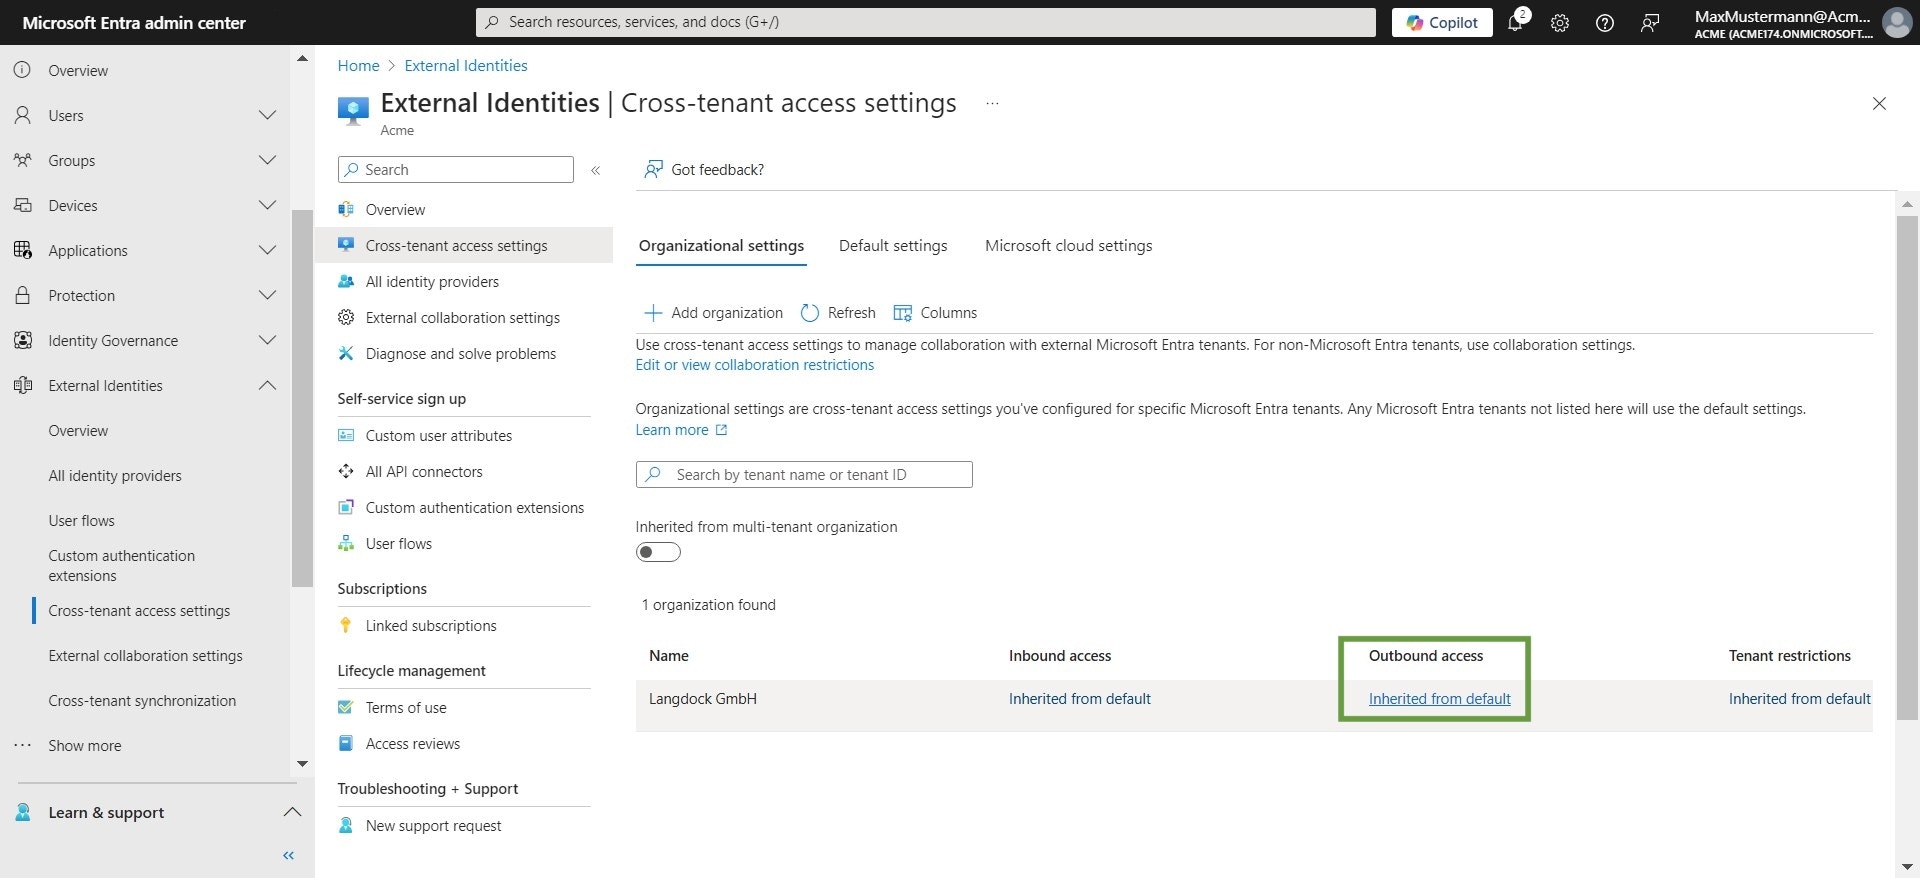
 13. Click **Inherited from default** in the **Outbound access** category for the Langdock organization
 14. Go to the **B2B direct connect** tab
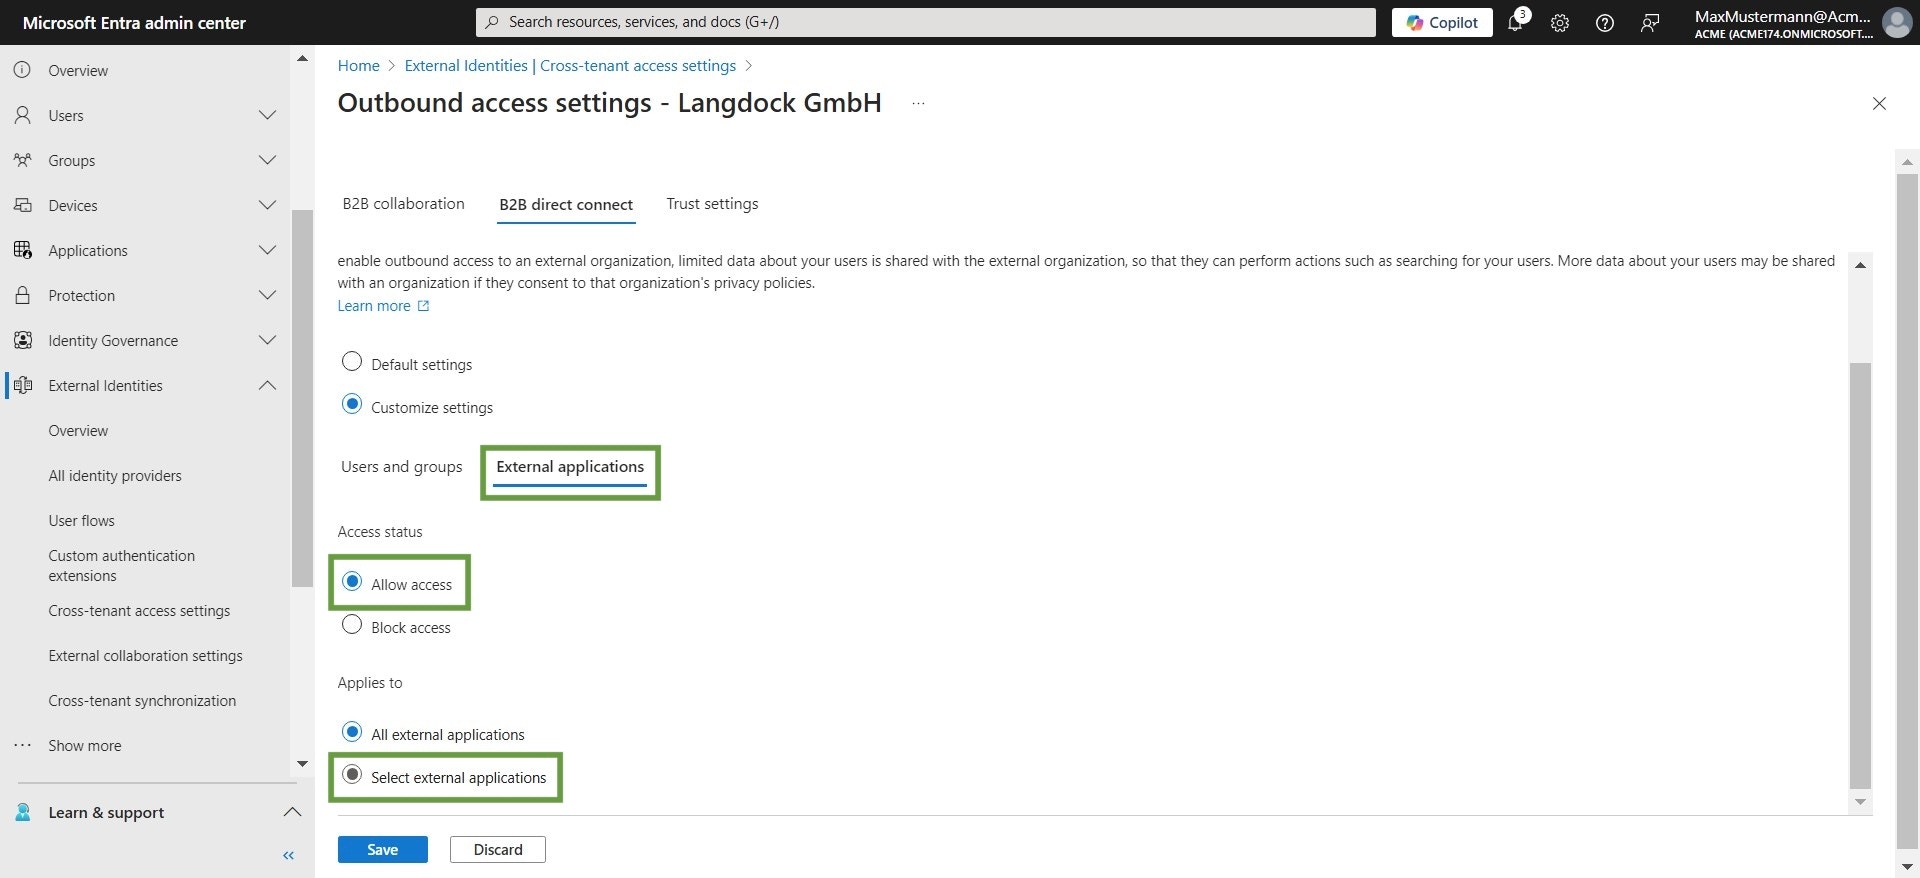
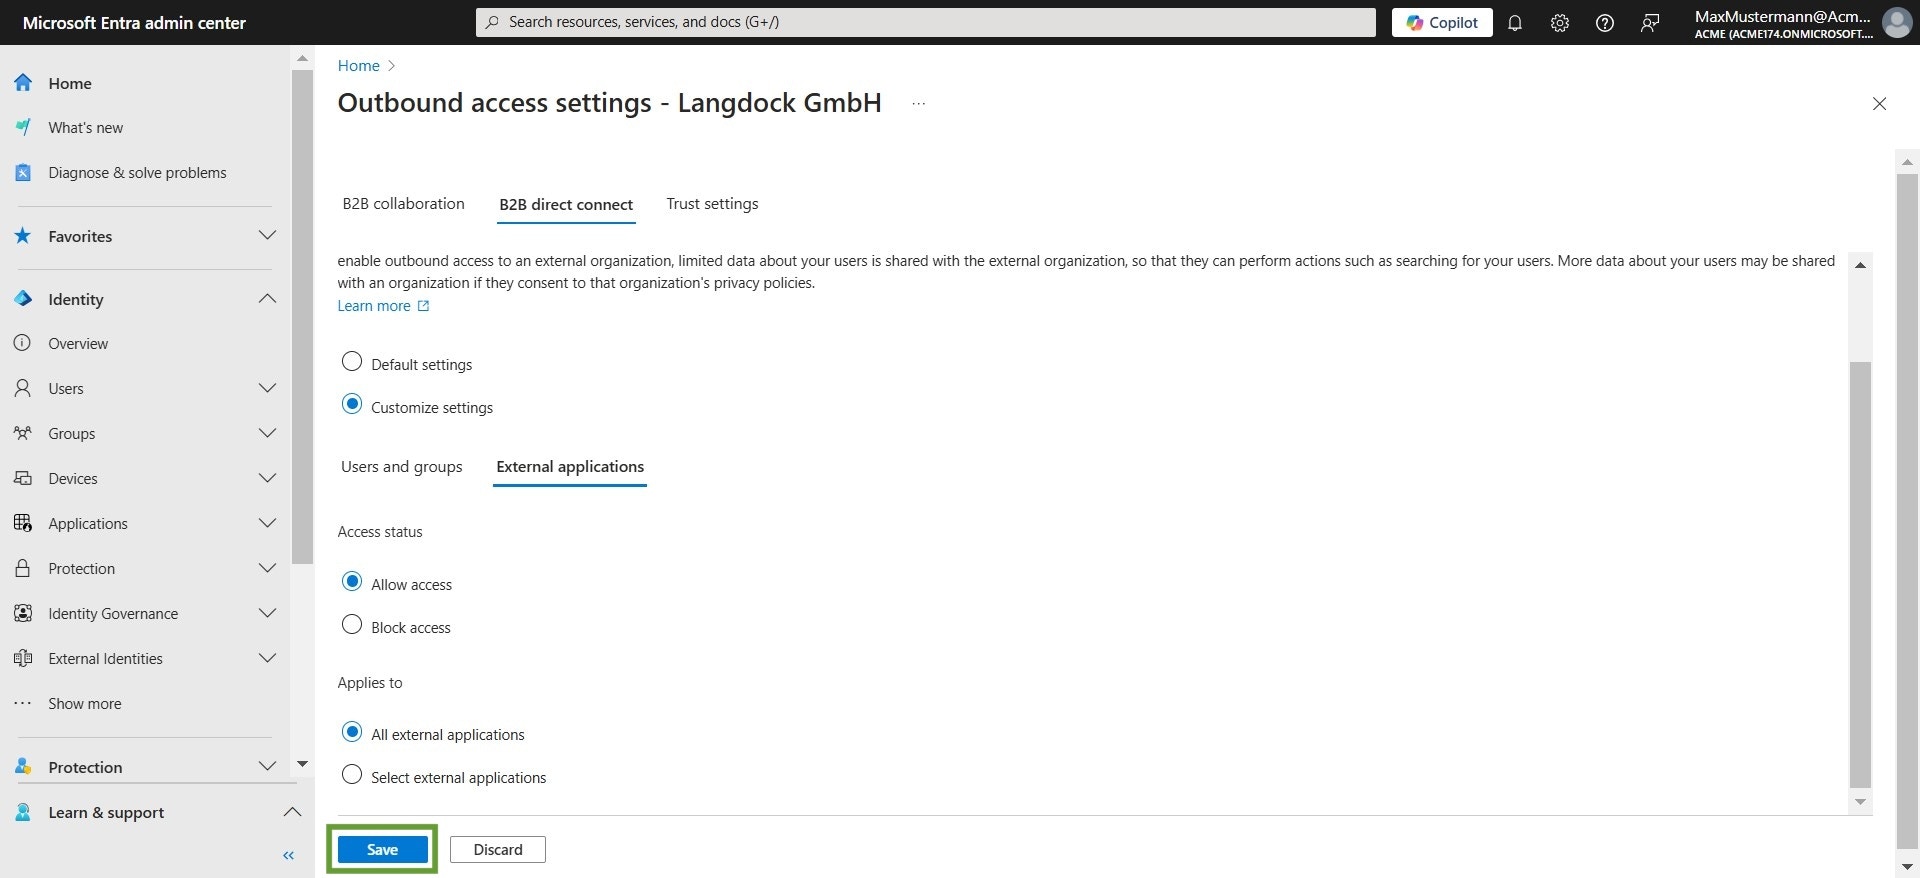
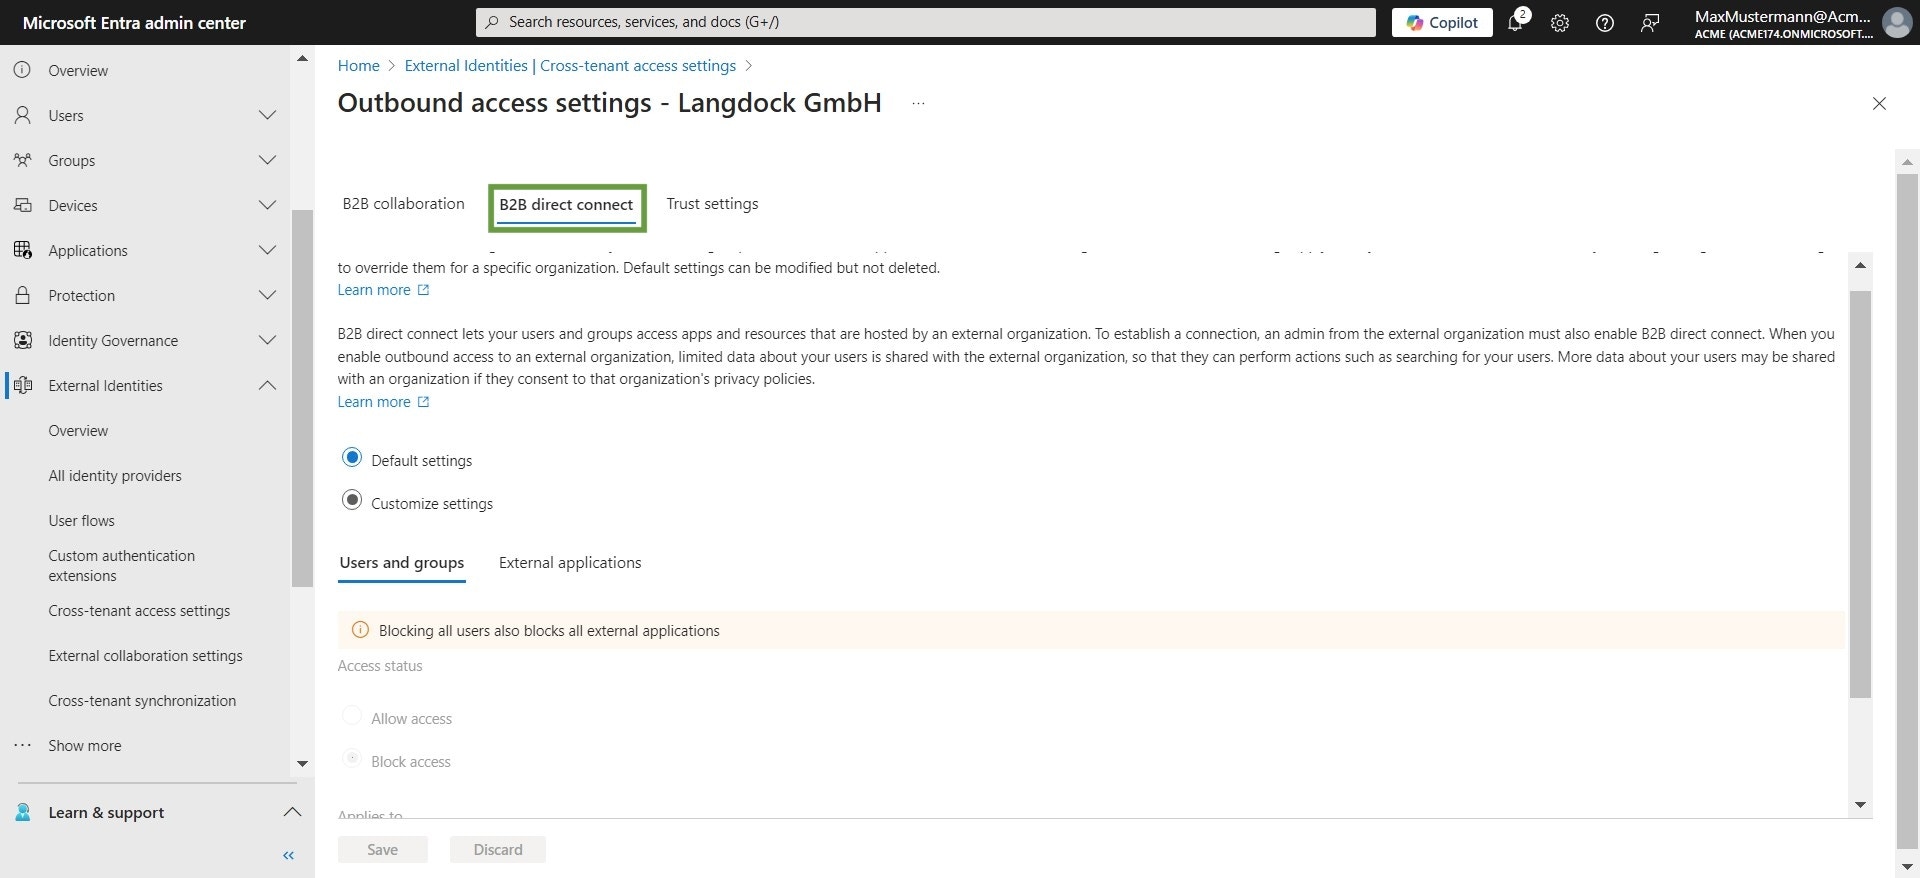 15. Click **Customize settings**
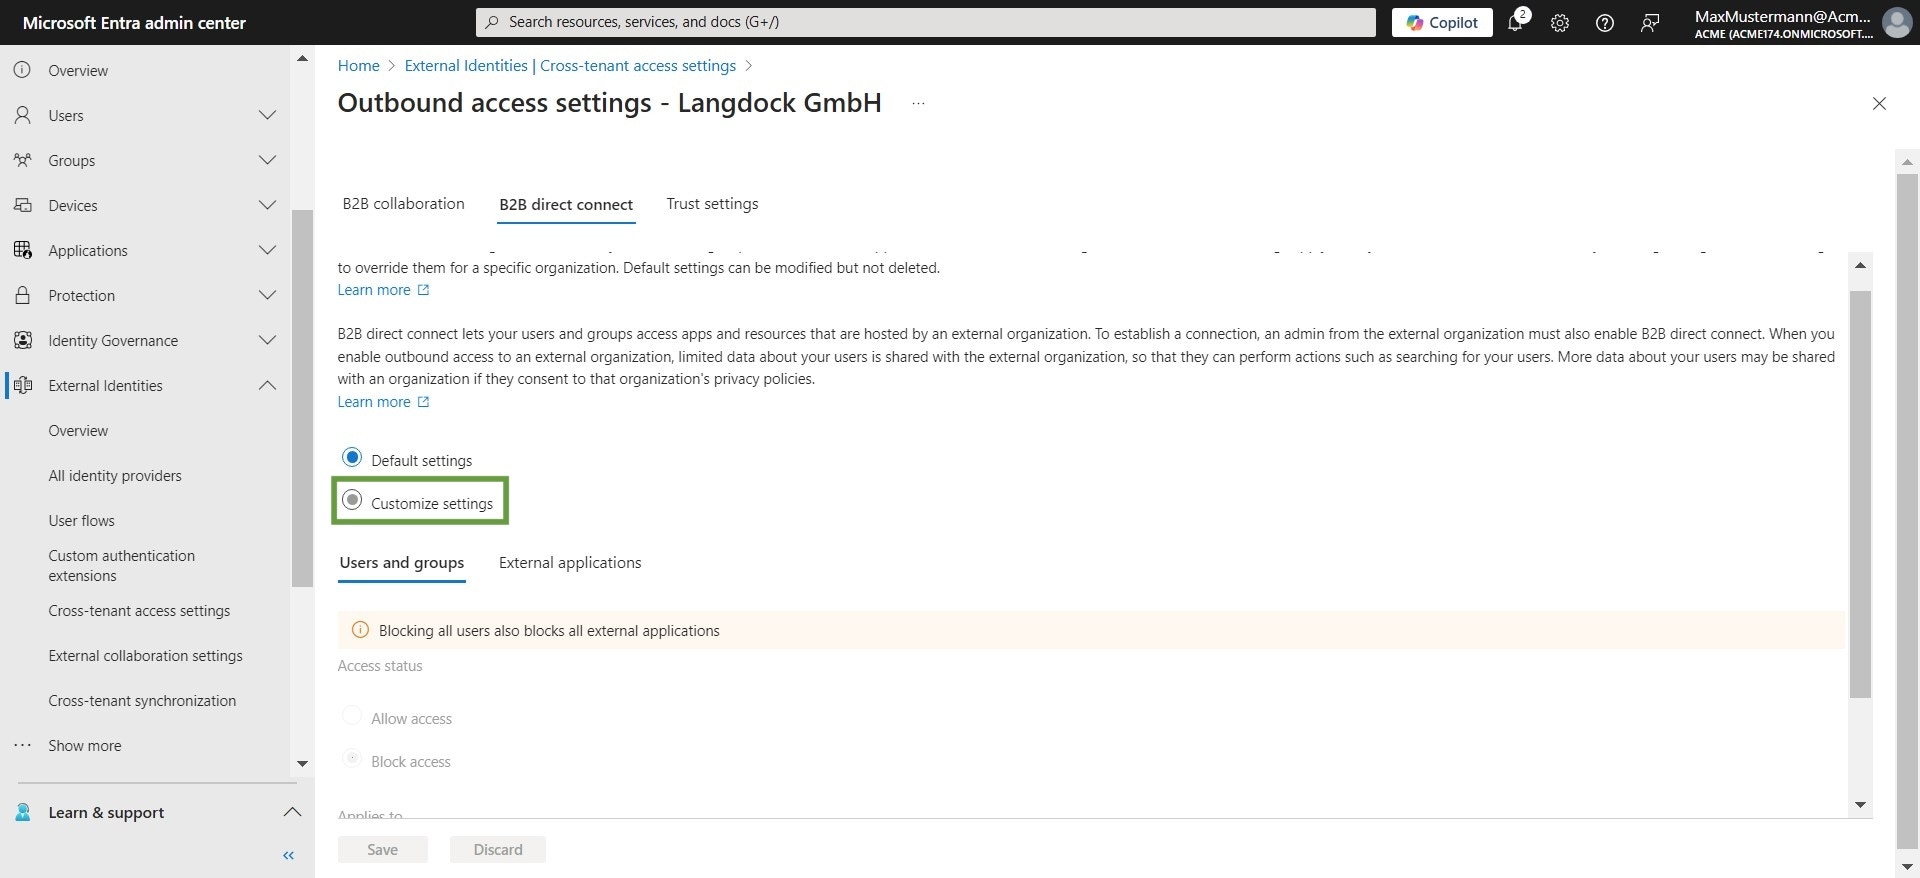 16. For users and groups, click **Allow access** for the access status
 17. Go to the **External applications** tab and select **Allow access** for the access status
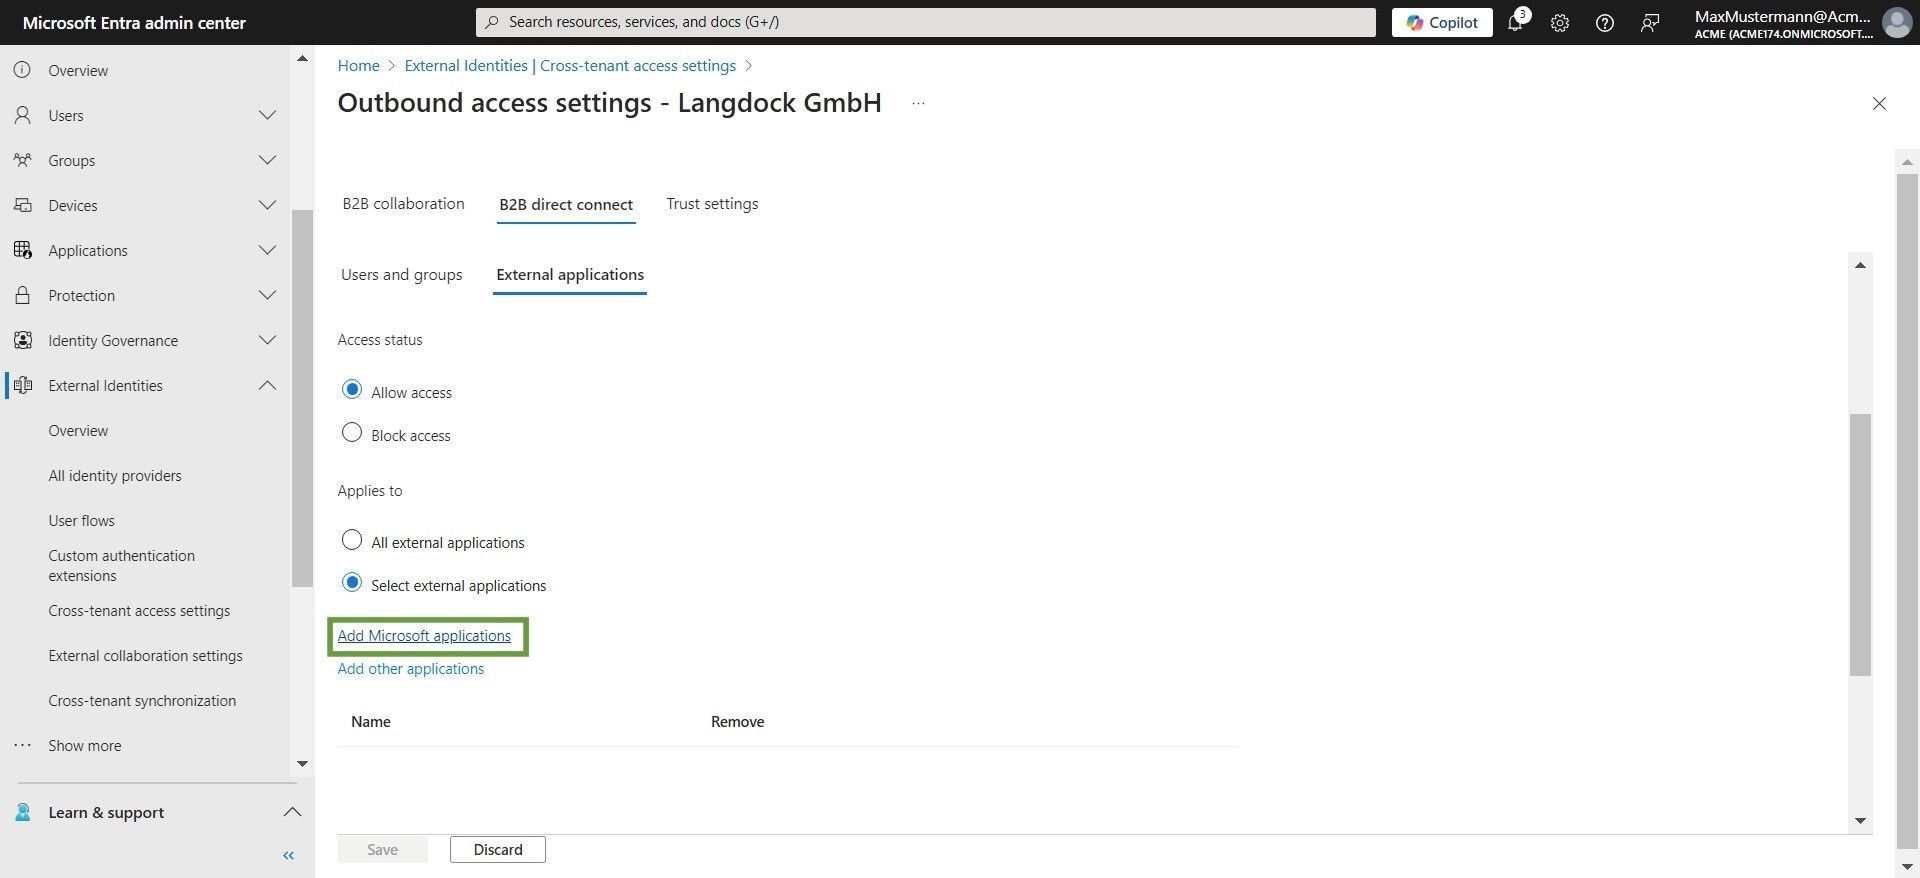
18. Click **Select external applications**
17. Go to the **External applications** tab and select **Allow access** for the access status
18. Click **Select external applications**
 19. Click **Add Microsoft applications**
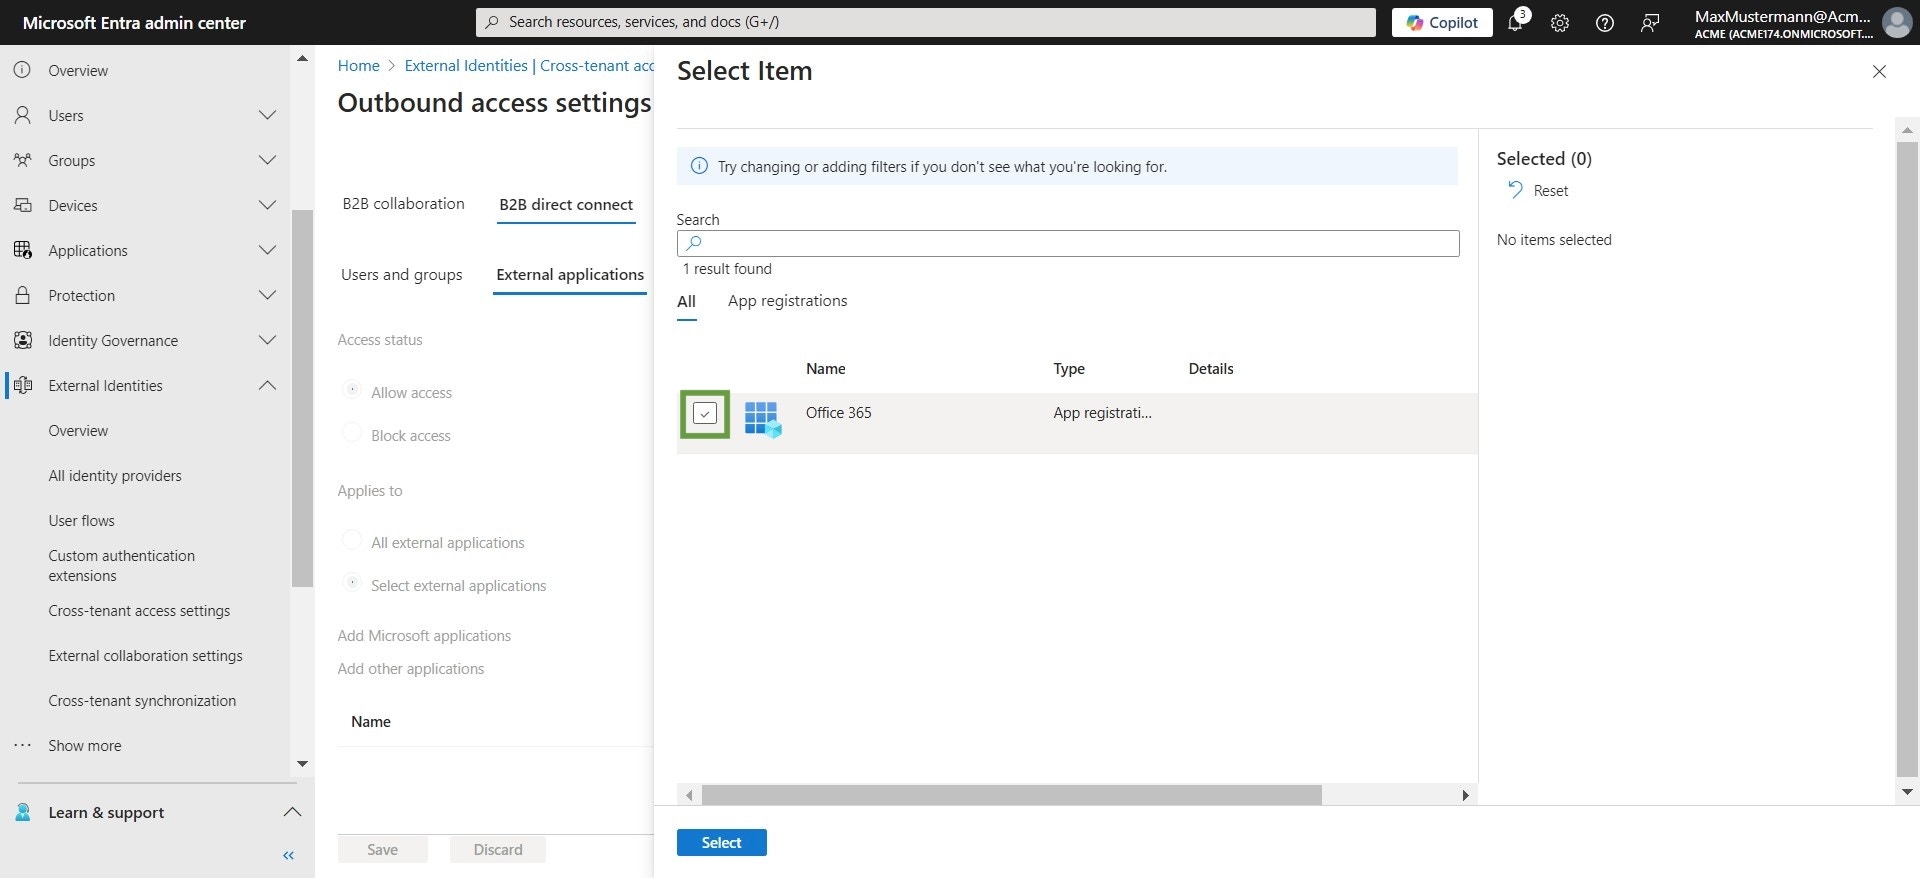
 20. Check the box for the **Office 365 app registration**
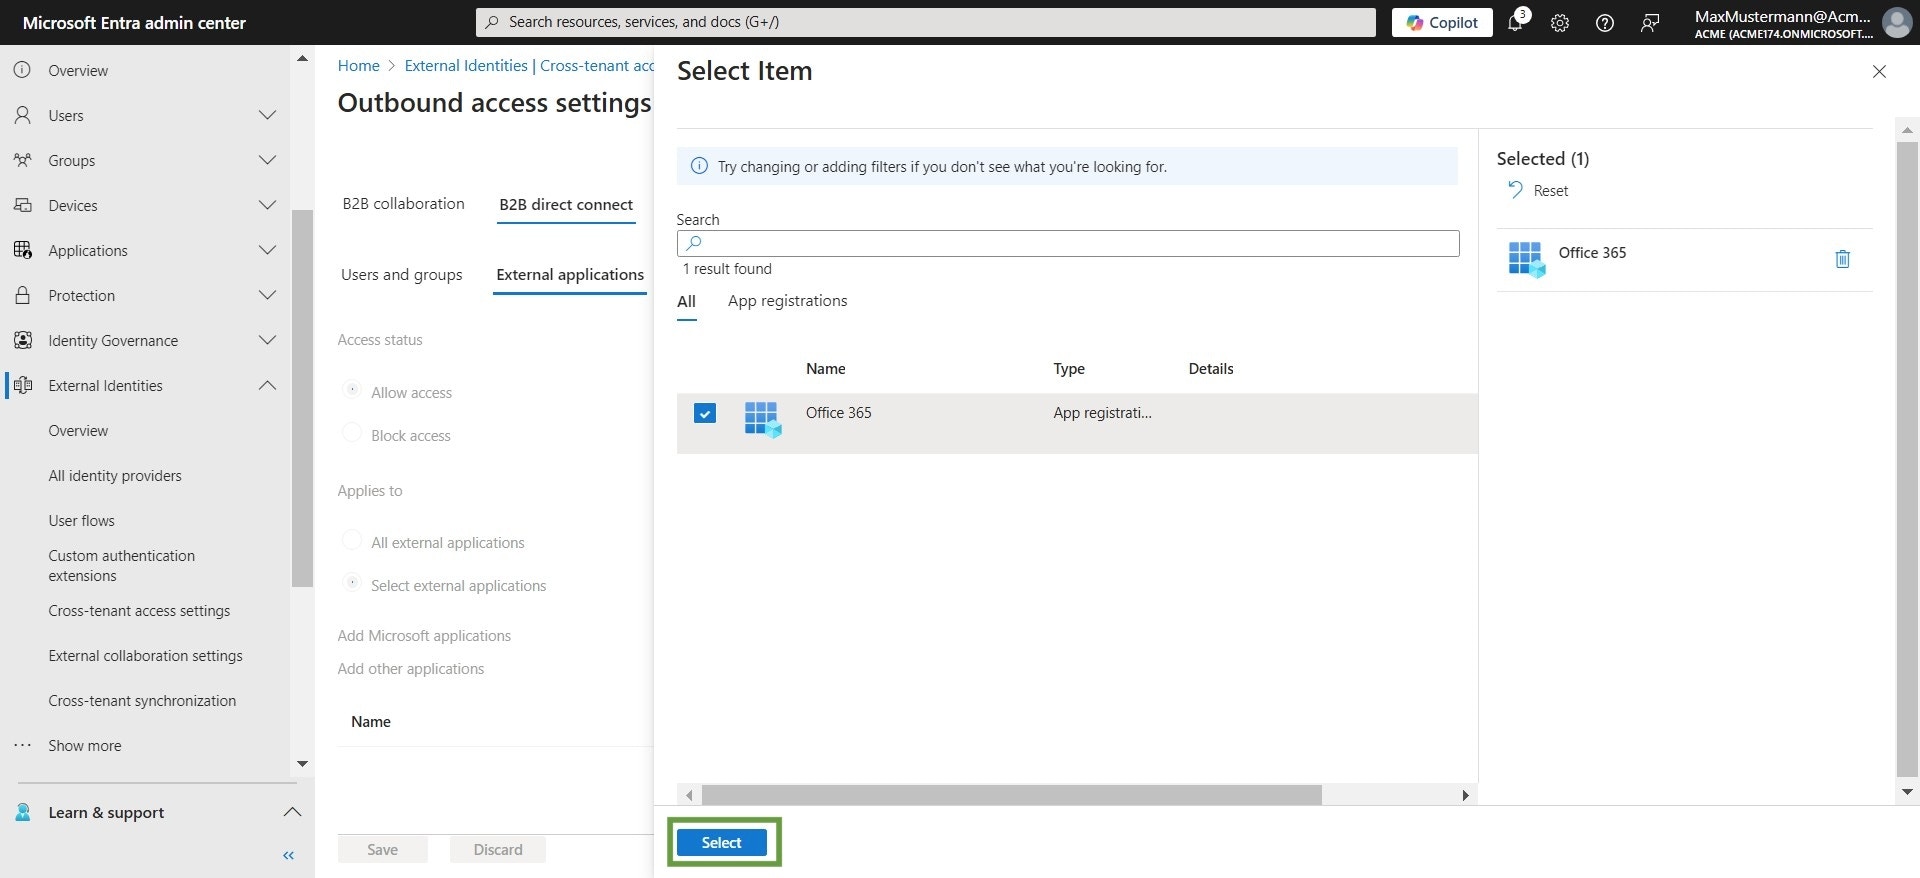
 21. Click **Select**
 22. Click **Save**
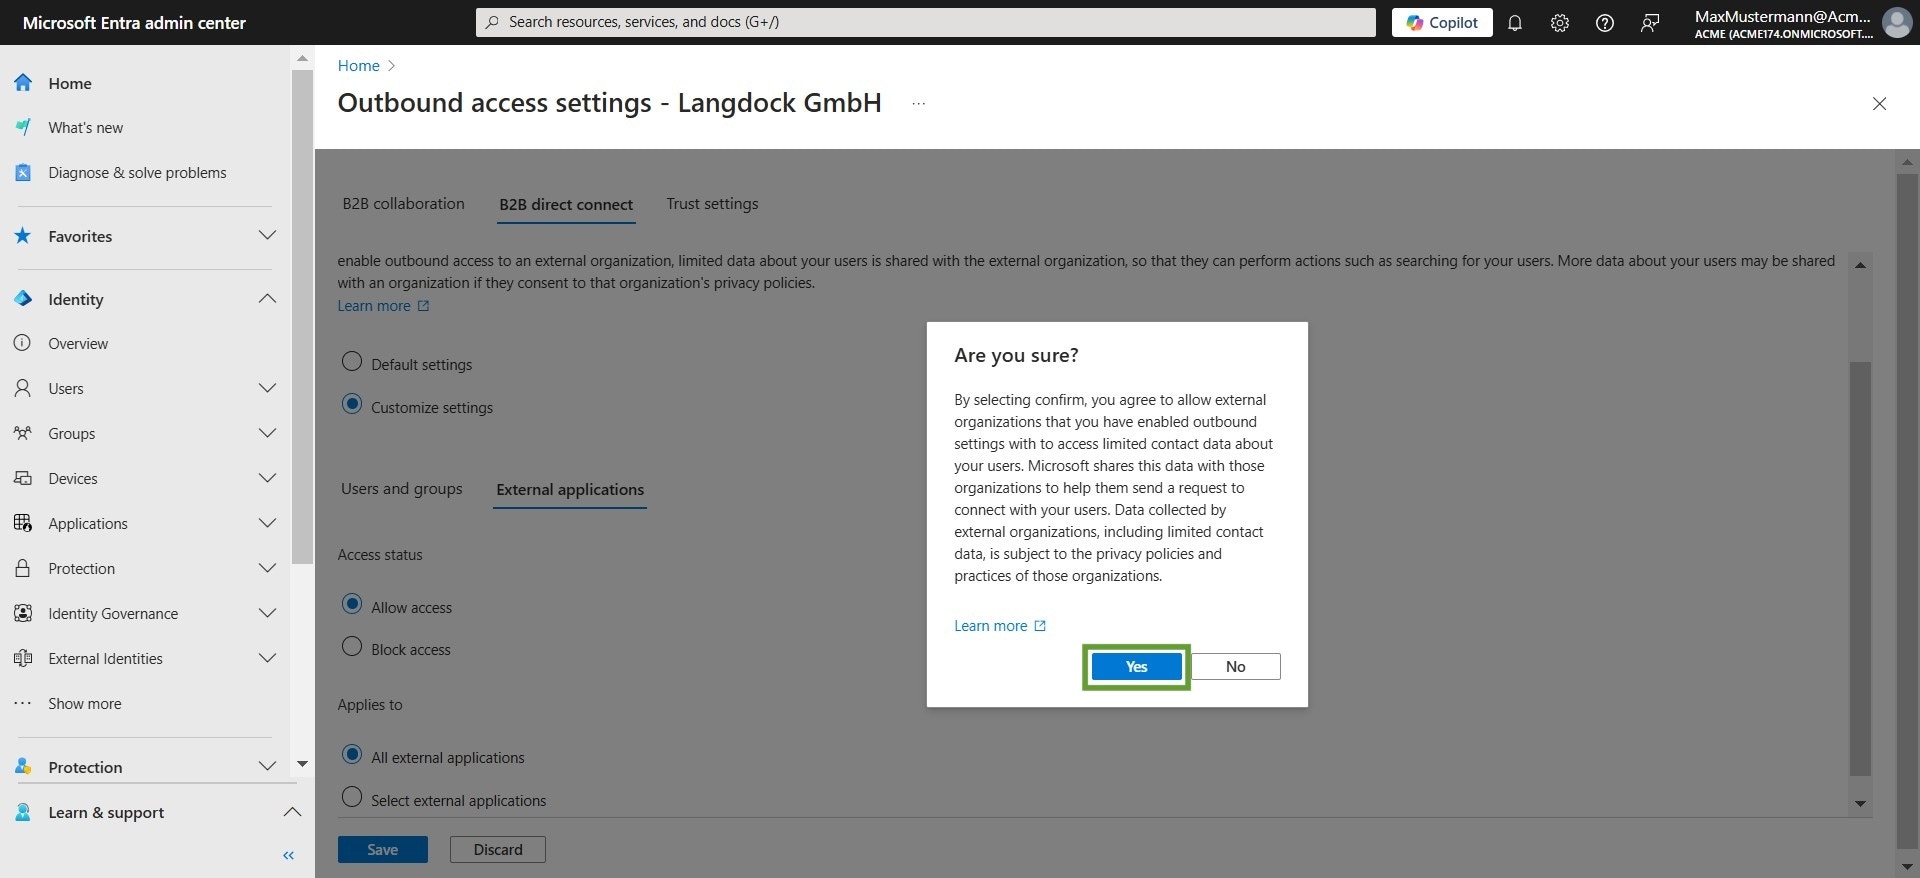
 23. Confirm with **Yes**. You have now completed the B2B direct connect setup from your side.
 ## Step 3: Share Your Tenant ID
Once you've completed the B2B direct connect setup:
1. Find your tenant ID on the [Microsoft Entra Admin Center homepage](https://entra.microsoft.com/#view/Microsoft_AAD_IAM/TenantOverview.ReactView)
2. Share the tenant ID with your Langdock contact
3. The Langdock team will send channel invitations to you and your users via email
Check your spam folder if you don't receive the invitation email.
## Step 3: Share Your Tenant ID
Once you've completed the B2B direct connect setup:
1. Find your tenant ID on the [Microsoft Entra Admin Center homepage](https://entra.microsoft.com/#view/Microsoft_AAD_IAM/TenantOverview.ReactView)
2. Share the tenant ID with your Langdock contact
3. The Langdock team will send channel invitations to you and your users via email
Check your spam folder if you don't receive the invitation email.