> ## Documentation Index
> Fetch the complete documentation index at: https://docs.langdock.com/llms.txt
> Use this file to discover all available pages before exploring further.
# Tips and tricks for your internal channels
> In this article you'll find little messages containing tips and tricks which you can publish in your internal channels to share little bits of knowledge.
## How to use this resource
When you want to share specific Langdock knowledge with your team, come to this page and copy the messages below directly into your internal messaging tool. Each message is designed to be immediately actionable and includes the technical context your colleagues need to try the feature right away.
We keep each message under 2 minutes to read and implement, so your team can quickly discover useful features without disrupting their workflow.
All messages include direct links to documentation or specific Langdock pages where users can learn more or take immediate action.
Each message either contains:
* **Clear feature explanation** with specific technical details
* **Exact steps** to try the feature immediately
* **Direct links** to relevant documentation or Langdock pages
* **Novice**: First few weeks with Langdock, covering essential basics
* **Regular**: Using Langdock for several weeks, ready for productivity features
* **Poweruser**: Advanced techniques for maximum efficiency
Filter messages by current team priorities:
* Prompting techniques
* Productivity shortcuts
* Langdock features
## Before you start
These messages don't include standard introductions like "Did you know\..." or "Hi there, did you know\..." to give you flexibility in how you share them with your team.
From our experience, adding context for your first message works well. You can use this snippet before sharing your first tip:
"We're starting to share practical AI knowledge over the next few days. Every few days, we'll post a quick tip in this channel covering topics like finding AI use cases, building custom agents, and other productivity techniques. Each one takes under 2 minutes to read and try."
### Intro hooks
If you still want to use some hooks, we prepared a few options:
**Quick Productivity Hook**
"Quick Langdock tip to save you time:"
**Feature Discovery Hook**\
"Here's a Langdock feature that might be useful:"
**Workflow Enhancement Hook**
"To make your AI workflow more efficient:"
**Hidden Gem Hook**
"Langdock feature you might have missed:"
**Problem-Solution Hook**
"If you want to \[work faster/stay organized/get better results] in Langdock:"
***
## Level: Novice
Perfect for teams just beginning their Langdock journey. These messages cover essential platform basics that create immediate value.
### Chat Branching
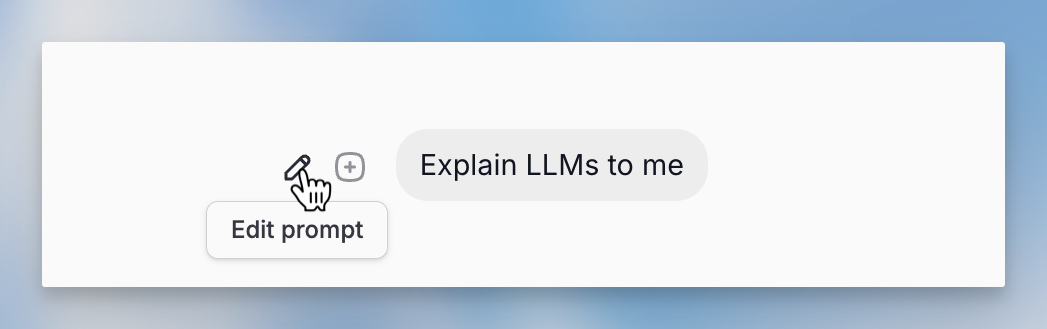
You can branch your chat in Langdock to explore different ideas without cluttering your conversation. Start by asking a question like "Explain 1" and dive into that topic. When you want to explore something else, go back to your original question and change it to "Explain 3."
To edit a prompt you've already sent, just hover over the message, click the pencil icon, and select "Edit Prompt." Make your changes and save. This way, you can keep your chats organized and focus on what matters most.
 ### Langdock Command Palette
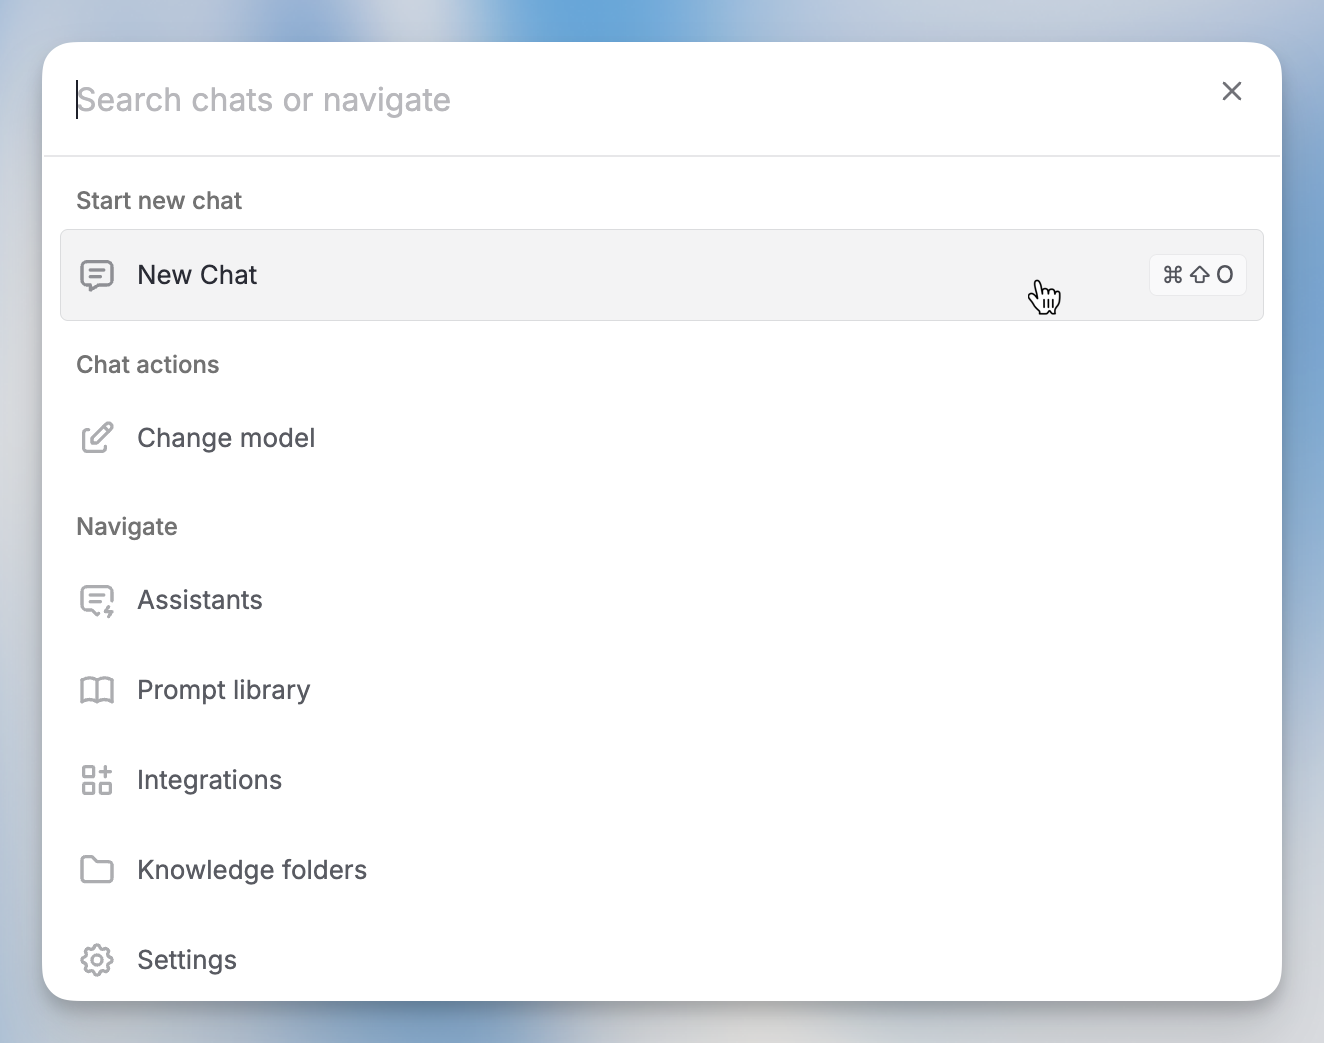
Quick productivity tip: Press Cmd + K (Mac) or Ctrl + K (Windows) to open Langdock's command palette. This lets you search commands, navigate your workspace, and access features without clicking through menus.
Try it right now: Open Langdock → press Cmd/Ctrl + K → search for any feature.
### Langdock Command Palette
Quick productivity tip: Press Cmd + K (Mac) or Ctrl + K (Windows) to open Langdock's command palette. This lets you search commands, navigate your workspace, and access features without clicking through menus.
Try it right now: Open Langdock → press Cmd/Ctrl + K → search for any feature.
 ### Brainstorm Use Cases
Want AI suggestions tailored to your specific role? Try this prompt template in Langdock:
"I am a \[JOB ROLE] at \[COMPANY NAME], a company working in \[PRODUCT/INDUSTRY]. In my daily work, I regularly \[IMPORTANT RECURRING TASK]. I want to improve this work by increasing quality, executing faster, or reducing effort. Please list 10 different ways a large language model can assist with activities related to this task."
This approach generates personalized AI use cases instead of generic suggestions. Give it a try and see what specific ideas come up for your role.
### Selecting a Theme
Langdock offers two visual themes to match your working preferences. To customize your theme, navigate to your account settings and select the Preferences tab.
In the themes section, you have three specific options. Choose "System" to automatically sync with your computer's light or dark mode settings, so Langdock switches themes when your system does.
Alternatively, select "Light" or "Dark" to lock Langdock into your preferred theme regardless of your system settings. This gives you consistent visual experience that won't change when your computer switches between light and dark modes.
Link to account Settings: [https://app.langdock.com/settings/account/preferences](https://app.langdock.com/settings/account/preferences)
***
## Level: Regular
For users comfortable with Langdock basics who are ready to unlock productivity features and workflow improvements.
### Context Picker Shortcut
Productivity shortcut: Type "@" in any Langdock chat input field to open the context picker. From here you can quickly search and add:
* Saved prompts from your prompt library
* Agents for specialized assistance
* Integrations to connect external tools
* Knowledge bases for document context
Try it: Open any chat → type "@" → browse categories or search for what you need → select to add it to your message.
More shortcuts:
[https://docs.langdock.com/resources/tricks-and-shortcuts#tricks-and-shortcuts](https://docs.langdock.com/resources/tricks-and-shortcuts#tricks-and-shortcuts)
### Pin Important Chats
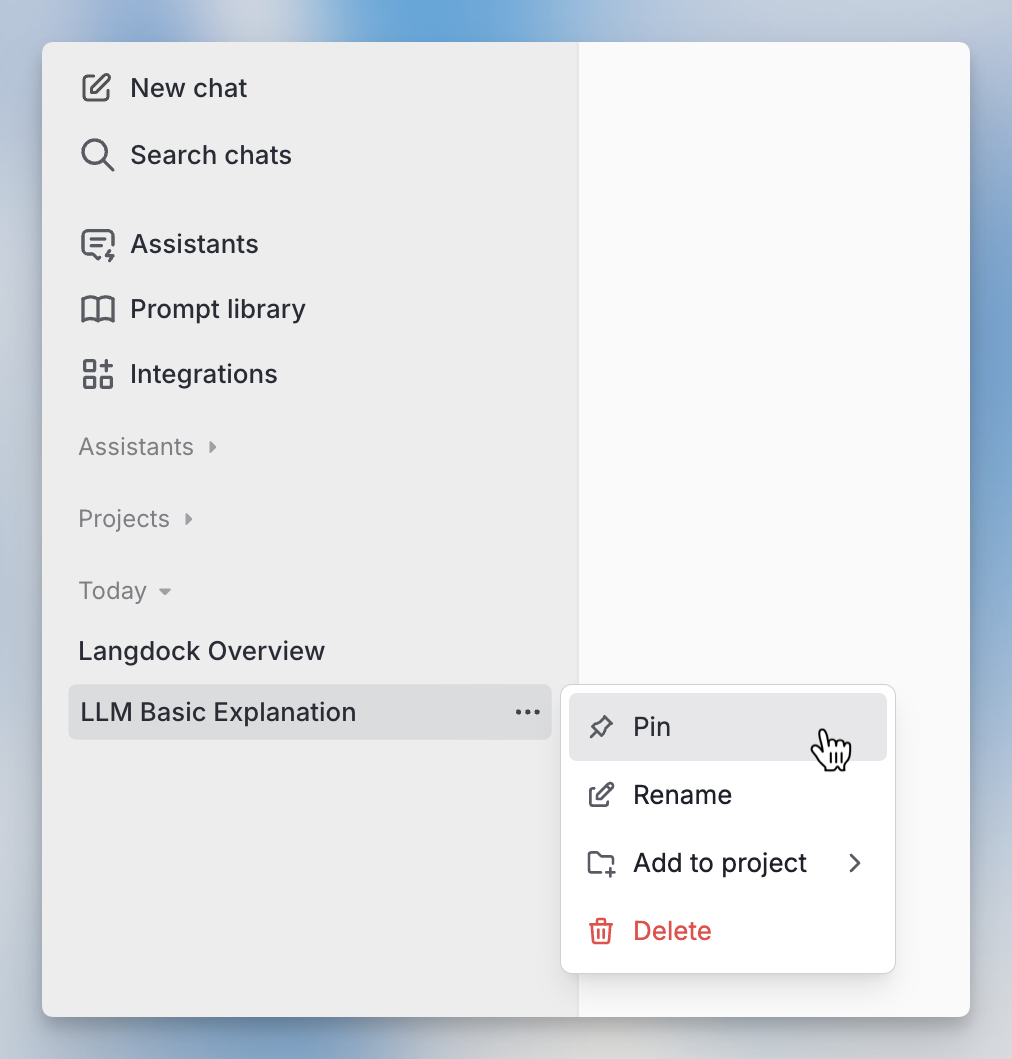
Keep your most important Langdock conversations easily accessible: hover over any chat in your sidebar → click the three dots menu → choose "Pin."
Pinned chats stay at the top of your sidebar, so you can return to key projects and ongoing work instantly. Perfect for daily standups, project planning, or frequently referenced conversations.
### Brainstorm Use Cases
Want AI suggestions tailored to your specific role? Try this prompt template in Langdock:
"I am a \[JOB ROLE] at \[COMPANY NAME], a company working in \[PRODUCT/INDUSTRY]. In my daily work, I regularly \[IMPORTANT RECURRING TASK]. I want to improve this work by increasing quality, executing faster, or reducing effort. Please list 10 different ways a large language model can assist with activities related to this task."
This approach generates personalized AI use cases instead of generic suggestions. Give it a try and see what specific ideas come up for your role.
### Selecting a Theme
Langdock offers two visual themes to match your working preferences. To customize your theme, navigate to your account settings and select the Preferences tab.
In the themes section, you have three specific options. Choose "System" to automatically sync with your computer's light or dark mode settings, so Langdock switches themes when your system does.
Alternatively, select "Light" or "Dark" to lock Langdock into your preferred theme regardless of your system settings. This gives you consistent visual experience that won't change when your computer switches between light and dark modes.
Link to account Settings: [https://app.langdock.com/settings/account/preferences](https://app.langdock.com/settings/account/preferences)
***
## Level: Regular
For users comfortable with Langdock basics who are ready to unlock productivity features and workflow improvements.
### Context Picker Shortcut
Productivity shortcut: Type "@" in any Langdock chat input field to open the context picker. From here you can quickly search and add:
* Saved prompts from your prompt library
* Agents for specialized assistance
* Integrations to connect external tools
* Knowledge bases for document context
Try it: Open any chat → type "@" → browse categories or search for what you need → select to add it to your message.
More shortcuts:
[https://docs.langdock.com/resources/tricks-and-shortcuts#tricks-and-shortcuts](https://docs.langdock.com/resources/tricks-and-shortcuts#tricks-and-shortcuts)
### Pin Important Chats
Keep your most important Langdock conversations easily accessible: hover over any chat in your sidebar → click the three dots menu → choose "Pin."
Pinned chats stay at the top of your sidebar, so you can return to key projects and ongoing work instantly. Perfect for daily standups, project planning, or frequently referenced conversations.
 ### Memory Feature
Make your Langdock conversations more personalized with the memory feature. When enabled, Langdock remembers details you share (like your preferred programming language, project context, or work style) and uses this knowledge in future chats.
Enable it:
[https://app.langdock.com/settings/account/memory](https://app.langdock.com/settings/account/memory)
Once enabled, share relevant details about your work, and Langdock will remember them across all future conversations. This saves time on context-setting and makes responses more relevant to your specific needs.
### Compare Model Responses
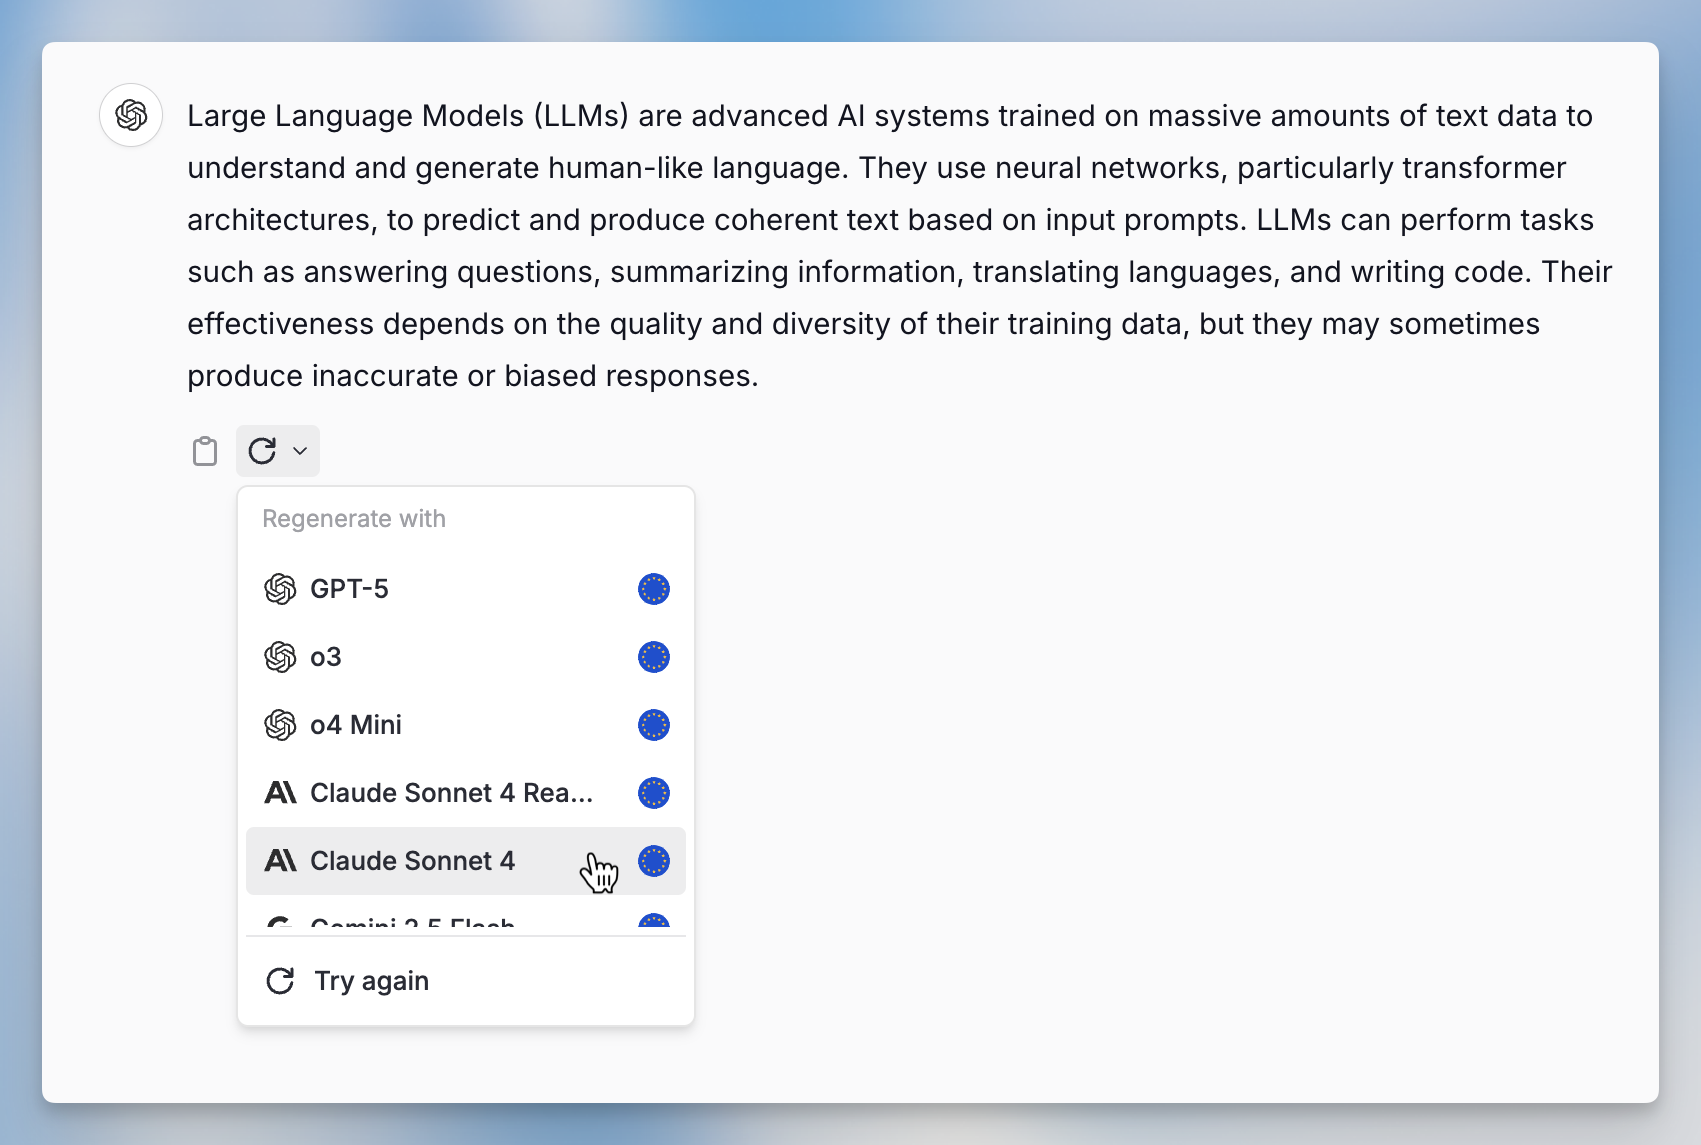
Want to see how different AI models handle the same question? Click the reload button next to any Langdock response, then choose a different model from the dropdown. Langdock generates a new response using your selected model.
This helps you compare approaches and find which models work best for different types of tasks. See available models at [langdock.com/models](https://langdock.com/models).
### Memory Feature
Make your Langdock conversations more personalized with the memory feature. When enabled, Langdock remembers details you share (like your preferred programming language, project context, or work style) and uses this knowledge in future chats.
Enable it:
[https://app.langdock.com/settings/account/memory](https://app.langdock.com/settings/account/memory)
Once enabled, share relevant details about your work, and Langdock will remember them across all future conversations. This saves time on context-setting and makes responses more relevant to your specific needs.
### Compare Model Responses
Want to see how different AI models handle the same question? Click the reload button next to any Langdock response, then choose a different model from the dropdown. Langdock generates a new response using your selected model.
This helps you compare approaches and find which models work best for different types of tasks. See available models at [langdock.com/models](https://langdock.com/models).
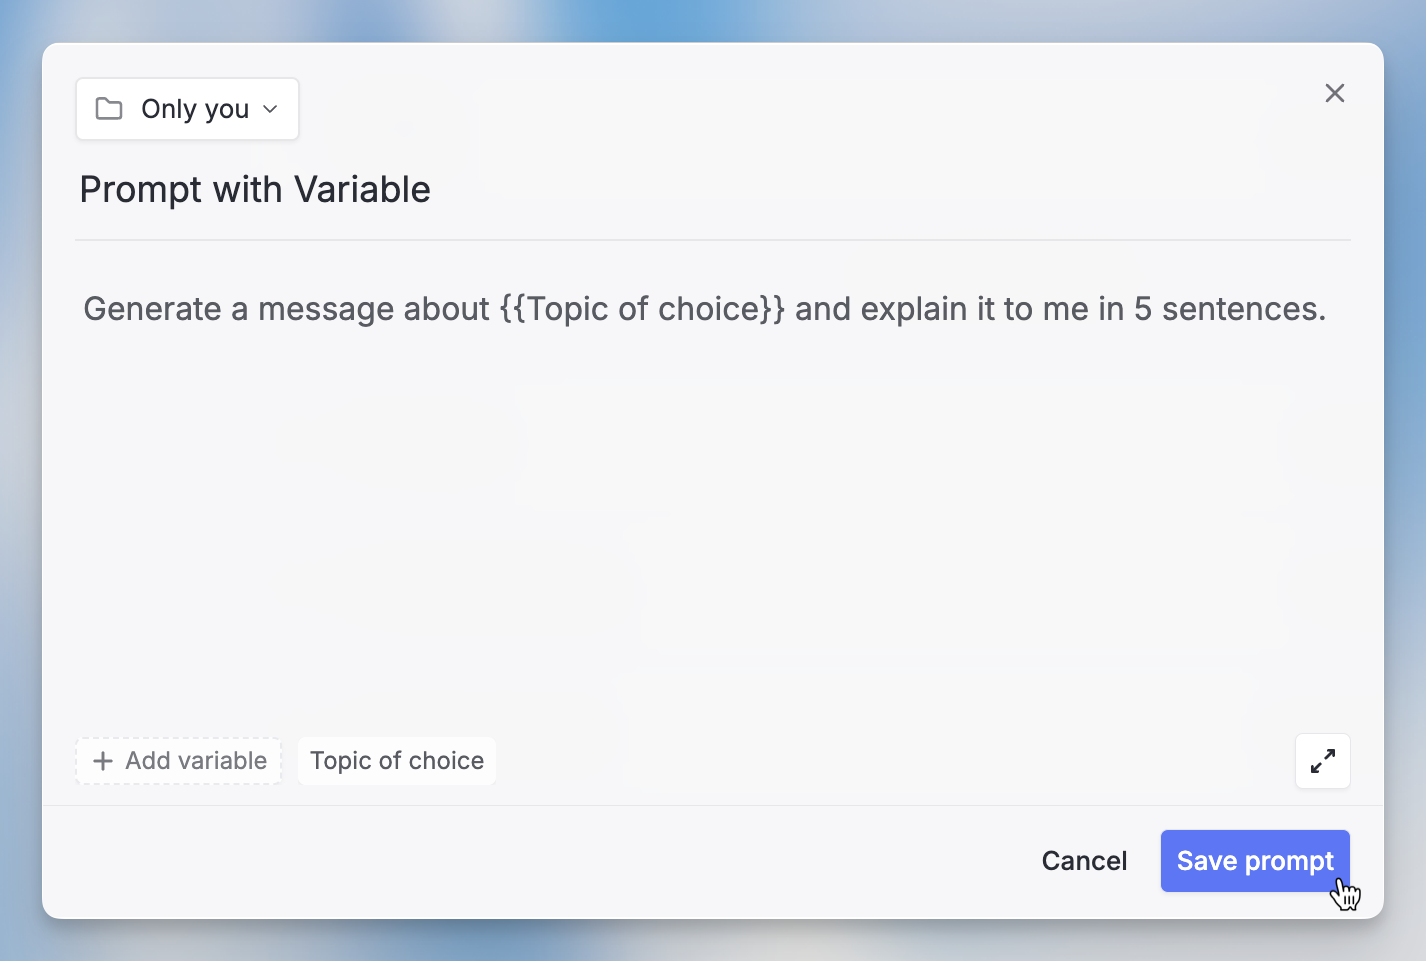
 ### Prompt Variables
You can make your saved prompts more flexible with variables. In Langdock's Prompt Library, wrap any changeable text in double curly braces like variableName. When you use the prompt, Langdock will ask you to fill in those variables.
Example: "Write a documentType for audience about topic"
This lets you reuse one prompt template for multiple situations instead of creating separate prompts for each variation.
### Prompt Variables
You can make your saved prompts more flexible with variables. In Langdock's Prompt Library, wrap any changeable text in double curly braces like variableName. When you use the prompt, Langdock will ask you to fill in those variables.
Example: "Write a documentType for audience about topic"
This lets you reuse one prompt template for multiple situations instead of creating separate prompts for each variation.
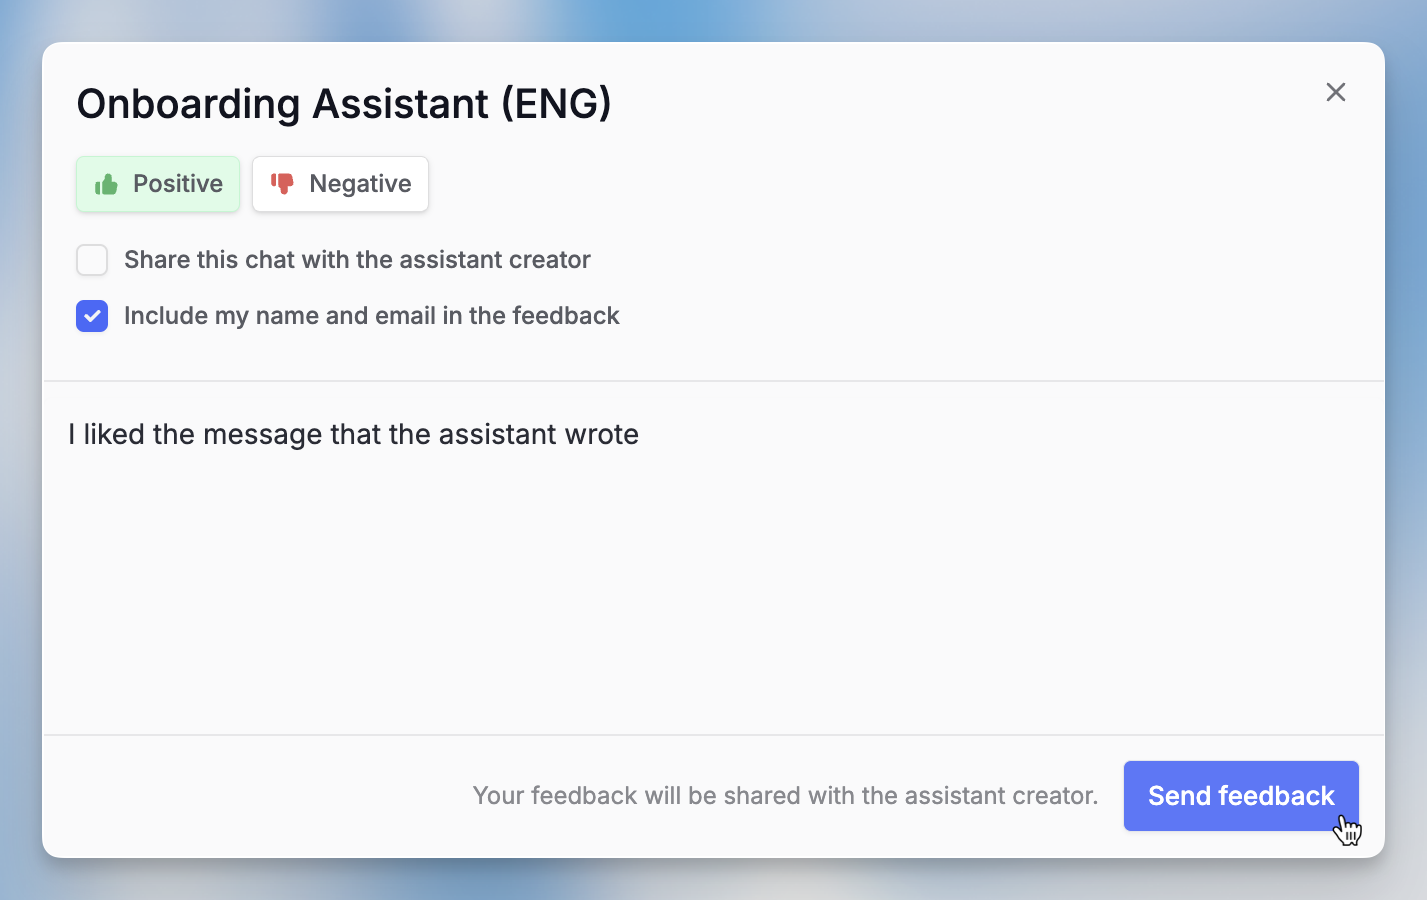
 ### Agent Feedback
Help improve custom Agents in your workspace by providing feedback. For any Agent response, click thumbs up/down for quick feedback, or use the agent menu → "Send feedback" for detailed comments.
If you own an Agent: Check feedback in the Agent builder → three dots menu → Analytics → Feedback. You can also download feedback data to review patterns and improve your Agent's performance.
This feedback loop helps Agent creators understand what's working and what needs improvement.
### Agent Feedback
Help improve custom Agents in your workspace by providing feedback. For any Agent response, click thumbs up/down for quick feedback, or use the agent menu → "Send feedback" for detailed comments.
If you own an Agent: Check feedback in the Agent builder → three dots menu → Analytics → Feedback. You can also download feedback data to review patterns and improve your Agent's performance.
This feedback loop helps Agent creators understand what's working and what needs improvement.
 ### Chat Sharing
Keep your team aligned by sharing important Langdock conversations. Click "Share" in any chat to create a workspace-only link. Anyone in your workspace can view the full conversation, including new messages and attachment names.
Manage all your shared chats:
[https://app.langdock.com/settings/account/shared-chats](https://app.langdock.com/settings/account/shared-chats)
Perfect for sharing research findings, brainstorming sessions, or technical solutions with your team.
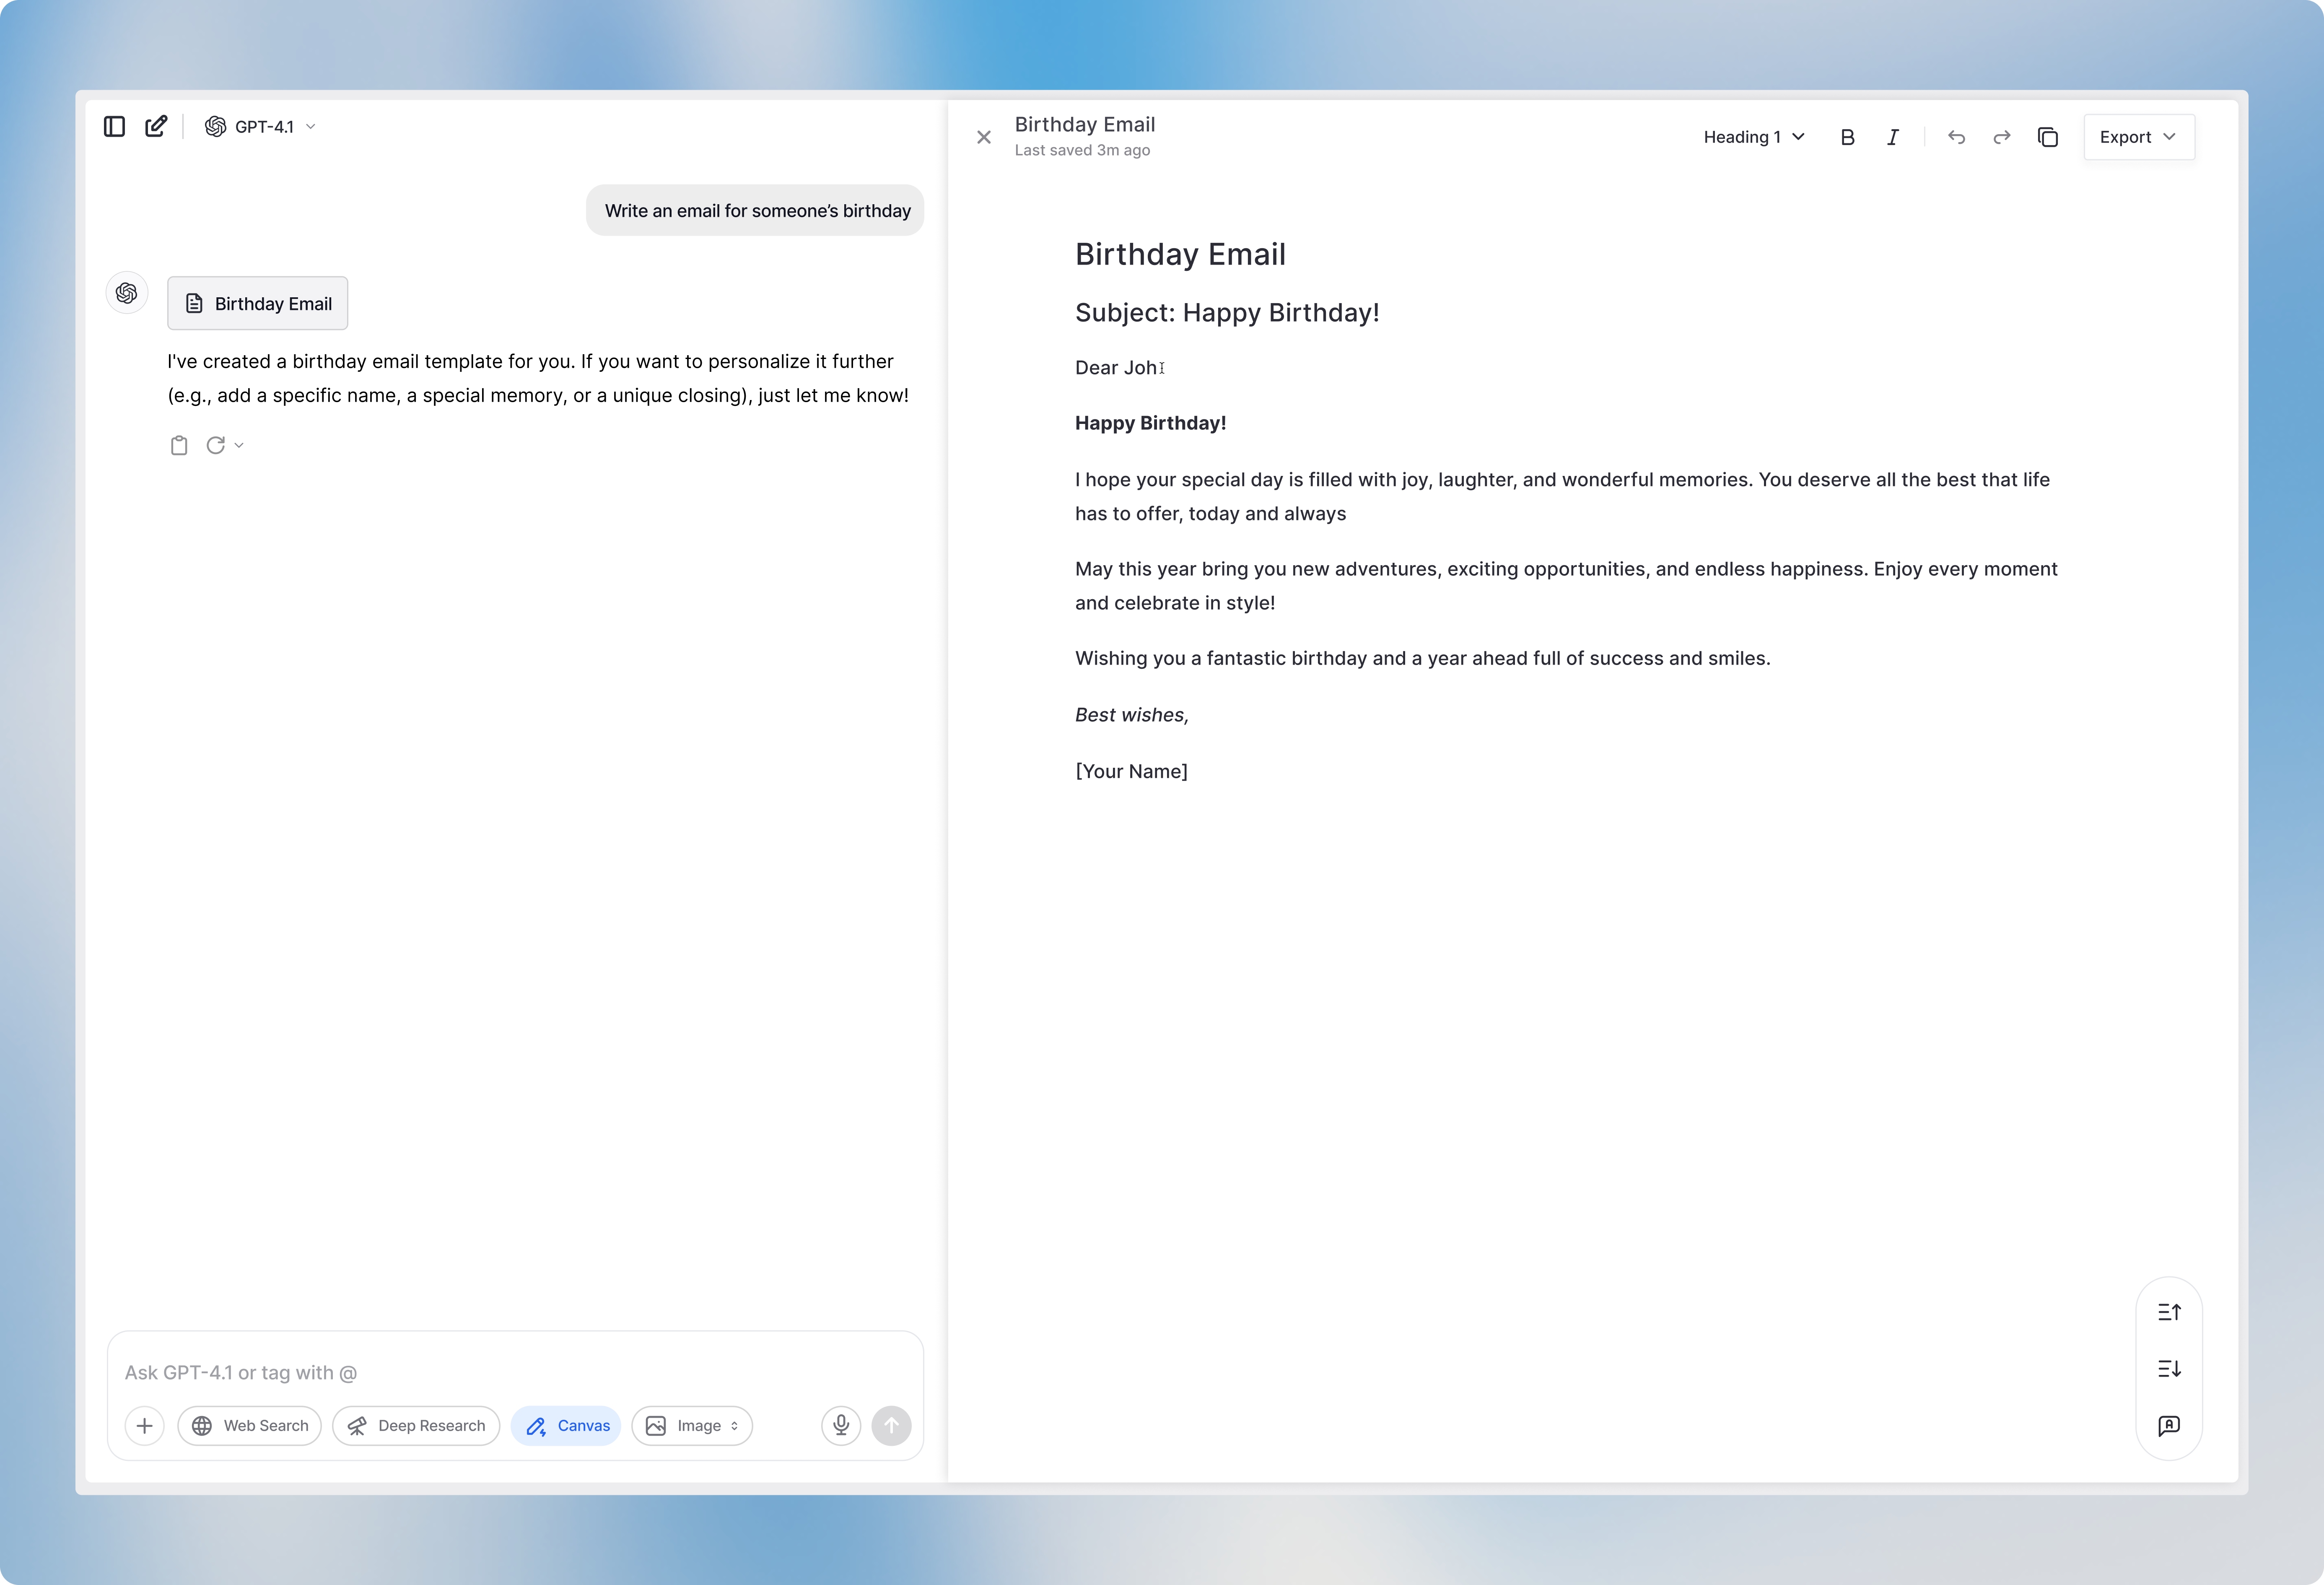
### Canvas
You can use Langdock's Canvas tool for collaborative document creation and code editing. Canvas provides a flexible workspace where you can format text, add headings and lists, work on code snippets, and get inline AI suggestions as you write.
Canvas automatically tracks version history and lets you work on documents without switching to external apps. Perfect for brainstorming, documentation, prototyping, or any collaborative writing project.
Learn more:
[https://docs.langdock.com/product/chat/document-editor](https://docs.langdock.com/product/chat/document-editor)
### Chat Sharing
Keep your team aligned by sharing important Langdock conversations. Click "Share" in any chat to create a workspace-only link. Anyone in your workspace can view the full conversation, including new messages and attachment names.
Manage all your shared chats:
[https://app.langdock.com/settings/account/shared-chats](https://app.langdock.com/settings/account/shared-chats)
Perfect for sharing research findings, brainstorming sessions, or technical solutions with your team.
### Canvas
You can use Langdock's Canvas tool for collaborative document creation and code editing. Canvas provides a flexible workspace where you can format text, add headings and lists, work on code snippets, and get inline AI suggestions as you write.
Canvas automatically tracks version history and lets you work on documents without switching to external apps. Perfect for brainstorming, documentation, prototyping, or any collaborative writing project.
Learn more:
[https://docs.langdock.com/product/chat/document-editor](https://docs.langdock.com/product/chat/document-editor)
 ### Model Selection Guide
Choose the right AI model for your specific needs with Langdock's detailed model guide. Each model has different strengths: some excel at coding, others at creative writing, analysis, or technical documentation.
Review the guide to understand your options and pick models that match your tasks:
[https://docs.langdock.com/resources/models](https://docs.langdock.com/resources/models)
This helps you get better results by matching the right model to each type of work.
If your workspace uses custom API keys, check with your admin about which models are available, as the public model guide might include models not accessible in your setup.
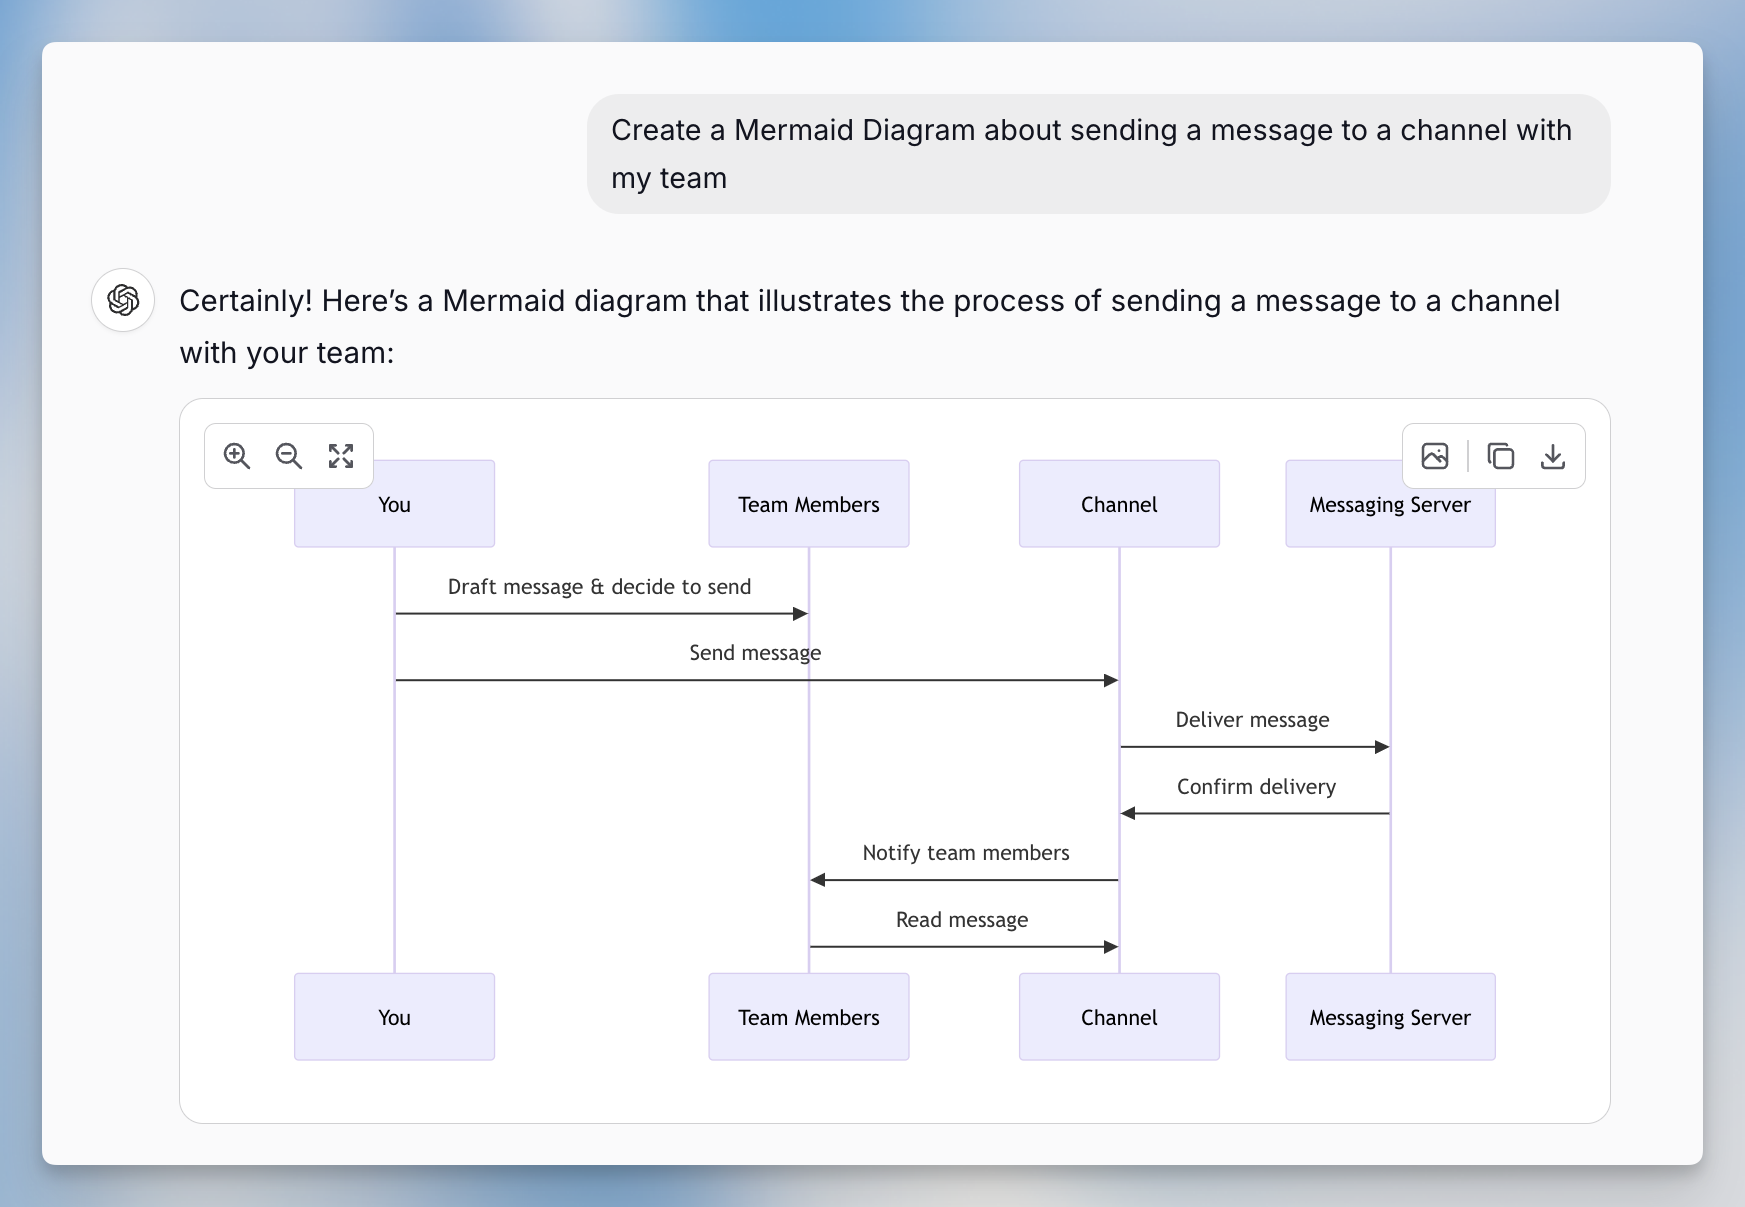
### Mermaid Diagrams
Create professional diagrams instantly in Langdock by asking for Mermaid diagrams. Simply prompt: "Create a flowchart of our onboarding process" or "Make a diagram showing our API architecture."
Langdock generates the diagram automatically. You can zoom, pan, copy the code, or download the image directly from your chat. No manual formatting required.
Perfect for visualizing workflows, processes, system architecture, or any concept that benefits from a diagram.
Documentation:
[https://docs.langdock.com/product/chat/mermaid](https://docs.langdock.com/product/chat/mermaid)
### Model Selection Guide
Choose the right AI model for your specific needs with Langdock's detailed model guide. Each model has different strengths: some excel at coding, others at creative writing, analysis, or technical documentation.
Review the guide to understand your options and pick models that match your tasks:
[https://docs.langdock.com/resources/models](https://docs.langdock.com/resources/models)
This helps you get better results by matching the right model to each type of work.
If your workspace uses custom API keys, check with your admin about which models are available, as the public model guide might include models not accessible in your setup.
### Mermaid Diagrams
Create professional diagrams instantly in Langdock by asking for Mermaid diagrams. Simply prompt: "Create a flowchart of our onboarding process" or "Make a diagram showing our API architecture."
Langdock generates the diagram automatically. You can zoom, pan, copy the code, or download the image directly from your chat. No manual formatting required.
Perfect for visualizing workflows, processes, system architecture, or any concept that benefits from a diagram.
Documentation:
[https://docs.langdock.com/product/chat/mermaid](https://docs.langdock.com/product/chat/mermaid)
 ### Projects
In Langdock, you can organize your chats by grouping them into Projects. This helps you keep track of related conversations, whether you’re working on a marketing campaign, process analysis, or getting ready for a presentation.
Projects get even more useful when you attach documents and extra instructions in the project settings. This way, every chat in the project uses the same information and follows the same guidelines. If you want to learn more about how Projects work, you can check out the details here.
Documentation:
[https://docs.langdock.com/product/navigation/projects](https://docs.langdock.com/product/navigation/projects)
### Hide the sidebar
When you need to focus on your chat in Langdock, you can quickly hide the sidebar with a simple shortcut Press:
`CMD + Shift + S (macOS) `\
`Ctrl + Shift + S (Windows)`
This clears up space so you can concentrate on the conversation. For more handy shortcuts, check the Langdock documentation.
Documentation: [https://docs.langdock.com/resources/tricks-and-shortcuts](https://docs.langdock.com/resources/tricks-and-shortcuts)
### Advanced Prompt Elements
Master prompt engineering with Langdock's five core elements for consistently better responses:
Persona: Assign a specific role ("You are a senior software architect")
Task: Define exactly what you want accomplished
Context: Provide background information, examples, or uploaded documents
Format: Specify output structure, style, tone, and length constraints
Example: "You are a technical writer. Create a user guide for our API authentication system. Use the attached API documentation as context. Format as a step-by-step guide with code examples, using a professional but approachable tone."
Detailed guide:
[https://docs.langdock.com/resources/prompt-elements](https://docs.langdock.com/resources/prompt-elements)
***
## Level: Poweruser
For experienced users ready to master advanced prompting techniques and maximize their Langdock efficiency.
### Custom Instructions
Customize how Langdock responds to you with Custom Instructions. Set up details about your role, communication preferences, and work style so every response is tailored to your needs.
Enable: Settings → Individual Preferences → Custom Instructions
Example instruction: "Always end responses with 4 numbered follow-up questions. Let me choose one by entering the number, then provide a detailed answer to my selection in the next message."
This creates a consistent, personalized experience across all your Langdock conversations.
Full guide:
[https://docs.langdock.com/resources/custom-instructions#custom-instructions](https://docs.langdock.com/resources/custom-instructions#custom-instructions)
### Precise Citation Responses
Make your Langdock conversations more precise by highlighting specific parts of any response and clicking the citation button. This lets you respond directly to particular sections instead of the entire message.
Perfect for:
Asking follow-up questions about specific points
Requesting clarification on particular details
Building on specific ideas while ignoring others
This keeps conversations focused and helps you dig deeper into exactly what matters most.
### Projects
In Langdock, you can organize your chats by grouping them into Projects. This helps you keep track of related conversations, whether you’re working on a marketing campaign, process analysis, or getting ready for a presentation.
Projects get even more useful when you attach documents and extra instructions in the project settings. This way, every chat in the project uses the same information and follows the same guidelines. If you want to learn more about how Projects work, you can check out the details here.
Documentation:
[https://docs.langdock.com/product/navigation/projects](https://docs.langdock.com/product/navigation/projects)
### Hide the sidebar
When you need to focus on your chat in Langdock, you can quickly hide the sidebar with a simple shortcut Press:
`CMD + Shift + S (macOS) `\
`Ctrl + Shift + S (Windows)`
This clears up space so you can concentrate on the conversation. For more handy shortcuts, check the Langdock documentation.
Documentation: [https://docs.langdock.com/resources/tricks-and-shortcuts](https://docs.langdock.com/resources/tricks-and-shortcuts)
### Advanced Prompt Elements
Master prompt engineering with Langdock's five core elements for consistently better responses:
Persona: Assign a specific role ("You are a senior software architect")
Task: Define exactly what you want accomplished
Context: Provide background information, examples, or uploaded documents
Format: Specify output structure, style, tone, and length constraints
Example: "You are a technical writer. Create a user guide for our API authentication system. Use the attached API documentation as context. Format as a step-by-step guide with code examples, using a professional but approachable tone."
Detailed guide:
[https://docs.langdock.com/resources/prompt-elements](https://docs.langdock.com/resources/prompt-elements)
***
## Level: Poweruser
For experienced users ready to master advanced prompting techniques and maximize their Langdock efficiency.
### Custom Instructions
Customize how Langdock responds to you with Custom Instructions. Set up details about your role, communication preferences, and work style so every response is tailored to your needs.
Enable: Settings → Individual Preferences → Custom Instructions
Example instruction: "Always end responses with 4 numbered follow-up questions. Let me choose one by entering the number, then provide a detailed answer to my selection in the next message."
This creates a consistent, personalized experience across all your Langdock conversations.
Full guide:
[https://docs.langdock.com/resources/custom-instructions#custom-instructions](https://docs.langdock.com/resources/custom-instructions#custom-instructions)
### Precise Citation Responses
Make your Langdock conversations more precise by highlighting specific parts of any response and clicking the citation button. This lets you respond directly to particular sections instead of the entire message.
Perfect for:
Asking follow-up questions about specific points
Requesting clarification on particular details
Building on specific ideas while ignoring others
This keeps conversations focused and helps you dig deeper into exactly what matters most.
 ### Instant New Chat
Start fresh conversations instantly: Press Cmd + Shift + O (Mac) or Ctrl + Shift + O (Windows) to open a new chat without navigating through menus.
Perfect for quickly switching topics, starting focused discussions, or beginning new projects while keeping your current conversation intact.
All keyboard shortcuts:
[https://docs.langdock.com/resources/tricks-and-shortcuts](https://docs.langdock.com/resources/tricks-and-shortcuts)
### Instant New Chat
Start fresh conversations instantly: Press Cmd + Shift + O (Mac) or Ctrl + Shift + O (Windows) to open a new chat without navigating through menus.
Perfect for quickly switching topics, starting focused discussions, or beginning new projects while keeping your current conversation intact.
All keyboard shortcuts:
[https://docs.langdock.com/resources/tricks-and-shortcuts](https://docs.langdock.com/resources/tricks-and-shortcuts)